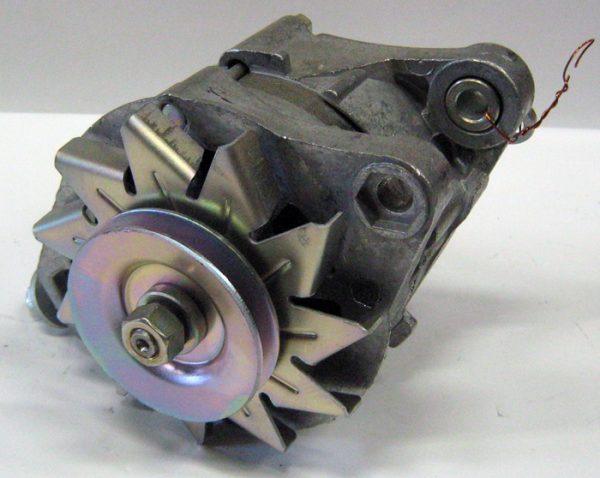
Generator VAZ 2105: principle of operation, malfunctions and their elimination
Content
- Purpose of the generator VAZ 2105
- Technical characteristics of the VAZ 2105 generator
- What generators can be installed on the VAZ 2105
- Wiring diagram for the "five" generator
- Generator device
- The principle of operation of the generator set
- Generator malfunctions
- Generator check
- Repair of the VAZ 2105 generator
- Generator belt
Despite the simple device of the VAZ 2105 generator, the uninterrupted operation of all electrical equipment of the car directly depends on it while driving. Sometimes there are problems with the generator, which you can identify and fix on your own, without visiting a car service.
Purpose of the generator VAZ 2105
The generator is an integral part of the electrical equipment of any car. Thanks to this device, mechanical energy is converted into electrical energy. The main purpose of the generator set in the car is to charge the battery and provide power to all consumers after starting the engine.
Technical characteristics of the VAZ 2105 generator
Beginning in 1986, generators 37.3701 began to be installed on the "fives". Prior to this, the car was equipped with the G-222 device. The latter had different data for stator and rotor coils, as well as a different brush assembly, voltage regulator and rectifier. The generator set is a three-phase mechanism with excitation from magnets and a built-in rectifier in the form of a diode bridge. In 1985, the relay responsible for indicating the warning lamp was removed from the generator. The control of the voltage of the on-board network was carried out only by a voltmeter. Since 1996, the 37.3701 generator has received a modified design of the brush holder and voltage regulator.

Table: generator parameters 37.3701 (G-222)
| Maximum output current (at a voltage of 13 V and a rotor speed of 5 thousand min-1), A | 55 (45) |
| Operating voltage, V | 13,6 – 14,6 Feet |
| Gear ratio engine-generator | 2,04 |
| Direction of rotation (drive end) | right |
| Generator weight without pulley, kg | 4,2 |
| Power, W | 700 (750) |
What generators can be installed on the VAZ 2105
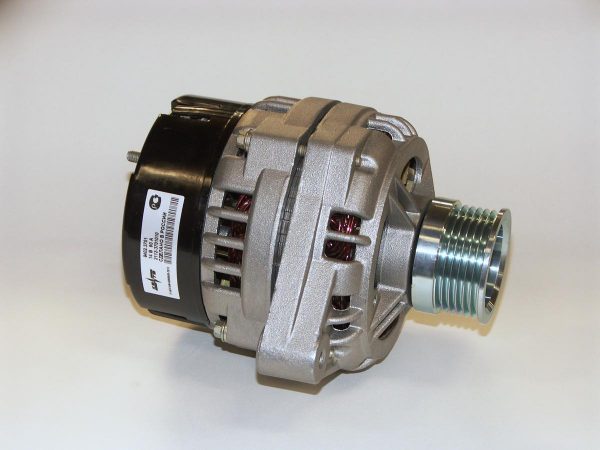
The question of choosing a generator on the VAZ 2105 arises when the standard device is not able to provide current to the consumers installed on the car. Today, many car owners equip their cars with powerful headlights, modern music and other devices that consume high current.
The use of an insufficiently powerful generator leads to undercharging of the battery, which subsequently negatively affects the engine start, especially in the cold season.
To equip your car with a more powerful source of electricity, you can install one of the following options:
- G-2107–3701010. The unit produces a current of 80 A and is quite capable of providing additional consumers with electricity;
- generator from VAZ 21214 with catalog number 9412.3701–03. The current output by the device is 110 A. For installation, you will need to purchase additional fasteners (bracket, strap, bolts), as well as make minimal changes to the electrical part;
- product from VAZ 2110 for 80 A or more current. An appropriate fastener is purchased for installation.
Wiring diagram for the "five" generator
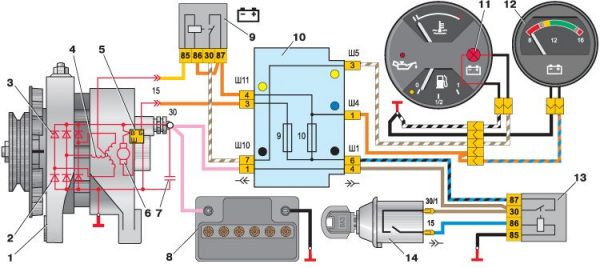
Like any other vehicle electrical device, the generator has its own connection scheme. If the electrical installation is incorrect, the power source will not only not provide the on-board network with current, but may also fail. Connecting the unit according to the electrical diagram is not difficult.
More about the VAZ 2105 ignition system: https://bumper.guru/klassicheskie-modeli-vaz/elektrooborudovanie/zazhiganie/kak-vystavit-zazhiganie-na-vaz-2105.html
Color-coded electrical wires are connected to the VAZ 2105 generator as follows:
- yellow from the connector "85" of the relay is connected to the terminal "1" of the generator;
- orange is connected to terminal "2";
- two pink ones on terminal "3".
Generator device
The main structural elements of a car generator are:
- rotor;
- stator;
- the body;
- bearings;
- pulley;
- brushes;
- voltage regulator.
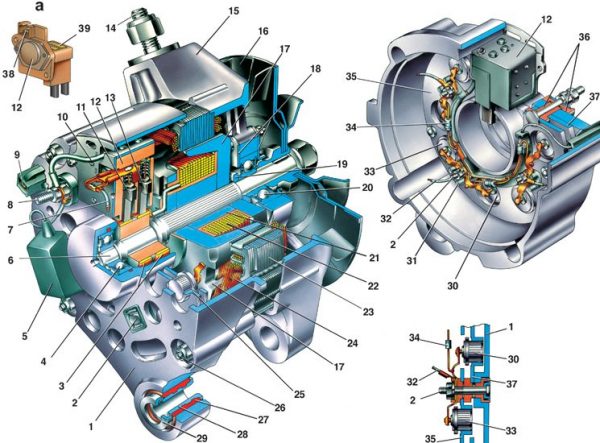
To know how the generator functions, you need to understand the purpose of each element in more detail.
On the VAZ 2105, the generator is installed in the engine compartment and is driven by a belt from the engine crankshaft.
Rotor
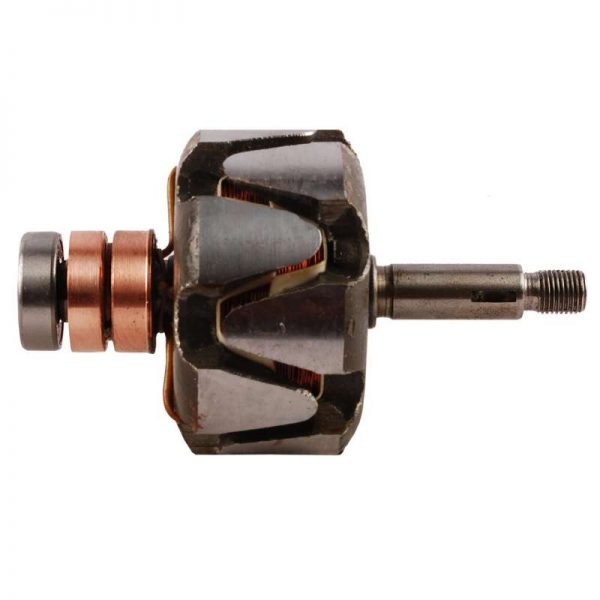
The rotor, also known as the anchor, is designed to create a magnetic field. On the shaft of this part there is an excitation winding and copper slip rings, to which the coil leads are soldered. The bearing assembly installed in the generator housing and through which the armature rotates is made of two ball bearings. An impeller and a pulley are also fixed on the rotor axis, through which the mechanism is driven by a belt drive.
Stator
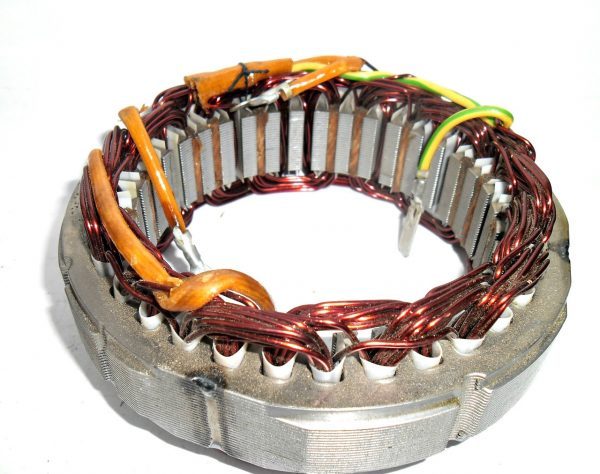
The stator windings create an alternating electric current and are combined through a metal core made in the form of plates. To avoid overheating and short circuit between the turns of the coils, the wires are covered with several layers of special varnish.
Chassis
The body of the generator consists of two parts and is made of duralumin, which is made to facilitate the design. To ensure better heat dissipation, holes are provided in the case. By means of the impeller, warm air is expelled from the device to the outside.
Generator brushes
The operation of the generator set is impossible without elements such as brushes. With their help, voltage is applied to the contact rings of the rotor. The coals are enclosed in a special plastic brush holder and installed in the corresponding hole in the generator.
Voltage regulator
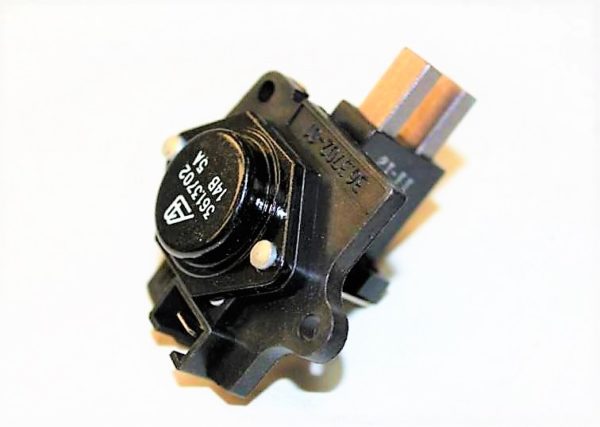
The relay-regulator controls the voltage at the output of the node in question, preventing it from rising more than 14,2–14,6 V. The VAZ 2105 generator uses a voltage regulator combined with brushes and fixed with screws on the back of the power source housing.
Diode bridge
The purpose of the diode bridge is quite simple - to convert (rectify) alternating current to direct current. The part is made in the form of a horseshoe, consists of six silicon diodes and is attached to the back of the case. If at least one of the diodes fails, the normal functioning of the power source becomes impossible.

The principle of operation of the generator set
The "five" generator functions as follows:
- At the moment the ignition is turned on, power from the battery is supplied to terminal "30" of the generator set, then to the rotor winding and through the voltage regulator to ground.
- The plus from the ignition switch through the fusible insert "10" in the mounting block is connected to the contacts "86" and "87" of the charge control lamp relay, after which it is fed through the contacts of the switching device to the light bulb and then to the battery minus. The light bulb glows.
- As the rotor rotates, a voltage appears at the output of the stator coils, which begins to feed the excitation winding, consumers and charge the battery.
- When the upper voltage limit in the on-board network is reached, the relay-regulator increases the resistance in the excitation circuit of the generator set and keeps it within 13–14,2 V. Then a certain voltage is applied to the relay winding responsible for the charge lamp, as a result of which the contacts open and the lamp goes out. This indicates that all consumers are powered by the generator.
Generator malfunctions
The Zhiguli generator is a fairly reliable unit, but its elements wear out over time, which leads to problems. Malfunctions can be of a different nature, as evidenced by characteristic signs. Therefore, it is worth dwelling on them, as well as on possible malfunctions, in more detail.
Battery light is on or blinking
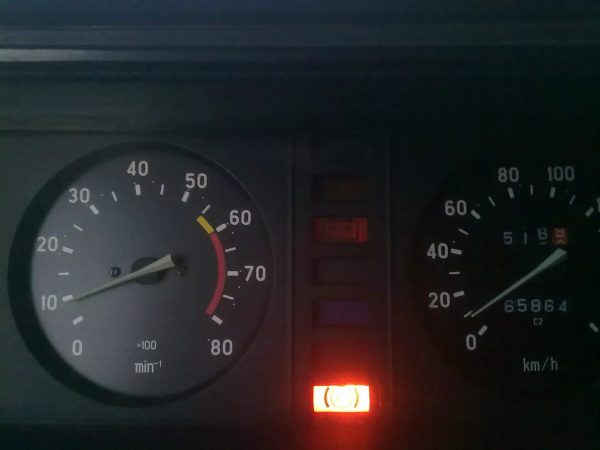
If you observe that the battery charge light on a running engine is constantly on or flashing, then there may be several reasons for this behavior:
- insufficient tension of the generator belt drive;
- open circuit between the lamp and the generator;
- damage to the power supply circuit of the rotor winding;
- problems with the relay-regulator;
- brush wear;
- diode damage;
- open or short circuit in the stator coils.
More about the instrument panel VAZ 2105: https://bumper.guru/klassicheskie-modeli-vaz/elektrooborudovanie/panel-priborov/panel-priborov-vaz-2105.html
No battery charge
Even with the alternator running, the battery may not be charged. This may be due to the following reasons:
- loosened alternator belt;
- unreliable fixing of the wiring to the generator or oxidation of the terminal on the battery;
- battery problems;
- voltage regulator problems.
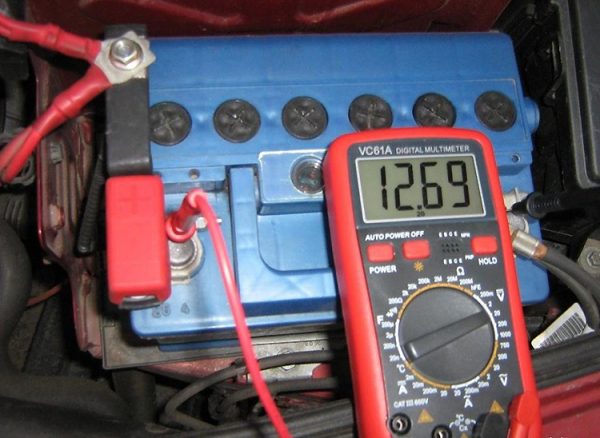
battery boils away
There are not so many reasons why a battery can boil away, and they are usually associated with an excess of voltage supplied to it:
- unreliable connection between the ground and the housing of the relay-regulator;
- the voltage regulator is faulty;
- battery is defective.
Alternator wire melting
Quite rarely, but still it happens that the wire going from the generator to the battery can melt. This is possible only in the event of a short circuit, which can occur in the generator itself or when the wire comes into contact with ground. Therefore, you need to carefully examine the power cable, and if everything is in order with it, the problem should be looked for in the source of electricity.
Generator is noisy
During operation, the generator, although it makes some noise, is not so loud as to think about possible problems. However, if the noise level is quite strong, then the following problems are possible with the device:
- bearing failure;
- the nut of the alternator pulley was unscrewed;
- short circuit between the turns of the stator coils;
- brush noise.
Video: generator noise on the "classic"
Generator check
If problems occur with the generator set, a device test must be performed to determine the cause. This can be done in several ways, but the most accessible and common is the option using a digital multimeter.
Diagnostics with a multimeter
Before starting the test, it is recommended to warm up the engine at medium speed for 15 minutes, turning on the headlights. The procedure is as follows:
- We turn on the multimeter to measure the voltage and measure between the terminal "30" of the generator and ground. If everything is in order with the regulator, then the device will show a voltage in the range of 13,8–14,5 V. In case of other readings, it is better to replace the regulator.
- We check the regulated voltage, for which we connect the probes of the device to the battery contacts. In this case, the engine must operate at medium speed, and consumers must be turned on (headlights, heater, etc.). The voltage must correspond to the values \u2105b\uXNUMXbset on the VAZ XNUMX generator.
- To check the armature winding, we connect one of the multimeter probes to ground, and the second to the slip ring of the rotor. At low resistance values, this will indicate a malfunction of the armature.

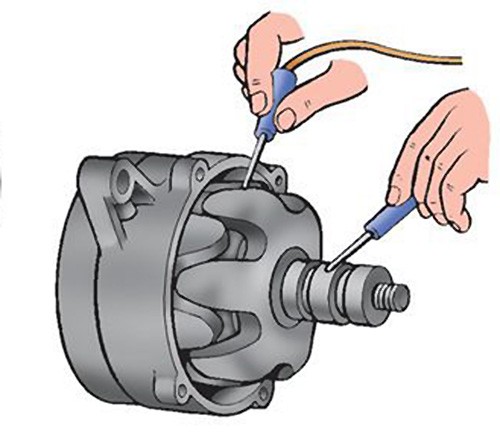 When checking the resistance of the rotor winding to ground, the value should be infinitely large
 - To diagnose positive diodes, we turn on the multimeter to the limit of continuity and connect the red wire to the terminal "30" of the generator, and the black one to the case. If the resistance will have a small value close to zero, then a breakdown has occurred in the diode bridge or the stator winding has been shorted to ground.
- We leave the positive wire of the device in the same position, and connect the negative wire in turn with the diode mounting bolts. Values close to zero will also indicate a rectifier failure.
- We check the negative diodes, for which we connect the red wire of the device to the bolts of the diode bridge, and the black one to ground. When the diodes break down, the resistance will approach zero.
- To check the capacitor, remove it from the generator and connect the multimeter wires to it. The resistance should decrease and then increase to infinity. Otherwise, the part must be replaced.
Video: generator diagnostics with a light bulb and a multimeter


Watch this video on YouTube
At the stand
Diagnostics at the stand is carried out at the service, and if you have everything you need, it is also possible at home.
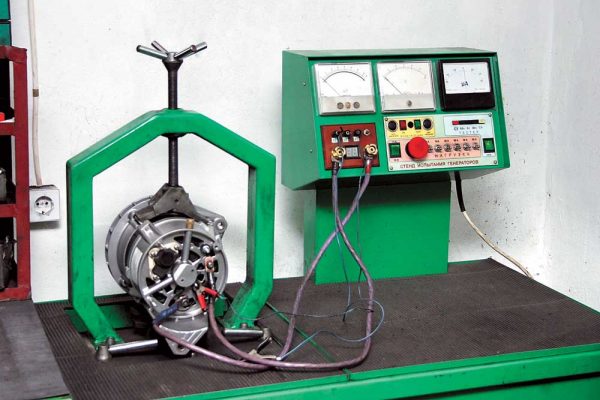

The procedure is as follows:
- We mount the generator on the stand and assemble the electrical circuit. On the G-222 generator, we connect pin 15 to pin 30.

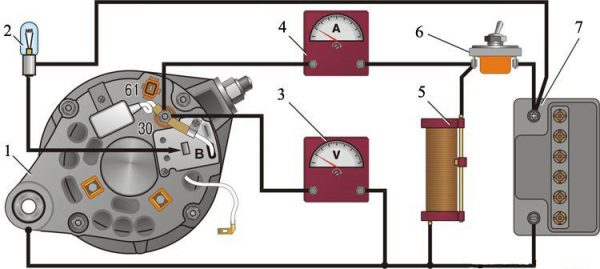 Connection diagram for testing the generator 37.3701 on the stand: 1 - generator; 2 - control lamp 12 V, 3 W; 3 - voltmeter; 4 - ammeter; 5 - rheostat; 6 - switch; 7 - battery
 - We turn on the electric motor and, using a rheostat, set the voltage at the generator output to 13 V, while the armature rotation frequency should be within 5 thousand min-1.
- In this mode, let the device work for about 10 minutes, after which we measure the recoil current. If the generator is working, then it should show a current within 45 A.
- If the parameter turned out to be smaller, then this indicates a malfunction in the rotor or stator coils, as well as possible problems with the diodes. For further diagnostics, it is necessary to check the windings and diodes.
- The output voltage of the device under test is evaluated at the same armature speed. Using a rheostat, we set the recoil current to 15 A and check the voltage at the output of the node: it should be about 14,1 ± 0,5 V.
- If the indicator is different, we replace the relay-regulator with a known good one and repeat the test. If the voltage matches the norm, this will mean that the old regulator has become unusable. Otherwise, we check the windings and the rectifier of the unit.
Oscilloscope
Diagnostics of the generator is possible using an oscilloscope. However, not everyone has such a device. The device allows you to identify the health of the generator in the form of a signal. To check, we assemble the same circuit as in the previous version of the diagnostics, after which we perform the following steps:
- On the generator 37.3701, we disconnect the output “B” from the diodes from the voltage regulator and connect it to the plus of the battery through a 12 V car lamp with a power of 3 watts.
- We turn on the electric motor at the stand and set the rotational speed to about 2 thousand min-1. We turn off the battery with the “6” toggle switch and set the recoil current to 10 A with a rheostat.
- We check the signal at terminal "30" with an oscilloscope. If the winding and diodes are in good condition, the shape of the curve will be in the form of uniform saw teeth. In the case of broken diodes or a break in the stator winding, the signal will be uneven.

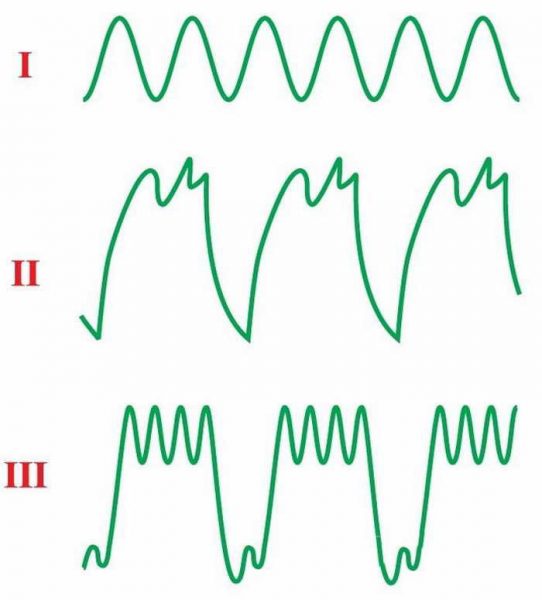 The shape of the curve of the rectified voltage of the generator: I - the generator is in good condition; II - the diode is broken; III - break in the diode circuit
Read also about the device of the fuse box on the VAZ 2105: https://bumper.guru/klassicheskie-modeli-vaz/elektrooborudovanie/blok-predohraniteley-vaz-2105.html
Repair of the VAZ 2105 generator
Having determined that the generator needs repair, it must first be dismantled from the car. To perform the operation, you will need the following tools:
- keys on 17 and 19;
- heads 10, 17 and 19;
- ratchet handle and collar;
- extension with cardan joint.
How to remove a generator
We dismantle the node in the following order:
- Remove the negative terminal from the battery and disconnect the wiring from the generator.

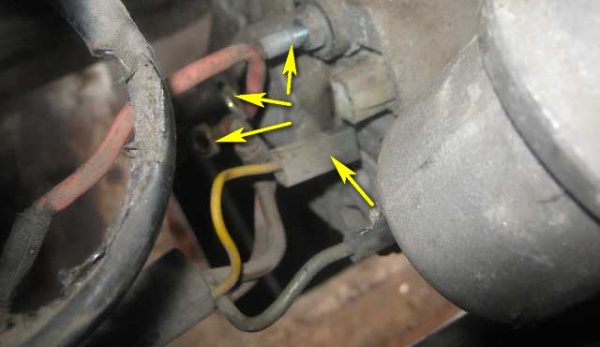 To dismantle the generator, disconnect all wires from it.
 - We unscrew the nut of the upper fastening of the assembly with a head of 17 with a knob, loosen the belt and remove it. During assembly, if necessary, we change the belt drive.

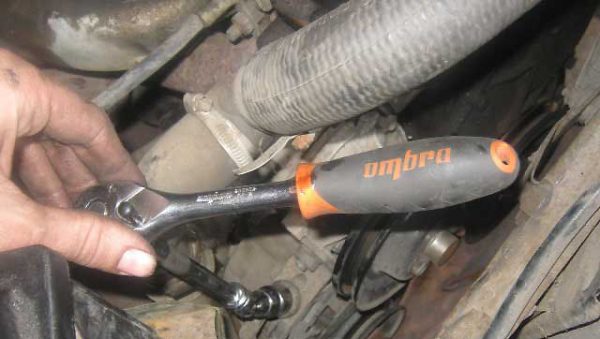 From above, the generator is attached to the bracket with a 17 nut
 - We go down under the front of the car and tear off the lower nut, after which we unscrew it with a ratchet.

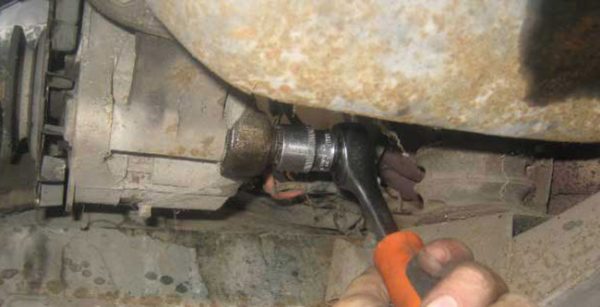 To unscrew the lower fasteners, you need to lower yourself under the car
 - We knock out the bolt with a hammer, pointing a wooden block at it, which will prevent damage to the thread.

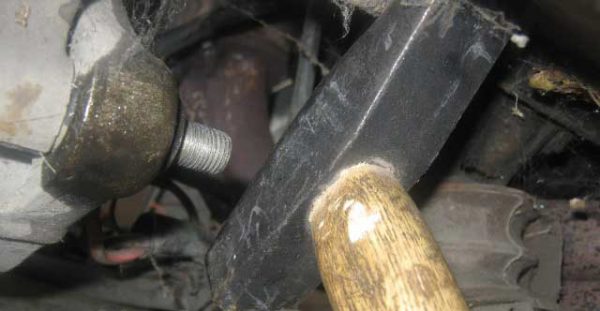 The bolt should be knocked out through a wooden spacer, although it is not in the photo
 - We take out the fasteners.

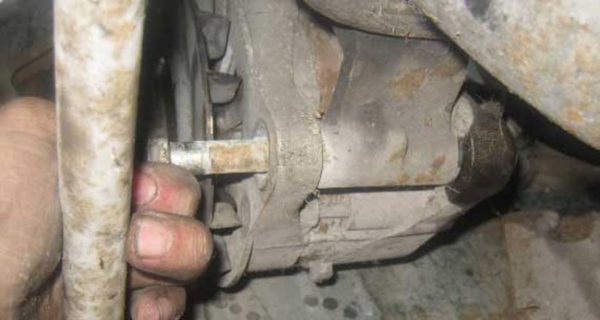 After tapping with a hammer, remove the bolt from the bracket and the generator
 - We take the generator down and take it out.

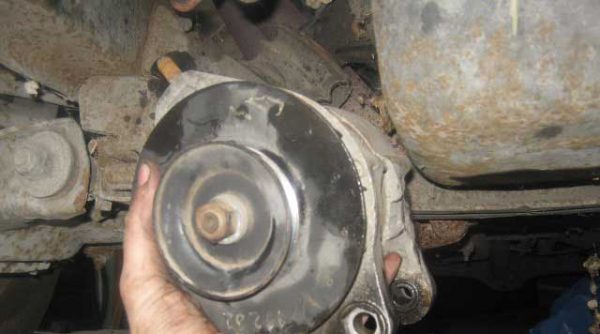 For convenience, the generator is removed through the bottom
 - After the repair work, the installation of the device is carried out in the reverse order.
Dismantling and repair of the generator
To disassemble the mechanism, you will need the following list of tools:
- wrench and head for 10 with an extension cord;
- hammer and soft metal tip;
- bearing puller;
- crosshead screwdriver.
The operation consists of the following steps:
- Using a Phillips screwdriver, unscrew the fastening of the relay-regulator to the housing.

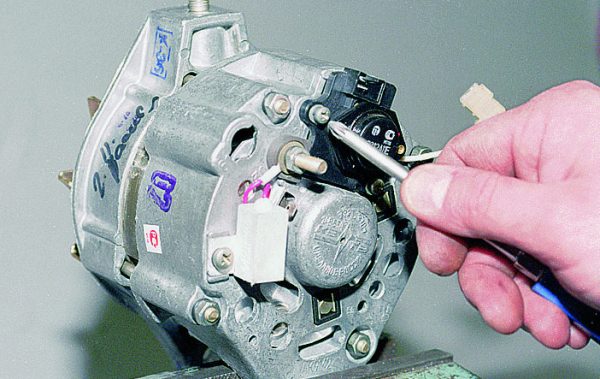 The relay-regulator is attached to the body with screws for a Phillips screwdriver.
 - We take out the regulator together with the brushes.

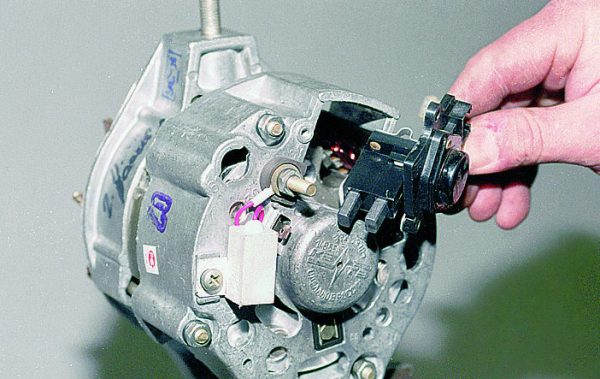 We take out the voltage regulator together with the brushes
 - If the coals are in a deplorable state, we change them when assembling the assembly.
- We stop the anchor from scrolling with a screwdriver, and with a 19 key we unscrew the nut holding the generator pulley.

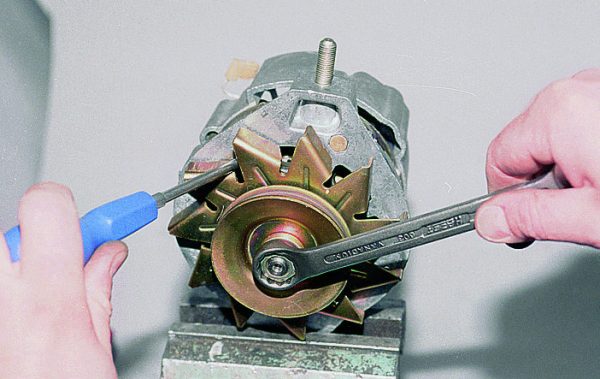 To remove the pulley and impeller, unscrew the nut, locking the axis from turning with a screwdriver
 - We remove the washer and the pulley, which consists of two parts, from the rotor shaft.

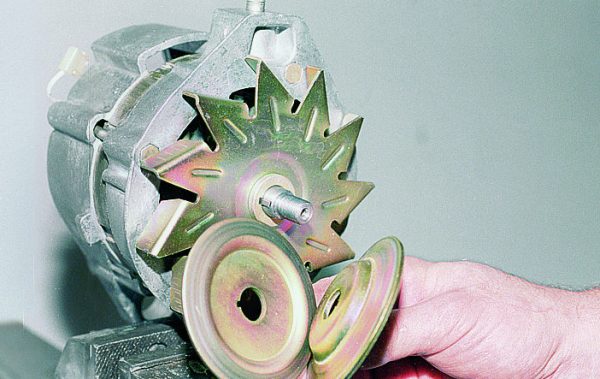 After unscrewing the nut, remove the washer and pulley, consisting of two parts
 - Remove another washer and impeller.

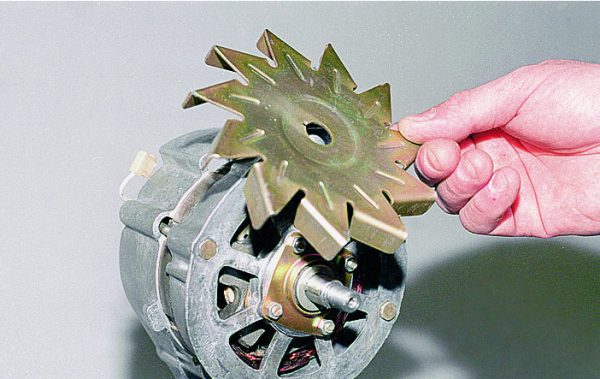 Remove the impeller and washer from the rotor shaft
 - Remove the pin and washer.

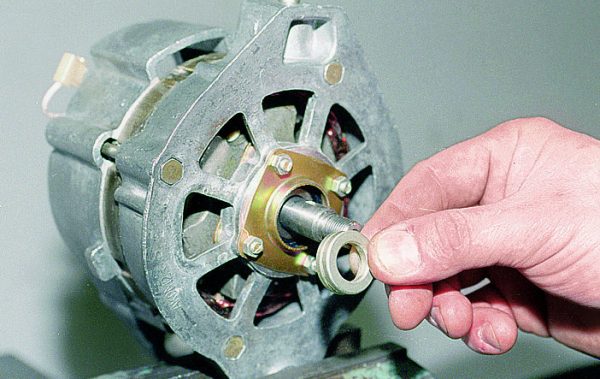 Remove the key and another washer from the rotor axis
 - Unscrew the nut that secures the capacitor terminal.

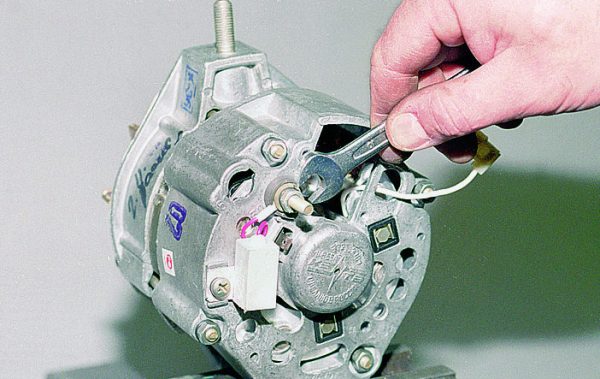 The capacitor terminal is fixed with a nut by 10, turn it off
 - We remove the contact and unscrew the capacitor mount, dismantling the part from the generator.

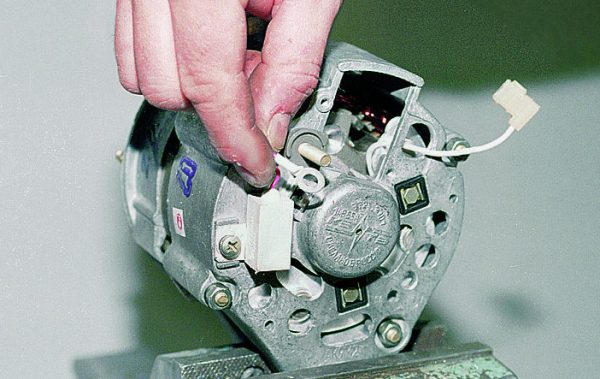 We remove the terminal and unscrew the fastening of the capacitor, then remove it
 - In order for the parts of the generator case to fall into place during installation, we mark their relative position with paint or a sharp object.
- With a head of 10, we unscrew the fastening of the body elements.

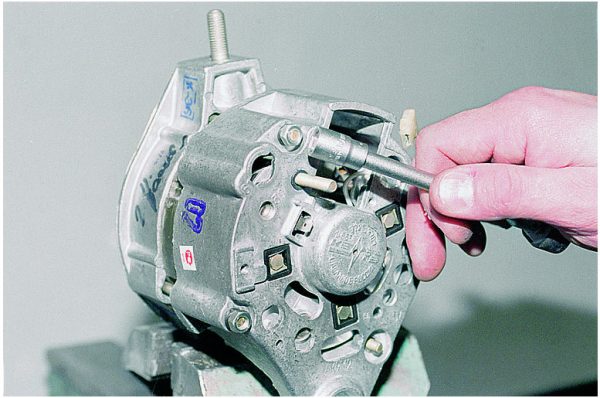 To disconnect the generator housing, unscrew the fasteners with a 10 head
 - We remove the fastener.

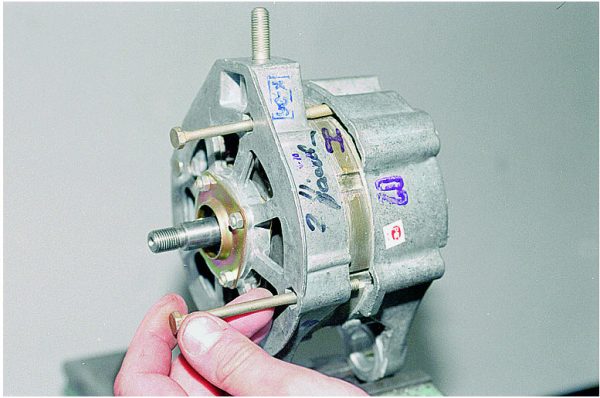 We take out the fixing bolts from the generator housing
 - We dismantle the front of the generator.

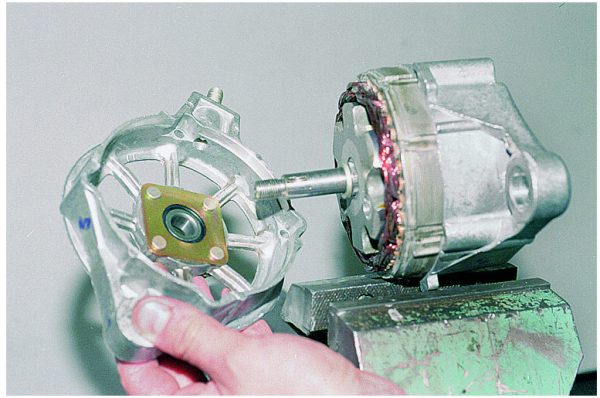 The front part of the case is separated from the back
 - If the bearing needs to be replaced, unscrew the nuts that hold the plate. Bearing wear usually manifests itself in the form of play and rotational noise.

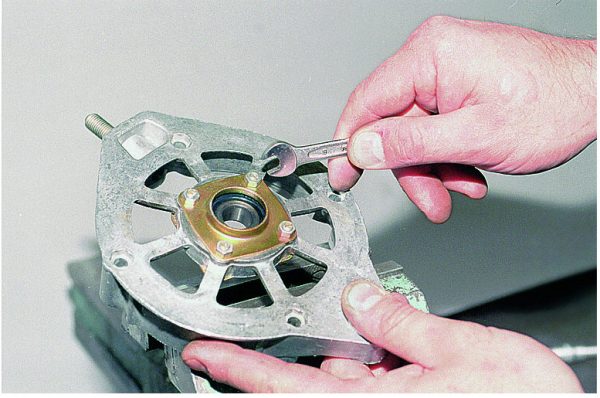 The bearing in the front cover is held by a special plate, which must be removed to replace the ball bearing.
 - Let's take the plate off.

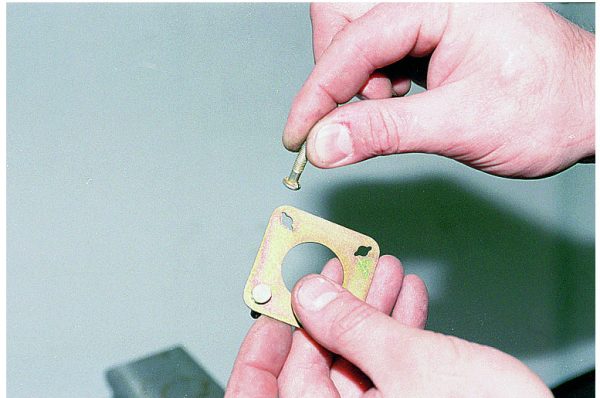 Unscrew the fasteners, remove the plate
 - We squeeze out the old ball bearing and press in a new one with a suitable adapter, for example, a head or a piece of pipe.

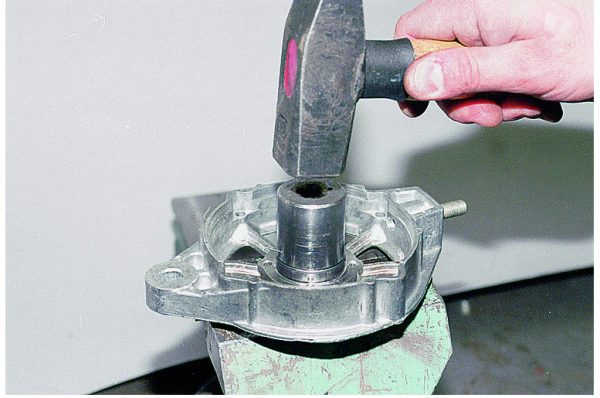 We press out the old bearing with a suitable guide, and install a new one in its place in the same way.
 - We remove the thrust ring from the armature shaft so as not to lose it.

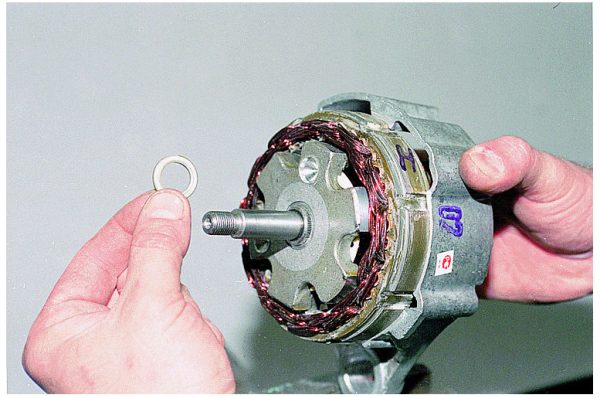 Remove the thrust ring from the rotor shaft
 - We screw the nut onto the shaft and, tightening it in a vice, pull off the back of the housing along with the stator coils.

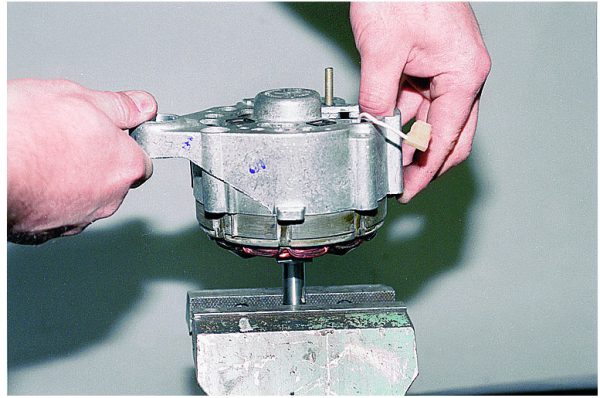 We fix the rotor axis in a vice and dismantle the back of the generator together with the stator coils
 - If the anchor comes out with difficulty, tap with a hammer through the drift on its end part.

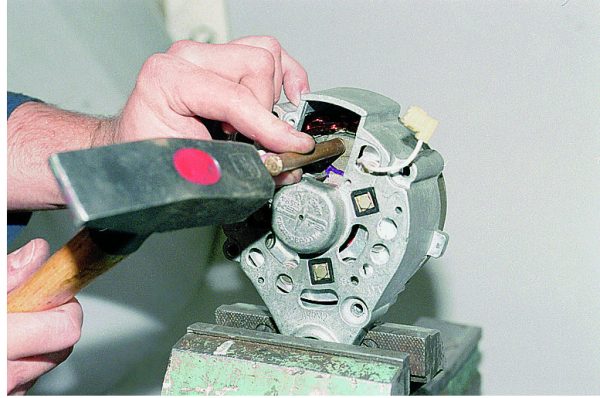 When dismantling the anchor, tap on its end part through a punch with a hammer
 - Remove the rotor from the stator.

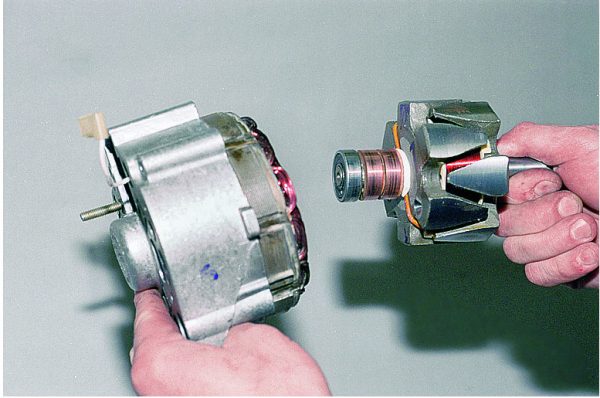 We take out the anchor from the stator
 - Remove the bearing using a puller. To press in a new one, we use a suitable adapter so that the force is transferred to the inner clip.

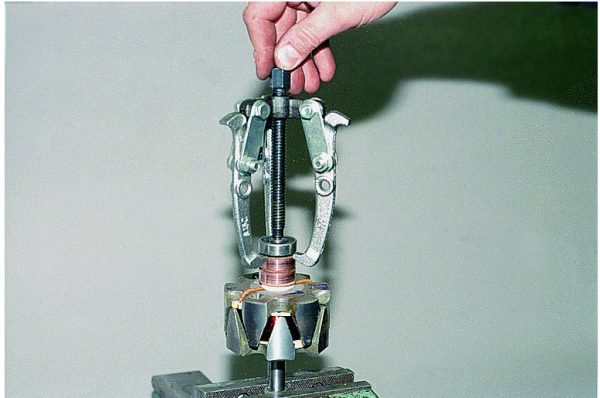 We dismantle the rear bearing with a puller, and press it in with a suitable adapter
 - We turn off the fastening of the coil contacts to the diode bridge.

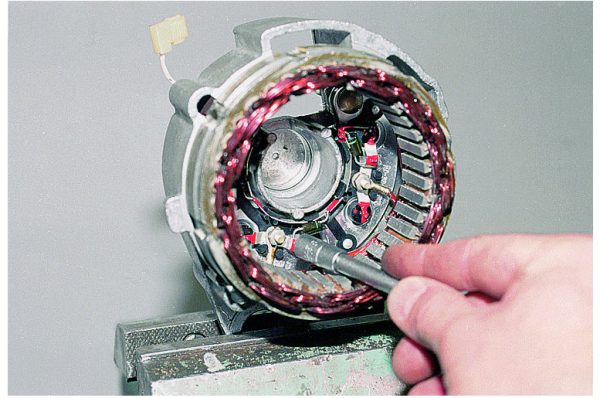 The contacts of the coils and the diode bridge itself are fixed with nuts, unscrew them
 - Prying with a screwdriver, dismantle the stator windings.

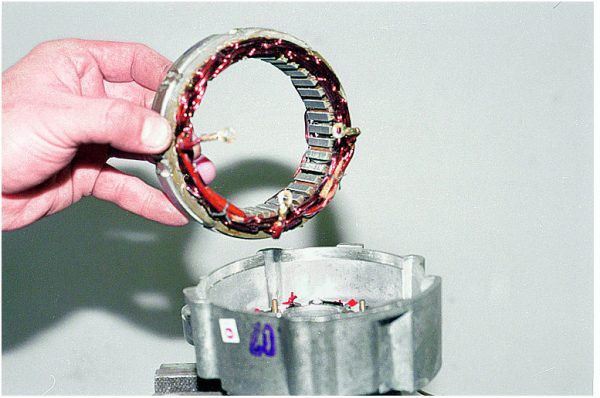 Unscrew the fasteners, remove the stator windings
 - Remove the rectifier block. If during the diagnostics it was found that one or more diodes are out of order, we change the plate with rectifiers.

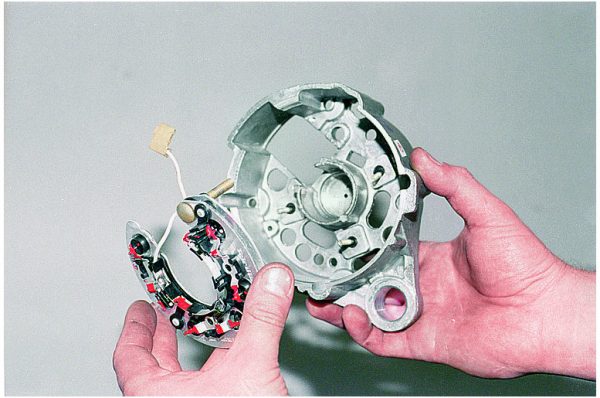 The diode bridge is removed from the back of the case
 - We remove the bolt from the diode bridge.

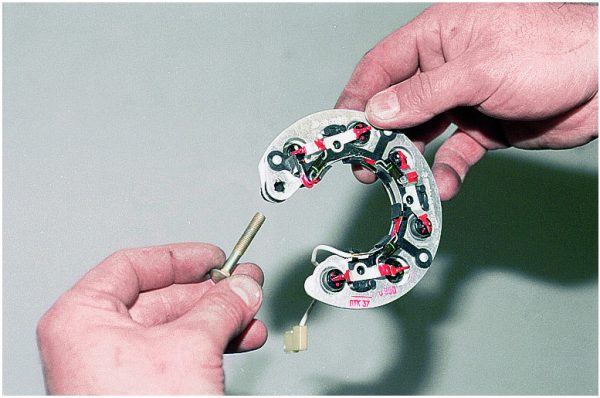 We take out the bolt from the rectifier, from which the voltage is removed to the battery
 - From the back of the generator housing, we take out the bolts for fastening the coil terminals and the diode bridge.

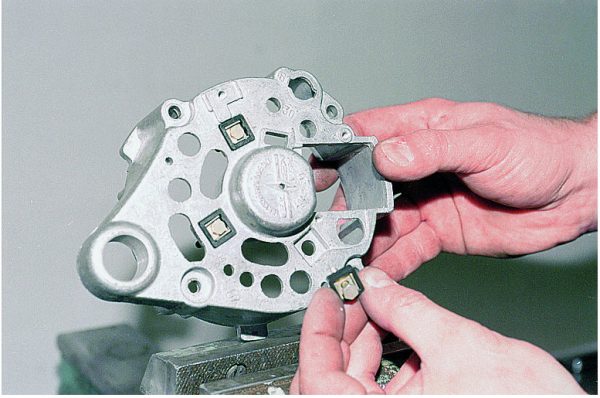 Remove the fixing bolts from the body
Video: generator repair on the "classic"


Watch this video on YouTube
Generator belt
The flexible drive is designed to rotate the pulley of the power source, ensuring the operation of the latter. Insufficient tension or a broken belt leads to a lack of battery charge. Therefore, despite the fact that the belt resource is about 80 thousand km, its condition must be periodically monitored. If damage is found, such as delamination, protruding threads or tears, it is better to replace it with a new product.


The VAZ "five" uses an alternator belt 10 mm wide and 944 mm long. The element is made in the form of a wedge, which makes it easier to catch on the generator pulley, pump and crankshaft.
How to tension the alternator belt
To tension the belt, you will need the following tools:
- mount;
- head 17 and collar.
The procedure consists of the following steps:
- Check drive tension. Normal values are those at which the belt between the pump pulley and the crankshaft pulley bends 12–17 mm or 10–17 mm between the pump pulley and the alternator pulley. When taking measurements, the pressure should not be more than 10 kgf in the place indicated in the image. To do this, press the thumb of the right hand with moderate effort.

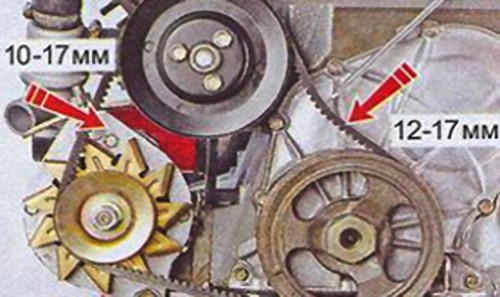 The tension of the belt can be checked in two places by pressing on it with the finger of the right hand
 - In case of excessive tension or loosening, carry out the adjustment.
- We loosen the upper fasteners of the generator with a head of 17.
- We insert the mount between the pump and the generator housing and tighten the belt to the desired values. To loosen the tension, you can rest a wooden block against the upper mount and knock it out lightly with a hammer.
- We wrap the nut of the generator set without removing the mount.
- After tightening the nut, check the tension of the flexible drive again.
Video: alternator belt tension on the "classic"


Watch this video on YouTube
The generator set on the fifth model of the Zhiguli rarely causes problems for car owners. The most common procedures that have to be carried out with the generator include tightening or replacing the belt, as well as troubleshooting the battery charge due to the failure of the brushes or the voltage regulator. All these and other generator malfunctions are quite simply diagnosed and eliminated with improvised devices and tools.

