How to add brake fluid
Brake fluid creates pressure in the brake lines, helping to stop the car when the brake pedal is pressed. Keep an eye on the brake fluid level to stay safe.
Your car's braking system is controlled by hydraulic pressure - fluid is used in constricted lines to force movement at the other end.
Hydraulic brake systems have been used for decades. They are reliable, require minimal maintenance, and most problems can be easily diagnosed and fixed.
Brake fluid is hygroscopic, meaning it absorbs water. This hygroscopic brake fluid prevents internal corrosion of metal lines and seizing of moving parts.
If the brake fluid is contaminated with water, it should be replaced with clean fluid from a fresh bottle. If wet brake fluid is left in the brake system for too long, damage can result, including:
- Leakage of internal seals of the brake system
- Rusty brake lines
- Stuck brake calipers
- Swollen rubber brake lines
If a part needs to be replaced in the brake system, such as a brake hose or caliper, brake fluid may leak out and the reservoir level may become low.
Method 1 of 2: Add brake fluid to the reservoir
If you have a low brake fluid level or have recently had your brakes repaired, you will need to add fluid to the reservoir.
Necessary materials
- Clean rag
- flashlight
- New brake fluid
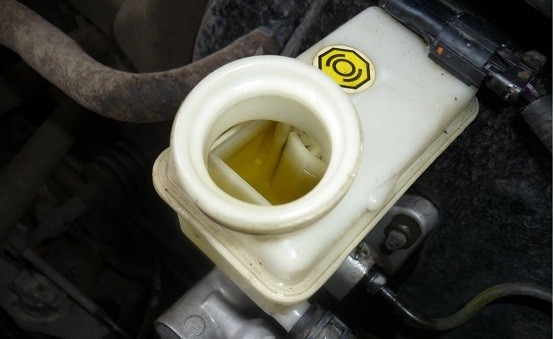
Step 1. Locate the brake fluid reservoir.. The brake fluid reservoir is located in the engine compartment and is attached to the brake booster near the fire wall.
The brake fluid reservoir is opaque or white.
Step 2: Check the brake fluid level. The fluid reservoir is marked on the side, such as "FULL" and "LOW". Use the markings to determine the liquid level in the tank.
Functions: If liquid is not visible, shine a flashlight on the tank from the opposite side. You will be able to see the top of the liquid.
Attention: Do not open the tank to check the level if you can. Brake fluid can absorb moisture from the air it is exposed to.
Step 3: Add Brake Fluid. Add brake fluid to the reservoir until the level reaches the "FULL" mark. Do not overfill as it may overflow the cap under pressure.
Match the required brake fluid to the fluid type indicated on the brake fluid reservoir cap. Always use a new sealed container of brake fluid to fill the reservoir.
- Attention: Modern vehicles mostly use DOT 3 or DOT 4 fluid and should never be mixed in applications.
Method 2 of 2: Change your brake fluid
The new brake fluid is honey brown. If your brake fluid is as dark as the color of used motor oil, or noticeably darker than new fluid, or if you rub it between your fingers it has a grainy consistency, you need to change the brake fluid in your vehicle.
Necessary materials
- Bridge stand
- brake bleed hose
- Brake bleeder
- Jack
- Empty container
- Wrench
Step 1: Raise and secure the car. Find a safe jacking point on your vehicle. Check your owner's manual to find out what types of jacks you can use on your vehicle. Jack up the vehicle until you can reach the rear of the wheel hub assembly.
For safety, place a stand under the frame, wheel hub or axle in a raised corner. If the jack slips, the axle stand will protect you from injury while you work under the vehicle.
Step 2: remove the wheel. Loosen the wheel nuts with a wrench. Getting to the brake bleed screw is easier when the wheel is off.
Step 3: Open the air outlet. The bleeder screw is a hex screw with a hole in the middle. Locate the bleeder screw on the rear of the steering knuckle or on the brake caliper and loosen it.
Turn the bleed screw half a turn counterclockwise to loosen it.
Continue backing out the bleed screw half a turn until you see drops of brake fluid coming from the end.
Step 4: Install the brake bleed hose.. Attach the brake bleed hose to the bleed screw.
- Functions: The brake bleeder hose has a built-in one-way valve. The fluid can pass in one direction under pressure, but if the pressure is released, the fluid cannot return through it. This makes bleeding the brakes a one-person job.
Step 5: Add Brake Fluid. To add brake fluid, use clean brake fluid of the same type as indicated on the reservoir cap.
During the entire process, add brake fluid after pressing the brake pedal every 5-7 presses.
- Attention: Never leave the tank empty. Air can get into the brake lines and cause a "soft" brake pedal. Air in the lines can also be difficult to remove.
Step 6: bleed the brakes. Pump the brakes five times to the floor.
Check the color of the brake fluid in the brake bleeder hose. If the fluid is still dirty, bleed the brakes 5 more times. Add brake fluid to the reservoir after each brake bleeding.
The brake fluid change is complete when the fluid in the brake bleeder hose looks like new.
Step 7: Assemble the Wheel Area. Remove the brake bleed hose. Tighten the bleed screw with a wrench.
Put the wheel back on and tighten it with a wrench.
Remove the axle support from under the vehicle and lower the vehicle to the ground.
Step 8: Repeat the procedure for all four wheels.. After flushing all four lines with clean fluid, the entire brake system will be new, and the fluid in the reservoir will also be clean and new.
Step 9: Pump up the brake pedal. When everything is assembled, press the brake pedal 5 times.
The first time you press the pedal, it may fall to the floor. It may be surprising, but the pedal will harden in the next few strokes.
- A warning: Do not get behind the wheel of a car until you pump up the brakes. You may find yourself in a situation where your brakes are not working properly, which could lead to an accident or injury.
Step 10: Test your car on the road. Start the car with your foot firmly on the brake pedal.
- Functions: If your vehicle starts to move when you depress the brake pedal, return it to the park position and depress the brake pedal again. Put the car in drive mode and try braking again. Your brakes should now hold.
Drive around the block slowly, checking your brakes regularly to make sure they are responsive.
- Functions: Always remember the location of the emergency brake. In the event of brake failure, be prepared to apply emergency braking.
Step 11: Check your car for leaks. Open the hood and check for brake fluid leaking through the reservoir. Look under the car and check for fluid leaks at each wheel.
- A warning: If fluid leaks are found, do not drive a vehicle until they are repaired.
Change your car's brake fluid every two to three years to keep your brakes working. Make sure the brake fluid is always at the correct level. Topping up brake fluid is relatively easy. Follow the recommendations in your owner's manual to determine the correct procedure and brake fluid for your vehicle.
If you find that you still need to bleed your brakes to get it working, have a certified mechanic like AvtoTachki have your brake system inspected. Have a professional technician check your brakes if you notice any signs of a brake fluid leak.
