How to replace the power steering pump
Content
Power steering pumps are malfunctioning when there is a smell of burning power steering fluid or an unusual noise comes from the pump.
Most modern cars are equipped with an updated version of the hydraulic power steering system introduced in 1951. Although the design and connections have changed over the years, the basic process of circulating power steering fluid through this hydraulic system remains the same. . It was and often still is powered by the power steering pump.
In a hydraulic power steering system, fluid is pumped through a series of lines and hoses to the steering rack, which moves when the driver turns the steering wheel left or right. This extra hydraulic pressure made the vehicle much easier to steer and was a welcome relief. Current state-of-the-art power steering systems are electrically controlled by power steering components attached to the steering column or the gearbox itself.
Prior to being replaced by EPS systems, the power steering pump was attached to the engine block or support bracket near the engine. The pump is driven by a series of belts and pulleys attached to the crankshaft center pulley or a serpentine belt that drives several components including the air conditioner, alternator and power steering pump. As the pulley rotates, it rotates the input shaft inside the pump, which creates pressure inside the pump housing. This pressure acts on the hydraulic fluid within the lines connecting the pump to the steering gear.
The power steering pump is always active when the vehicle engine is running. This fact, along with the reality that all mechanical systems wear out over time, are the main factors that cause this component to break or wear out.
In most cases, the power steering pump should last about 100,000 miles. However, if the power steering belt breaks or other internal components inside the pump wear out, it becomes useless and requires either a new belt, pulley, or a new pump. When replacing a pump, mechanics typically replace the primary hydraulic lines connecting the pump to the fluid reservoir and steering gear.
AttentionA: The job of replacing the power steering pressure sensor is quite simple. The exact location of the power steering pump depends on the specifications and design of the manufacturer. Always refer to your vehicle service manual for exact instructions on how to replace this component and be sure to follow their service steps for the ancillary components that make up the power steering system before completing the job.
A warning: Be sure to wear safety goggles and gloves when working on this project. Hydraulic fluid is very corrosive, so it is recommended to wear plastic gloves when replacing this component.
Part 1 of 3: Identifying the Symptoms of a Faulty Power Steering Pump
There are several separate parts that make up the entire power steering system. The main component that supplies pressure to the hydraulic lines is the power steering pump. When it breaks or starts to fail, there are a few warning signs:
Sounds coming from the pump: The power steering pump often makes grinding, clanging, or whining sounds when internal components are damaged.
Burnt Power Steering Fluid Smell: In some cases, the power steering pump generates excess heat if some internal parts are broken. This can cause the power steering fluid to heat up and actually burn out. This symptom is also common when the seals on the power steering pump crack, causing power steering fluid to leak out of them.
In many cases, the power steering pump is not working because the coil or drive belt is broken and needs to be replaced. Also, the power steering pulley often breaks or wears out. If you notice these symptoms and inspect the power steering pump, your best bet is to replace this component. This job is fairly easy to do, but you should always read the exact procedures your vehicle manufacturer recommends in your service manual.
Part 2 of 3: Power Steering Pump Replacement
Necessary materials
- Hydraulic Line Wrenches
- Pulley removal tool
- Socket wrench or ratchet wrench
- Pallet
- Replacing the power steering drive or V-ribbed belt
- Power steering pulley replacement
- Replacing the power steering pump
- Protective equipment (safety goggles and plastic or rubber gloves)
- Shop rags
- Threaded
According to most experts, this work should take about two to three hours. Make sure you have enough time to work on this project and try to complete everything in one day so you don't miss any steps.
Before you begin this job, make sure you have a good supply of rags under any hydraulic lines you can remove. Hydraulic fluid is very difficult to remove from metal components and hoses will leak when they are removed.
Step 1: Disconnect the car battery. Before removing any parts, locate the vehicle battery and disconnect the positive and negative battery cables.
This step should always be the first thing you do when working on any vehicle.
Step 2: Raise the car. Do this with a hydraulic lift or jacks and jacks.
Step 3: Remove the engine cover and accessories.. This will give you easy access to the power steering pump.
Most vehicles have easy access to the power steering pressure sensor, while others require you to remove several components including: engine cover, radiator fan shroud and radiator fan, air intake assembly, alternator, A/C compressor, and harmonic balancer.
Always refer to your vehicle's service manual for exact instructions on what you need to remove.
Step 4: Remove poly V-belt or drive belt.. To remove the V-ribbed belt, loosen the tension roller located on the left side of the engine (when looking at the engine).
Once the tensioner pulley is loose, you can remove the belt fairly easily. If your power steering pump is driven by a drive belt, you will also need to remove that belt.
Step 5: Remove the bottom engine cover.. Most domestic and foreign vehicles have one or two engine covers under the engine.
This is commonly known as a protective plate. To gain access to the power steering pump lines, you will have to remove them.
Step 6: Remove the radiator fan shroud and the fan itself.. This facilitates access to the power steering pump, pulley and support lines, which must be removed.
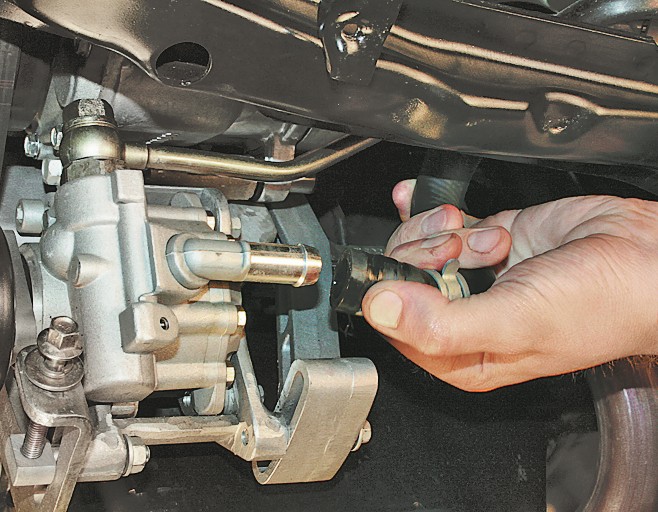
Step 7: Disconnect the lines going to the power steering pump.. Using a socket and a ratchet or a line wrench, remove the hydraulic lines that are connected to the bottom of the power steering pump.
This is usually the feed line that connects to the gearbox. Make sure you put a pan under the car before attempting this step as the power steering fluid will drain.
Step 8: Drain Power Steering Fluid. Let it drain from the pump for a few minutes.
Step 9: Remove the mounting bolt under the power steering pump.. There is usually a mounting bolt that connects the power steering bolt to either the bracket or the engine block. Remove this bolt with a socket or socket wrench.
- Attention: Your vehicle may not have mounting bolts located under the power steering pump. Always refer to your service manual to determine if this step is necessary for your particular application.
Step 10: Remove auxiliary hydraulic lines from power steering pump.. After you have removed the main feed line, remove the other attached lines.
This includes the supply line from the power steering reservoir and the return line from the gearbox. On some vehicles, a wiring harness is connected to the power steering pump. If your vehicle has this option, remove the wiring harness at this stage of the removal project.
Step 11: Remove the power steering pump pulley.. To successfully remove the power steering pump pulley, you will need the right tool.
It is often referred to as a pulley remover. The pulley removal process is outlined below, but you should always read the manufacturer's service manual to see what steps it recommends.
This involves attaching a pulley removal tool to the pulley and driving a lock nut over the edge of the pulley. Using a socket and ratchet, slowly loosen the pulley while holding the pulley mounting nut with an appropriate spanner.
This process is very slow, but necessary in order to properly remove the power steering pulley. Continue to loosen the pulley until the pulley is removed from the power steering pump.
Step 12: Remove mounting bolts. Using an impact wrench or a conventional ratchet socket, remove the bolts securing the power steering pump to the bracket or cylinder block.
Usually it is necessary to unscrew two or three bolts. Once this is complete, remove the old pump and take it to the workbench for the next step.
Step 13: Move the mounting bracket from the old pump to the new one.. Most replacement power steering pumps do not come with a mounting bracket for your specific vehicle.
This means that you will have to remove the old bracket from the old pump and install it on the new bracket. Simply remove the bolts securing the bracket to the pump and install it on the new pump. Be sure to install these bolts with thread locker.
Step 14: Install the new power steering pump, pulley and belt.. Every time you install a new power steering pump, you will need to install a new pulley and belt.
The process of installing this block is exactly the opposite of removing it and is noted below for your reference. As always, refer to your vehicle's service manual for specific steps as these will vary for each manufacturer.
Step 15: Attach the pump to the cylinder block.. Attach the pump to the engine block by screwing the bolts through the bracket into the block.
Tighten the bolts before going to the recommended torque.
Step 16: Install the new pulley with the pulley installation tool.. Connect all hydraulic lines to the new power steering pump (including the lower feed line).
Step 17: Reinstall the Remaining Parts. Replace all removed parts for better access.
Install the new poly V-belt and drive belt (refer to the manufacturer's service manual for the correct installation procedure).
Reinstall the fan and radiator shroud, lower engine shrouds (skid plates), and any parts that you had to remove originally, in the reverse order of their removal.
Step 18: Fill fluid into the power steering reservoir..
Step 19: Clean the bottom of the car. Before you finish the job, be sure to remove all tools, debris, and equipment from under the vehicle so that you do not run over them with your vehicle.
Step 20: Connect the battery cables.
Part 3 of 3: Test driving a car
Once you've reinstalled all the components that were removed and topped up the power steering fluid to the "full" line, you need to top up the power steering system. This is best done by starting the engine while the front wheels are in the air.
Step 1: Fill the Power Steering System. Start the car and turn the steering wheel left and right several times.
Stop the engine and add fluid to the power steering reservoir. Continue this process until the power steering fluid reservoir requires topping up.
Step 2: Road Test. After replacing the power steering pump, a good 10 to 15 mile road test is recommended.
Start the vehicle first and inspect the underside of the vehicle for leaks before taking the vehicle to any road test.
If you have read these instructions and are still unsure about performing this repair, have one of your local AvtoTachki ASE certified mechanics come to your home or work and perform the power steering pump replacement for you.