How to replace the power window switch
Content
The power window switch fails when the windows do not work properly or at all, and also when the windows are operated only from the main switch.
Modern cars are equipped with power windows. Some vehicles may still have power windows. For the most part, power window switches are used to control power windows on standard economy vehicles. In luxury cars, there is a new proximity switch for power windows with voice control.
The power window switch on the driver's door activates all power windows in the vehicle. There is also a disable switch or window lock switch that only allows the driver's door to activate other windows. This is a good idea for small children or animals that might accidentally fall out of a moving car.
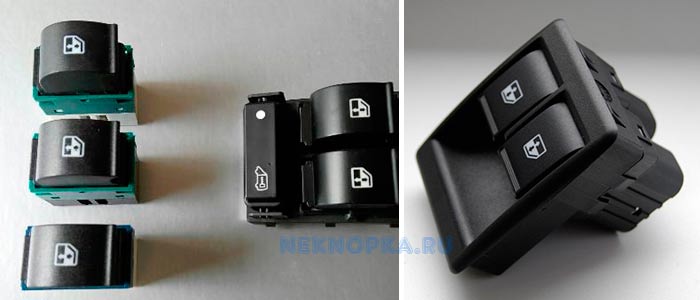
The power window switch on the driver's door is usually combined with the door locks. This is called a switch panel or a cluster panel. Some switch panels have removable window switches, while other switch panels are one piece. For front passenger doors and rear passenger doors, there is only a power window switch, not a switch panel.
The switch is the passenger door power switch. Common symptoms of a failed power window switch include non-working or non-working windows, as well as power windows that only operate from the main switch. If the switch does not work, the computer detects this situation and displays the engine indicator along with the built-in code. Some common engine light codes associated with the power window switch are:
B1402, B1403
Part 1 of 4: Checking the Power Window Switch Status
Step 1: Locate a door with a damaged or defective power window switch.. Visually inspect the switch for external damage.
Gently press the switch to see if the window goes down. Gently pull the switch to see if the window goes up.
- Attention: In some vehicles, the power windows only work when the ignition key is inserted and the toggle switch is on, or in the accessory position.
Part 2 of 4: Replacing the Power Window Switch
Necessary materials
- socket wrenches
- crosshead screwdriver
- Electric cleaner
- Flat head screwdriver
- lyle door tool
- Pliers with needles
- Pocket flathead screwdriver
- Ratchet with metric and standard sockets
- Torque bit set
Step 1: Park your vehicle on a level, firm surface..
Step 2: Install wheel chocks around the rear wheels.. Apply the parking brake to block the rear wheels from moving.
Step 3: Install a nine volt battery in the cigarette lighter.. This will keep your computer running and save the current settings in the car.
If you don't have a nine-volt battery, no big deal.
Step 4: Open the car hood to disconnect the battery.. Remove the ground cable from the negative battery terminal by turning off power to the power window switches.
For vehicles with a retractable power window switch:
Step 5: Locate the door with the failed power window switch.. Using a flathead screwdriver, pry up slightly around the base of the switch or cluster.
Pull out the switch base or group and remove the wire harness from the switch.
Step 6: Raise the locking tabs. Using a small flat-tip pocket screwdriver, slightly pry the locking tabs on the power window switch.
Pull the switch out of the base or cluster. You may need to use pliers to pry the switch out.
Step 7: Take an electric cleaner and clean the wiring harness.. This removes any moisture and debris to create a complete connection.
Step 8 Insert the new power window switch into the door lock assembly.. Make sure the locking tabs snap into place on the power window switch, holding it in a secure position.
Step 9. Connect the wiring harness to the power window base or combination.. Snap the power window base or group into the door panel.
You may need to use a flat-tip pocket screwdriver to slide the lock latches into the door panel.
For vehicles with a power window switch installed on the dashboard of cars from the late 80s, 90s and modern cars:
Step 10: Locate the door with the failed power window switch..
Step 11: Remove the interior door handle. To do this, pry the cup-shaped plastic trim from under the door handle.
This component is separate from the plastic rim around the handle. There is a gap on the front edge of the cup lid so you can insert a flathead screwdriver. Remove the cover, under it there is a Phillips screw, which must be unscrewed. After that, you can remove the plastic bezel around the handle.
Step 12: Remove the panel from the inside of the door.. Carefully bend the panel away from the door around the entire perimeter.
A flathead screwdriver or a door opener (preferred) will help here, but be careful not to damage the painted door around the panel. Once all the clamps are loose, grab the top and bottom panel and pry it slightly away from the door.
Lift the entire panel straight up to release it from the latch behind the door handle. This will release the large coil spring. This spring is located behind the power window handle and is quite difficult to put back in place when reinstalling the panel.
- Attention: Some vehicles may have bolts or socket screws that secure the panel to the door. Also, you may need to disconnect the door latch cable to remove the door panel. The speaker may need to be removed from the door panel if installed outside.
Step 13: Pry off the Locking Tabs. Using a small flat-tip pocket screwdriver, slightly pry the locking tabs on the power window switch.
Pull the switch out of the base or cluster. You may need to use pliers to pry the switch out.
Step 14: Take an electric cleaner and clean the wiring harness.. This removes any moisture and debris to create a complete connection.
Step 15 Insert the new power window switch into the door lock assembly.. Make sure the locking tabs click into place on the power window switch that holds it in place.
Step 16. Connect the wiring harness to the power window base or combination..
Step 17: Install the door panel on the door. Slide the door panel down and towards the front of the vehicle to make sure the door handle is in place.
Insert all door latches into the door, securing the door panel.
If you have removed bolts or screws from the door panel, be sure to reinstall them. Also, if you disconnected the door latch cable to remove the door panel, make sure you reconnect the door latch cable. Finally, if you had to remove the speaker from the door panel, be sure to reinstall the speaker.
Step 18: Install the interior door handle. Install the screws to attach the door handle to the door panel.
Snap the screw cover in place.
Step 19: Open the car's hood if it's not already open.. Reconnect the ground cable to the negative battery post.
Remove the nine volt fuse from the cigarette lighter.
Step 20: Tighten the battery clamp. Make sure the connection is good.
- AttentionA: If you didn't have a XNUMX-volt power saver, you'll have to reset all of your car's settings, such as the radio, power seats, and power mirrors.
Step 21: Remove the wheel chocks from the vehicle.. Also clean your tools.
Part 3 of 3: Checking the Power Window Switch
Step 1 Check the function of the power switch.. Turn the key to the on position and press the top of the switch.
The door window should rise when the door is open or closed. Press the bottom side of the switch. The door window must be lowered when the door is open or closed.
Press the switch to block the passenger windows. Check each window to make sure they are blocked. Now press the switch to unlock the passenger windows. Check each window to make sure they are working.
If your door window does not open after replacing the power window switch, the power window switch assembly may need further diagnostics or an electronic component may be faulty. If you do not feel confident doing the work yourself, contact one of the certified AvtoTachki specialists who will replace it.