Checking and replacing the master brake cylinder VAZ 2106
Content
If the car cannot stop in time, it is extremely dangerous to drive it. This rule is true for all cars, and the VAZ 2106 is no exception. On the "six", as well as on the entire VAZ classic, a liquid brake system is installed, the heart of which is the master cylinder. If this device fails, the driver will be in danger. Fortunately, the cylinder can be independently checked and replaced. Let's figure out how it's done.
Where is the brake cylinder VAZ 2106
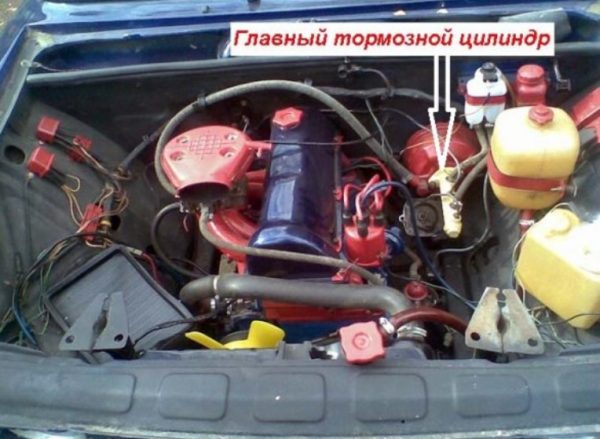
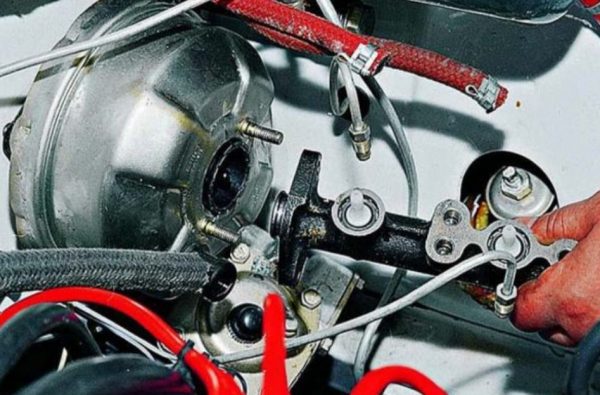
The master brake cylinder is installed in the engine compartment of the VAZ 2106, above the engine. The device is located about half a meter from the driver. Just above the cylinder is a small expansion tank into which brake fluid is poured.
The cylinder has an oblong shape. The body is made of high quality steel.
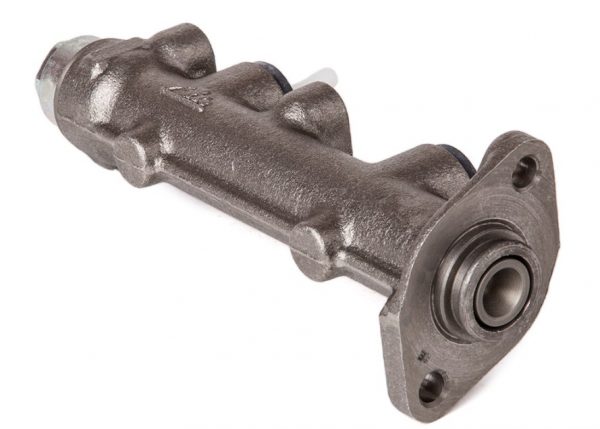
The housing has several threaded holes for screwing contour brake pipes. This device is bolted directly to the brake booster with two 8 bolts.
The main function of the cylinder
In short, the function of the master brake cylinder is reduced to the timely redistribution of brake fluid between several brake circuits. There are three such circuits on the "six".
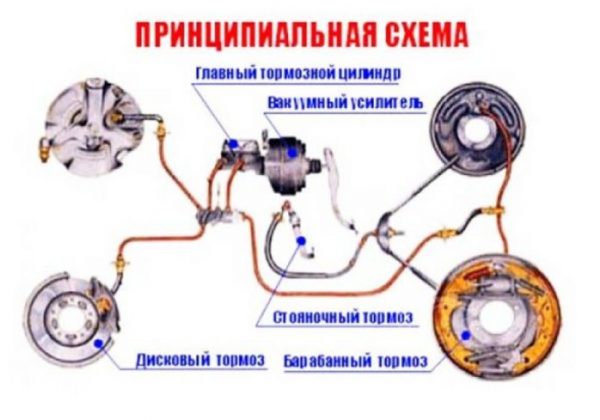
There is one circuit for each front wheel, plus a circuit for serving two rear wheels. It is from the master brake cylinder that the fluid comes, which then begins to put pressure on the wheel cylinders, forcing them to firmly compress the brake pads and stop the car. In addition, the master cylinder performs two additional functions:
- diverting function. If the brake fluid has not been completely used by the working cylinders, then its remainder goes back into the reservoir until the next braking;
- return function. When the driver stops braking and takes his foot off the pedal, the pedal rises to its original position under the action of the master cylinder.
How the cylinder is arranged and how it works
There are a lot of small parts in the VAZ 2106 master cylinder, so at first glance the device seems very complicated. However, there is nothing complicated about it. Let's list the main elements.
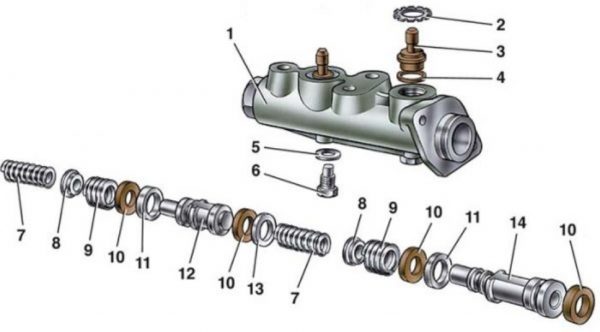
- Steel body with two internal chambers.
- Washer fixing the main fitting.
- Brake fluid drain plug (it connects directly to the expansion tank).
- Plug seal.
- Washer for stop screw.
- Stop screw for brake piston.
- Recoil spring
- Base cap.
- compensatory spring.
- Sealing ring for the brake piston (there are 4 such rings in the cylinder).
- Spacer washer.
- Rear brake piston.
- Small spacer.
- Front brake piston.
A steel plug is installed at one end of the cylinder body. The other end is equipped with a flange with mounting holes. And the master cylinder works as follows:
- before pressing the pedal, the pistons are in the cylinder body against the walls of their chambers. At the same time, each spacer ring is held back by its restrictive screw, and the chambers themselves are filled with brake fluid;
- after the driver, pressing the pedal, bleeds all the free play of this pedal (this is about 7-8 mm), the pusher in the cylinder begins to put pressure on the main piston, moving it to the opposite wall of the chamber. In parallel with this, a special cuff covers the hole through which the brake fluid goes into the reservoir;
- when the main piston reaches the opposite wall of the chamber and squeezes all the liquid into the hoses, an additional piston is turned on, which is responsible for increasing the pressure in the rear circuit. As a result, the pressure in all brake circuits increases almost simultaneously, which allows the driver to use both front and rear pads for braking;
- once the driver releases the brakes, the springs return the pistons back to their starting point. If the pressure in the cylinder was too high and not all of the liquid was used up, then its remnants are drained into the tank through the outlet hose.
Video: principles of operation of brake cylinders

Which cylinder to choose for installation
The driver who decides to replace the brake master cylinder will inevitably face the problem of choice. Practice shows that the best option is to install the original VAZ cylinder purchased from an authorized auto parts dealer. The number of the original cylinder in the catalog is 2101-350-500-8.
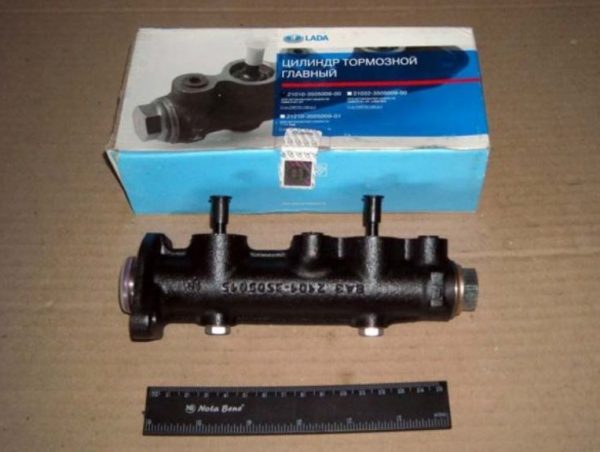
However, it is not always possible to find such a cylinder, even from official dealers. The fact is that the VAZ 2106 has long been discontinued. And spare parts for this car are on sale less and less. If this is the situation, then it makes sense to look at the products of other manufacturers of cylinders for the VAZ classics. Here they are:
- "Basalt";
- "Belmag";
- LPR.
The products of these companies are in high demand among the owners of "sixes", although the price of cylinders from these manufacturers is often unreasonably high.
Signs of a broken cylinder and checking its serviceability
The driver should immediately check the brake cylinder if he detects one of the following warning signs:
- a light on the dashboard flashed, signaling that the level of brake fluid in the reservoir had decreased;
- the free play of the brake pedal became longer or the pedal generally began to fall into the floor of the passenger compartment;
- braking has become uneven: when you press the pedal, the car drives to the side;
- braking has become more difficult: even if the pedal is completely recessed into the floor of the passenger compartment, the car does not stop completely.
All these points indicate that something is wrong with the master cylinder, and this problem needs to be sorted out as soon as possible. Here's how you can do it:
- The first and easiest way to diagnose a cylinder is a routine inspection. If brake fluid leaks are visible on the cylinder body, the problem has been found. When the seals in the cylinder lose their tightness, fluid begins to flow either to the vacuum booster or to the spar under the cylinder. In all these cases, the cylinder will have to be dismantled and disassembled;
 When the cylinder loses its tightness, the liquid begins to flow directly onto the langeron
 - if the problem is only in the seals, they can be changed (VAZ repair kits are still sold in auto parts stores). If not only seals are damaged, but also other parts of the cylinder, then it will have to be changed entirely, since it is far from always possible to find small parts for brake cylinders.
There is another, more complicated way to check the cylinder. We list its main stages.
- Using a 10 open-end wrench, all contour hoses are unscrewed from the cylinder. In their place, 8 bolts are screwed in, which will serve as plugs.The contour hose, after removal, is placed in a piece of a plastic bottle so that the liquid does not flow onto the langeron
- Plugs are inserted into the removed hoses (bolts for 6, or pointed wooden plugs can serve as such plugs).
- Now you need to sit in the passenger compartment and press the brake pedal 5–8 times. If the master cylinder is in order, then after several presses it will become impossible to fully depress the pedal, since all the brake chambers in the cylinder will be filled with liquid. If the pedal, even in such conditions, continues to be pressed freely or completely falls into the floor, there is a leakage of brake fluid due to the loss of tightness of the brake system.
- Usually, the sealing cuffs, which are responsible for blocking the outlet channel of the cylinder, are to blame for this. Over time, they become unusable, crack and begin to leak liquid, which goes into the tank all the time. To confirm this “diagnosis”, unscrew the fixing nuts on the cylinder flange, and then pull the cylinder slightly towards you. There will be a gap between the cylinder body and the booster body. If brake fluid flows out of this gap, then the problem is in the return cuffs, which will have to be changed.
Replacing the brake master cylinder VAZ 2106
In the vast majority of cases, it is the replacement of the cylinder that is the best repair option. The fact is that it is far from always possible to find individual parts of brake cylinders (pistons, return springs, spacers, etc.) on sale. Much more often on sale there are sets of seals for cylinders, however, the quality of these seals sometimes leaves much to be desired. In addition, they are often faked. That is why car owners prefer not to bother with repairing the old cylinder, but simply install a new one on their “six”. To do this, we need the following tools:
- a set of spanners;
- pliers;
- flat screwdriver;
- rags;
- medical syringe;
- brake fluid canister (capacity 0.5 liters);
- 5 x 6 bolts (they will be used as plugs for the brake hoses).
Sequence of work
Starting to replace the master cylinder, you should make sure that the car engine is completely cool. In addition, all brake fluid should be drained from the reservoir. The most convenient way to do this is with a medical syringe (if it was not at hand, a medical pear is also suitable). Without these preparatory measures, it will not be possible to change the cylinder.
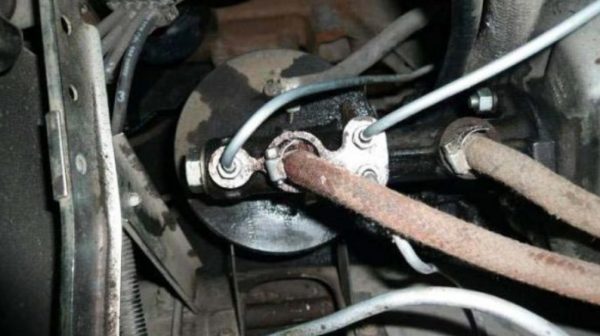
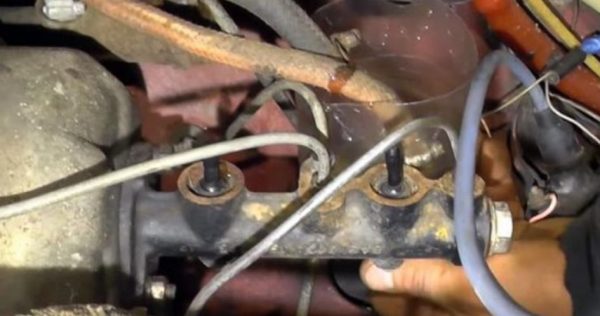
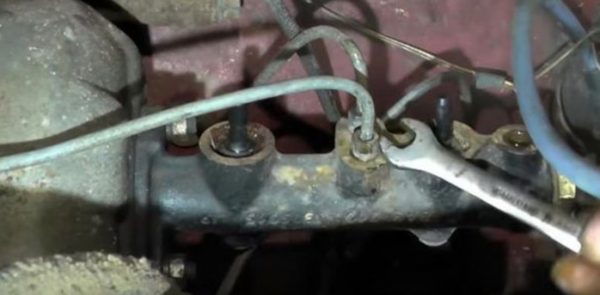
- The fixing nuts on the brake hoses are unscrewed with an open-end wrench. The hoses are carefully removed from the cylinder body. 8 bolts are screwed into the vacated sockets. They will serve as plugs and will not allow the brake fluid to leak out when the cylinder is tilted and removed. Brake hoses are also plugged with 6 bolts to prevent leakage.The nuts on the brake hoses are unscrewed with an open-end wrench by 10
- Using a 13 open-end wrench, two fixing nuts are unscrewed that hold the cylinder to the filter housing. After that, the cylinder should be gently pulled towards you, all the time trying to keep it horizontal so that the liquid does not flow out of it.The brake cylinder must be kept horizontal to prevent fluid from escaping.
- The removed cylinder is replaced by a new one. The fixing nuts on the amplifier housing are tightened. Then the fixing nuts of the brake hoses are tightened. After that, a portion of brake fluid is added to the reservoir to compensate for the leakage that inevitably occurs when replacing the cylinder.
- Now you should sit in the passenger compartment and press the brake pedal several times. Then you need to slightly unscrew the fixing nuts on the hoses. After unscrewing them, a characteristic hiss will be heard. This means that air comes out of the cylinder, which was there during the repair and which should not be there. As soon as brake fluid drips from under the nuts, they are tightened.
Video: change the brake cylinder on the "classic"

Dismantling the cylinder and installing a new repair kit
If the driver decided to do without replacing the cylinder and change only the sealing cuffs, then the cylinder will have to be disassembled. The sequence of actions is listed below.
- First, the rubber seal is removed with a screwdriver, which is located in the cylinder body from the side of the mounting flange.
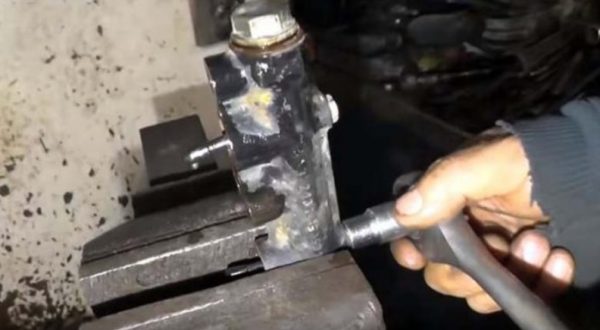
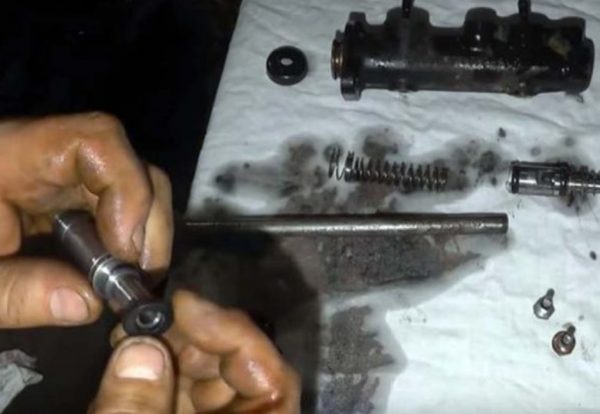
- Now the cylinder should be vertically placed in a vise. And with the help of a 22 open-end wrench, slightly loosen the front plug. With a 12 key, the restrictive bolts located next to it are unscrewed.To remove the plug and bolts, the cylinder will have to be installed in a vise
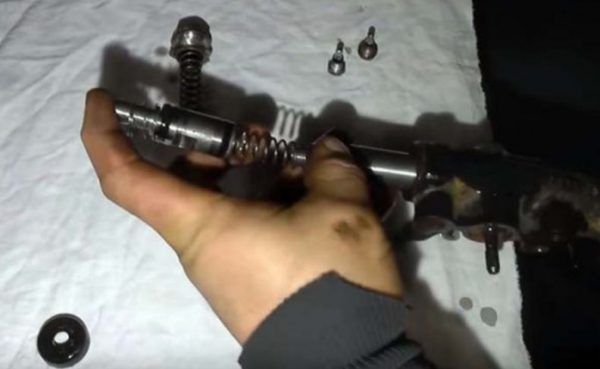
- The loose plug is screwed out by hand. Under it is a thin washer. You have to make sure she doesn't get lost. After the limiters are completely unscrewed, the cylinder is removed from the vise.
- The cylinder is placed on the table (before that, you need to lay something on it). Then, from the side of the flange, an ordinary screwdriver is inserted into the body, and with its help all the parts are pushed onto the table.To push the cylinder parts onto the table, you can use a regular screwdriver
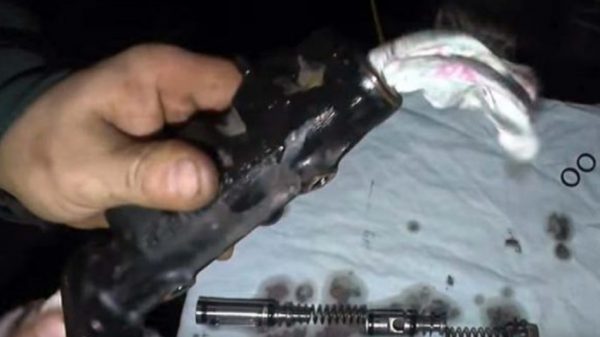
- A rag is inserted into the empty case. The case is thoroughly cleaned. Then it should be inspected for scratches, deep cracks and scuffs. If any of this is found, then the meaning of replacing the seals is lost: you have to change the entire cylinder.The cylinder body is thoroughly wiped from the inside with a rag
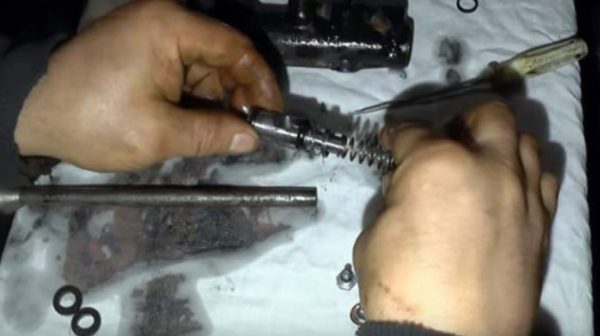
- The rubber rings on the pistons are removed by hand and replaced with new ones. Retaining rings on fittings are pulled out with pliers. The gaskets under these rings are also replaced with new ones.Sealing cuffs are removed from the pistons manually
- After replacing the sealing collars, all parts are installed back into the housing, then a plug is installed. The assembled cylinder is installed on the booster flange, then the brake circuit hoses are connected to the cylinder.Parts with new seals are assembled and placed back into the cylinder body one by one.
Video: replacing the repair kit on the "classic" brake cylinder

How to expel air from the brake system
When the driver changes the master cylinder, air enters the brake system. It's almost inevitable. Air bubbles accumulate in the hoses of the brake circuits, which make normal braking difficult. So the driver will have to expel air from the system using the recommendations outlined below. It should also be noted here that this operation will require the help of a partner.
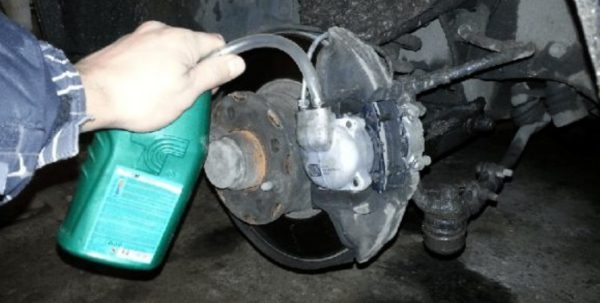
- The front wheel of the car is jacked up and removed. Access to the brake fitting opens. A piece of plastic tube is put on it. Its second end is sent to an empty bottle. Then the nut on the fitting is carefully unscrewed.When bleeding the brake system, the second end of the tube is placed in an empty bottle
- The brake fluid will start to come out into the bottle, while it will bubble strongly. Now the partner sitting in the cabin presses the brake pedal 6-7 times. Pressing it for the seventh time, he must hold it in a recessed position.
- At this point, you should loosen the fitting a couple of turns. Fluid will continue to flow. As soon as it stops bubbling, the fitting is twisted back.
- The above actions must be done with each VAZ 2106 wheel. After that, add brake fluid to the reservoir and check the brakes for proper operation by pressing them several times. If the pedal does not fail and the free play is normal, then the bleeding of the brakes can be considered complete.
Video: pumping the brakes of the "classics" without the help of a partner

So, the brake cylinder on the "six" is an extremely important part, the condition of which depends on the life of the driver and passengers. But even a novice motorist can change this part. No special skills and knowledge are required for this. All you need is to be able to hold a wrench in your hands and follow the recommendations outlined above exactly.

