Cabin filter Auto. Where is? Replacement frequency.
Content
Cabin filter: where is it located, how to replace - the frequency of replacing the cabin air filter
There is an unpleasant smell in the cabin, and the windows fog up? This is easily eliminated - you just need to change the cabin filter and then not only the car, but also the body will thank you.
The car is a real pantry of filters, and we are not talking about the trunk of a thrifty driver at all. The normal functioning of a mechanical creation is difficult or impossible if the air, oil, fuel and, finally, the cleaning element in the automatic transmission has become unusable. At least they are not forgotten and changed regularly. But there is a filter, often forgotten. He is busy cleaning the air entering the cabin and is by no means the least important for the quality of life.
Where is the cabin filter
Often it can be found in the glove box area - it stands behind it or under it, as, for example, in Renault Logan. In some cars, the cleaning element is located under the hood. The paradox is that many of the motorists we interviewed are not even aware of the location of the cleaning element - the question confuses them. What can we say about observing the frequency of its replacement on a used "chariot"? If there are problems with finding the habitat of the filter, then the manual (operation and maintenance manual) will accurately tell you or help on thematic forums.
The purpose of the cabin filter
The task of this element is to purify the air entering the car, which “on the way” is often a mixture that is frankly dangerous to health. The surface layer in large cities is saturated with exhaust gases, emissions from industrial enterprises and other substances. For example, the content of nitrogen dioxide, formaldehyde and benzapyrene is increased in the air of the capital. At motorways, the concentration of any rubbish is significantly exceeded, and motorists “floating” in the “chemical ocean” get especially hard. Standing in many hours of summer traffic jams in complete calm or, God forbid, in tunnels that turn into gas chambers, and there is nothing to say.

We hope you have already understood that you should not look at the cabin filter carelessly and through your fingers - it allows you to maintain health to one degree or another by holding soot particles, sand and dust, and in the case of more “advanced” elements, which will be discussed below, harmful substances and allergens.
The symptoms of a cabin filter failure are obvious and well-marked. Firstly, the glasses will fog up more often from the inside. Secondly, when moving, the interior will begin to attack unpleasant odors. Finally, thirdly, when the ventilation is turned on, dust will be noticeable.

Residents of big cities who forget to change the filter experience the above symptoms much more often than motorists who mostly spend time outside metropolitan areas. They also have a chance to get acquainted with other much more disturbing manifestations, starting with a headache and ending with the risk of serious diseases.
Kinds and types of filters
Cabin guards are divided into two main groups - conventional anti-dust (paper) and coal. The first uses paper or synthetic fiber as a filter element, which can be electrified to attract suspended matter. Before fine particles are filtered, there is a pre-filter layer. Elements of this type are able to capture dust, soot and plant pollen, which causes a lot of inconvenience to allergy sufferers, but they cannot cope with toxic substances. They are usually the cheapest.
 filter and carbon filter")
As for carbon filters, their design is more complex and aimed at higher efficiency. First, harmful substances enter the pre-filter layer, then the fine particles section, and finally, they are captured by porous activated carbon granules, which are not found in conventional paper filters. Here, for example, is what one of the cheapest RAF Filter models has, according to the manufacturer: an antibacterial and antifungal coating, activated carbon with sodium bicarbonate and a layer that traps most known allergens. A true air purification system! Such multilayer elements have disadvantages and this is by no means the price - carbon filters work fully, while the carbon part, intended for fine cleaning, performs its absorbent functions. Experts say that deterioration may happen earlier than expected.
How to replace the cabin filter
Changing the filter yourself is usually quite simple, but there are nuances. So, on some cars, the procedure takes place once or twice, while other models require more labor. It all depends on how easy access to the cleaning system is. For example, on the Nissan Almera Classic, the process takes a few minutes - you need to remove the glove box (glove box), behind which there is a removable cabin filter cover. No special tool is required for the job.

However, on some machines it is more difficult to get to the place of deployment and it is possible to install the element not tight enough or crooked. In addition, there is a possibility of breaking something during the installation process - such cases are known. In this regard, our advice to you: before exciting actions, do not hesitate to look into the manual and traditionally learn useful information from it or seek help from experienced comrades.
Step by step guide
STEP 1 - Open the glove box.
Open the glove box and take out the contents.
STEP 2 - Remove the limit stop lever.
The limit stop is located on the right side of the glove box. Just slide it off the pin.
STEP 3 - Empty the glove box.
Grasp the front and back of the glove box, pressing them together until the side clips release. Now that the sides are free, you can lower the entire glove box so you can see the bezel to the cabin air filter duct.
STEP 4 - Remove the old cabin air filter.
Lift the latches on the sides of the front panel and slide it to the side to reveal the filter compartment. Now you can simply pull out the old cabin filter, being careful not to spill dust, dirt and debris from the filter into the car. When you remove the old filter, pay attention to which direction the arrows are pointing. They indicate the direction of the air flow.
STEP 5 - Clean the filter chamber and check the seals and gaskets.
Before installing a new EnviroShield cabin air filter, vacuum the filter chamber and then wipe it with a damp cloth to remove any stray debris. Check the condition of the gaskets and seals to make sure they don't need to be replaced either.
STEP 6 - Install a new cabin air filter.
Make sure the new cabin filter matches the old one. Double check that the arrows on the new filter are pointing in the same direction as the old filter you removed and insert the new filter.
STEP 7 - Install and secure the glove box.
Once the filter is in place, simply replace the faceplate, snap the glove box into place, reinstall the restrictor and place everything back in the glove box.
The cabin air filter in this example is located behind the glove box. Yours may be under the dash, usually on the passenger side. Under-panel filters can often be removed without any tools by simply opening a small door. Filters located under the hood may require removal of other parts. To access them, you may need to remove the hood vent grill housing, wiper blades, washer reservoir, or other items. See your owner's service manual for details.
Replacement frequency
The regularity of updating the filter element is regulated by the manufacturer, but one thing is the factory interval and “a little” different is the actual operating conditions. We advise you to carry out periodic inspection and change if necessary, because the condition of the filter depends on the environment of the car. In large cities, the purifier is under a lot of stress, its unscheduled inspection is sometimes necessary and sometimes it has to be changed more often. The same applies to filters in cars that drive on dirt and sandy roads.
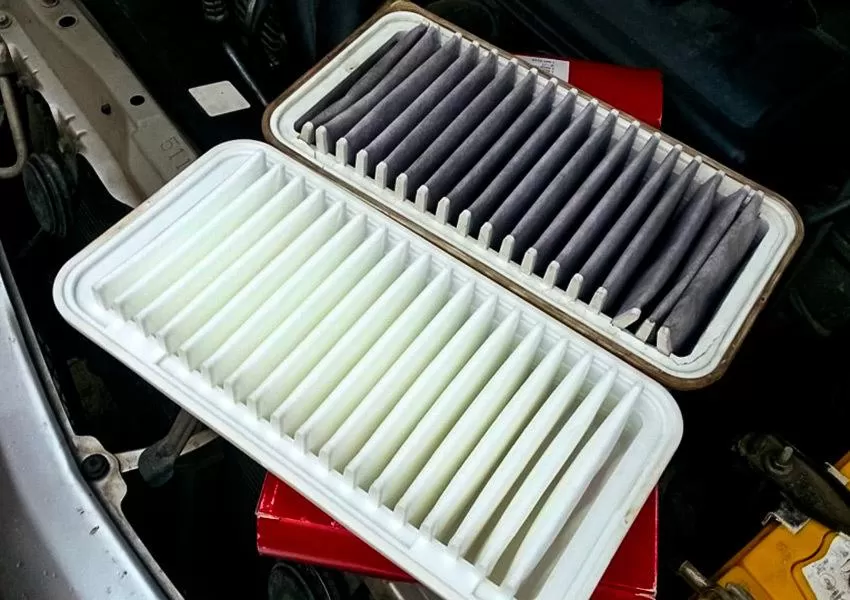
If you do not operate with factory recommendations, then the advice on the frequency is different - from replacing every 10-15 thousand kilometers to updating, based on the actual state, which can sometimes surprise. In advanced cases, the removed filter is scary to hold in your hands: a clogged element not only stops working, but over time it turns into a breeding ground for bacteria and mold. Now imagine if it didn't exist at all!