Ignition system VAZ 2105: diagnostics and adjustment
Content
The ignition system is used in any car and ensures the smooth operation of the engine. As the vehicle is operated with system elements, malfunctions occur, which leads to malfunctions of the power plant. Zhiguli owners can independently identify and fix problems in the ignition, as well as carry out adjustment work without contacting a car service.
Ignition system VAZ 2105
On the VAZ 2105, as on other classic Zhiguli models, a contact ignition system is installed, which requires periodic adjustment. This is due to the design features of such a system. The performance of the power unit, power and fuel consumption, directly depend on the correct setting of the ignition timing. It is worth dwelling on the adjustment and malfunctions of this system in more detail.
What it consists of
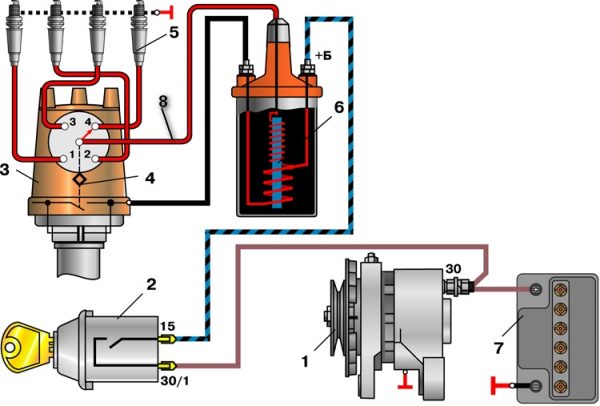
The main elements of the ignition system of the VAZ "five", which are responsible for the formation and ignition of a spark, are:
- generator;
- ignition switch;
- distributor;
- spark plug;
- ignition coil;
- high voltage wires;
- accumulator battery.
A malfunction of any of the listed devices leads to malfunctions in the operation of the power plant.
What is the adjustment
Operating a vehicle with an incorrectly adjusted ignition is a problem, as evidenced by the following symptoms:
- fills the candles, which leads to tripping of the motor;
- power decreases;
- dynamics is lost;
- fuel consumption increases;
- The engine gets very hot;
- at idle, the engine is unstable, etc.
The engine troit is when one of the cylinders does not work, which is accompanied by a characteristic sound and unstable operation of the unit.
These signs indicate that the ignition timing is set incorrectly and needs to be adjusted. However, these symptoms may also indicate problems with other elements of the ignition system. Therefore, in each individual case, a more detailed study of the problem that has arisen is required.
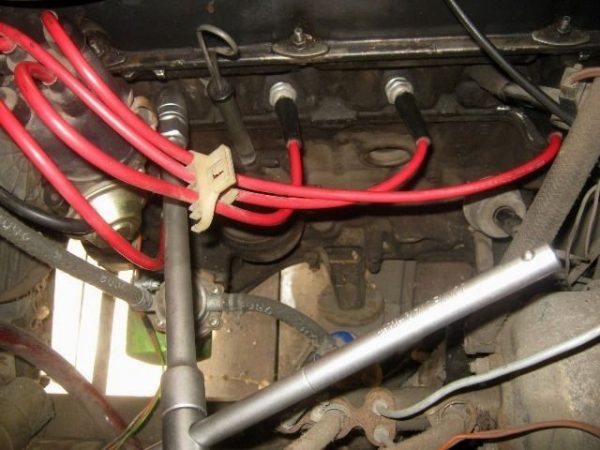
BB wires
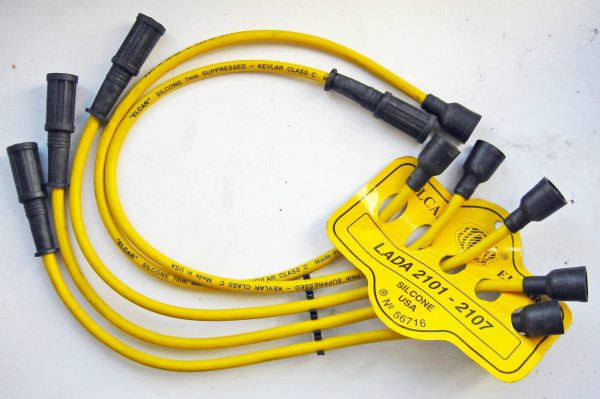
High voltage wires (HV wires) of the ignition system are designed to transmit high voltage pulses from the ignition coil to the spark plugs. Structurally, such a cable is a metal central conductor, covered with a layer of insulation made of PVC, rubber or polyethylene, as well as a special layer that increases the resistance of the wire to chemical attack (fuel, oil). Today, silicone BB wires are widely used, which are characterized by high elasticity at low temperatures. These cables work great in wet weather and do not overheat.
Malfunctions
The occurrence of problems with candle wires manifests itself in the form of unstable operation of the power unit:
- problem starting the engine, especially in wet weather;
- interruptions in the operation of the power plant at medium and high speeds;
- if the center conductor is damaged, the motor stalls;
- power is reduced;
- fuel consumption increases.
Problems with high-voltage wires arise mainly due to aging. Over time, the insulating layer becomes covered with small cracks, which is due to temperature differences in the engine compartment. As a result, current leakage appears through the damaged areas: a spark breaks through to ground and there is not enough electricity for normal sparking. When dirt accumulates on the surface of wires and protective caps, the surface conductivity of the insulation increases, which leads to current leakage. In addition, leakage is also possible when the cable contacts are oxidized, when the tightness of the protective cap is broken, for example, if it is damaged.

How to check
Before proceeding to a more detailed diagnosis of explosive wires, you need to inspect them for damage, such as cracks, fractures, tears in protective caps, etc. After that, you can resort to one of the following methods:
- Use a known-good cable. To do this, turn off the BB wires in turn, replacing them with a spare one. If stable operation of the motor resumes, this will indicate a damaged element.
- Wait until dark. When darkness comes, open the hood and start the engine. In the event of a cable breakdown, a spark will be clearly visible on the faulty element.
- Connect an extra wire. To do this, use an insulated piece of cable, stripping both ends. We close one of them to ground, the second we draw along the spark plug wire, especially in places of bends and caps. If the high-voltage cable breaks through, then a spark will appear in the problem area between the additional wire.
- Diagnostics with a multimeter. Using the device, we determine the resistance of the cables by selecting the ohmmeter mode. Having disconnected the wires from the ignition coil and the distributor, we measure the resistance one by one. For a working wire, the readings should be about 5 kOhm. If the central vein breaks, the values \uXNUMXb\uXNUMXbwill be missing.
If any kind of malfunctions with spark plug wires are detected, it is necessary to replace them, and not only the problem cable, but the entire set.
Video: diagnostics of high-voltage wires

What to put
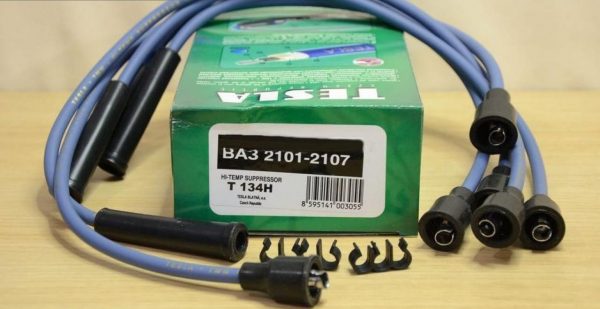
The choice of explosive wires is a responsible event, since they directly affect the performance of the power plant, and a high price is far from always an indicator of quality. It is best to give preference to candle wires with a copper central core. The resistance should be about 4 kOhm. Wires with zero resistance lead to the rapid burnout of the central electrode of the candle and its premature failure. When choosing, you should pay attention to such manufacturers:
- I TAKE;
- NGK;
- PARTS-MALL;
- AMD;
- Bremen;
- Tesla Technics.
Spark plug
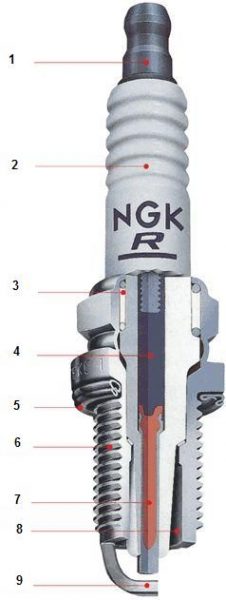
Along with high-voltage wires in the ignition system, candles are an important component. A four-cylinder engine is installed on the VAZ 2105, so candles are used in the amount of four pieces - one per cylinder. The purpose of the candle elements is to ignite the combustible mixture in the combustion chamber of the engine, i.e., the formation of a spark between the central and side electrodes due to the high voltage applied. Structurally, this part consists of the following parts:
- contact rod;
- insulator;
- seals;
- resistor;
- threaded part;
- sealing washer;
- housing;
- center and side electrodes.
To date, candles go 30 thousand km. and more. However, you need to understand that their service life depends on the quality of the fuel used and the products themselves, as well as on the driving style of the car owner.
Malfunctions
Problems with candles are accompanied by the following symptoms:
- Difficulty starting the engine when cold. This phenomenon is due to the formation of condensate on cold candles, a large gap between the electrodes, as well as a decrease in battery capacity, which is especially felt in cold weather;
- increased fuel consumption. Due to incomplete ignition of the mixture in the problem cylinder, power is reduced, to replenish which excess fuel is supplied to other cylinders;
- noise when the engine is idling during warm-up;
- wet candles;
- a decrease in power indicators, since the engine does not develop speed.
How to check
You can identify malfunctions of candles in different ways, so each of them should be discussed in more detail.
Visual inspection
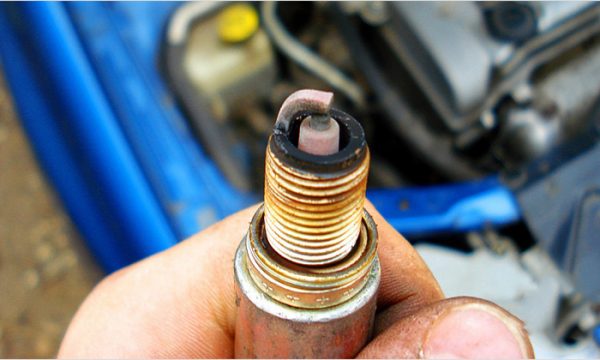
Inspection of the external condition of the candles allows you to determine not only the faulty part, but also identify problems with the engine itself. Depending on the color and nature of the soot on the candle, this may indicate the following:
- brown - a working element with a correctly set gap;
- dry soot - a rich combustible mixture is supplied to the cylinders or a late ignition is set. There are misfires in the ignition, starting the engine is difficult, the operation is unstable. It is necessary to check the correct installation of the ignition and the condition of the air filter;
- oil deposits - the main cause is oil getting into the combustion chamber. This indicates wear on the valve stem seals, valve guides or piston rings. With such a malfunction, the engine also starts with difficulty, the work is accompanied by twitches. In this case, repair of the cylinder head or piston group of the motor is required;
- plaque containing metal particles - the use of gasoline with additives. Over time, these formations lead to misfiring, power loss and increased fuel consumption. The plaque is not removed mechanically, which requires the installation of new candle elements and a change in the place of refueling;
- melted electrodes - early ignition. It is necessary to correctly set the lead angle, check the candles for compliance with the type.
In addition to the listed states of the candle elements, cracks or chips in the insulator can be detected. Such a breakdown can damage the piston.
Automakers recommend checking spark plugs at least once a year.
Sequential disconnection of BB wires
The procedure involves sequentially disconnecting the spark plug wires from the spark plugs with the engine running. If, when disconnecting the wire, it is revealed that the operation of the engine has not changed, then the problem is in the candle or wire on this cylinder. With obvious changes in the operation of the engine, the wire must be reinstalled and diagnostics continued.
This test method should only be used on a car with contact ignition. If the wires are disconnected on a contactless system, the ignition coil may fail.
Video: checking spark plugs on a running engine

Spark test
If the previous diagnostic option did not give results, you should resort to the second method. To do this, you will need to follow these steps:
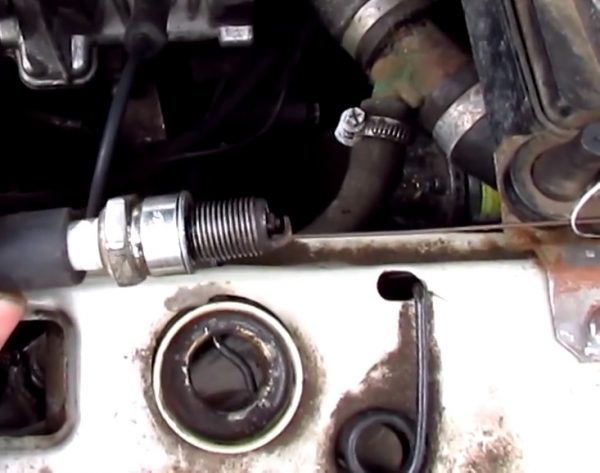
- Unscrew the spark plug from the cylinder head and attach the BB wire to it.
- Lean the spark plug body against a ground, for example, on the engine block.
 We connect the threaded part of the candle to the engine or ground
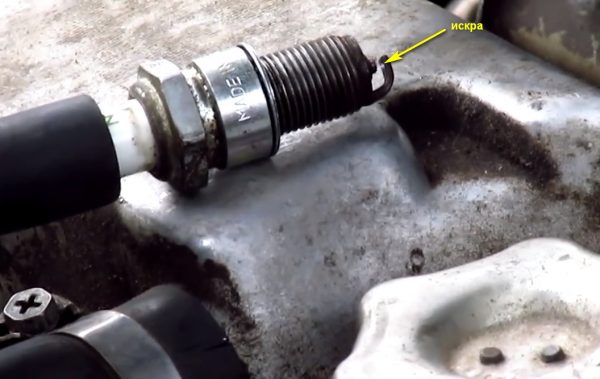
 - Switch on the ignition and crank the starter.
- A powerful spark should jump between the contacts of the candles. If this does not happen or the spark is too weak, the part has become unusable and needs to be replaced.If you turn on the ignition and lean the unscrewed candle on the ground, a spark should jump on it when turning the starter
Multimeter
There is an opinion among car owners that spark plugs can be checked with a multimeter. In fact, it is impossible to do this. The only thing such a device can help is to detect a short circuit inside the element. To do this, you will need to select the resistance measurement mode and connect the probes to the contacts of the candle. If the resistance is less than 10–40 MΩ, this will indicate a leak in the insulator.
Special pistol
With the help of a special gun, you can determine the problem of the candle most accurately. The tool allows you to create the same conditions under which the candle element works inside the cylinder. The check is performed as follows:
- We unscrew the spark plug from the engine.
- We insert it into the gun according to the instructions for the device.
- We press the trigger.
- When the indication appears, the candle is considered to be operational. If there is no glow, the part needs to be replaced.
Video: diagnosis of candles with a gun

What to put
The main parameter of spark plugs is the glow number, which indicates the ability of the spark plug to remove heat and independently clean itself of deposits during operation. Depending on the incandescent number, the elements under consideration, according to the Russian classification, are divided into:
- hot (11–16). The most common application is low power and low compression engines;
- standard (17–19). Candles, which are most widely used and are also used on the "classic";
- cold (20-26) - the opposite of hot elements, since they are used on powerful power units with a high compression ratio.
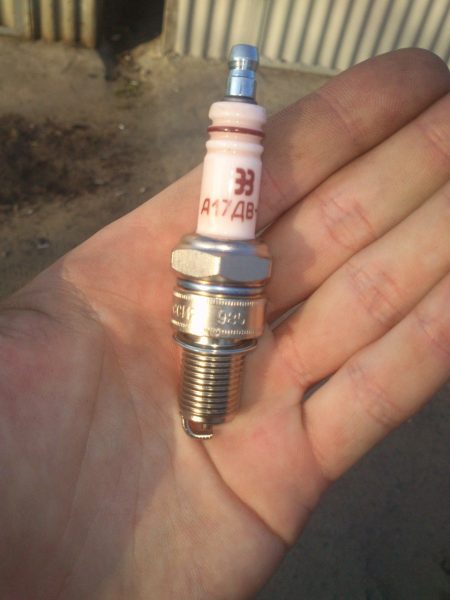
If, on the VAZ 2105, candles are installed that are not suitable for the glow number, the power plant will not be able to produce maximum efficiency. It is worth considering that the Russian classification of candles and foreign ones differ from each other, plus, each manufacturer applies its own marking. Therefore, when choosing and purchasing the elements under consideration for the “five”, tabular data should be taken into account.
Table: designation of spark plugs depending on the manufacturer, ignition system and power supply
| Type of power supply and ignition system | According to Russian classification | NGK, Japan | Bosch, Germany | I take Germany | Brisk, Czech Republic |
| Carburetor, mechanical contacts | A17DV, A17DVM | BP6E | W7D | W7D | L15Y |
| Carburetor, electronic | A17DV-10, A17DVR | BP6E, BP6ES, BPR6E | W7D, WR7DC, WR7DP | 14–7D, 14–7DU, 14R-7DU | L15Y,L15YC, LR15Y |
| Injector, electronic | A17DVRM | BPRX NUMXES | WR7DC | 14R7DU | LR15Y |
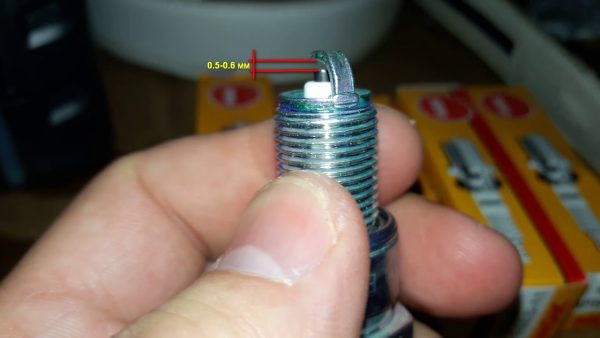
Gap of contacts of candles
One of the parameters of spark plugs, on which the stable operation of the motor depends, is the gap between the contacts. It is determined by the distance between the central and lateral contact. Incorrect installation results in the following:
- problematic launch;
- decrease in dynamic characteristics due to improper ignition and combustion of the mixture;
- increase in fuel consumption.
The contact gap of the candles on the VAZ 2105 is selected according to the installed ignition system:
- contact - 0,5–0,6 mm;
- non-contact - 0,7–0,8 mm.
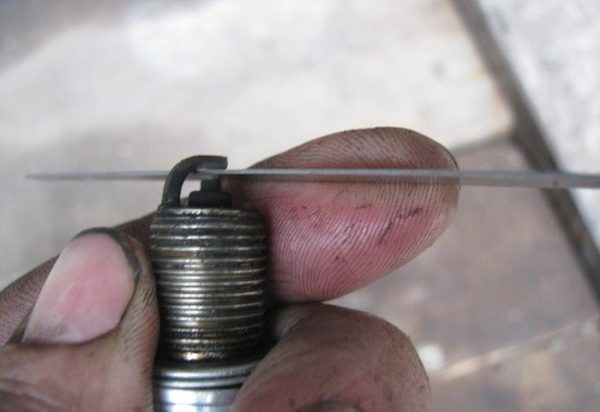
The parameter in question is adjusted using a set of probes and a candle key in the following sequence:
- We unscrew the candles from the cylinder head with a key.We remove the wire and unscrew the candle
- In accordance with the installed ignition system, we select the probe and place it between the electrodes of the candle. The tool should enter with some effort.We check the gap between the contacts of the candles with a feeler gauge
- If the gap differs from the norm, we bend or bend the side contact, setting the desired value.
- In the same way, we check and adjust the gap on all candles.
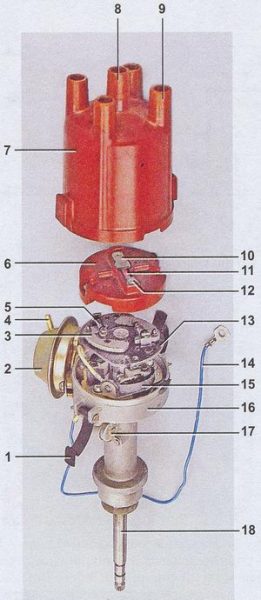
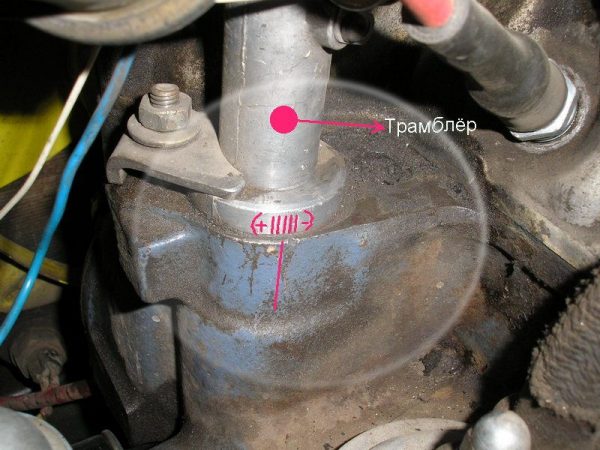
contact distributor
The distributor is a device by which the moment of spark formation is determined. In addition, the mechanism distributes the spark to the engine cylinders. The main functions that the ignition distributor performs are:
- interruption of the low-voltage circuit of the ignition system;
- distribution of energy between candles.
The contact ignition system (KSZ) or contact distributor got its name due to the fact that the primary circuit is broken by means of mechanical contacts mounted inside the device. Such a distributor was originally installed on the VAZ 2105 and other classic Zhiguli. It is driven by a shaft that rotates from the mechanisms of the motor. A cam is located on the shaft, from the influence of which the contacts close and open.
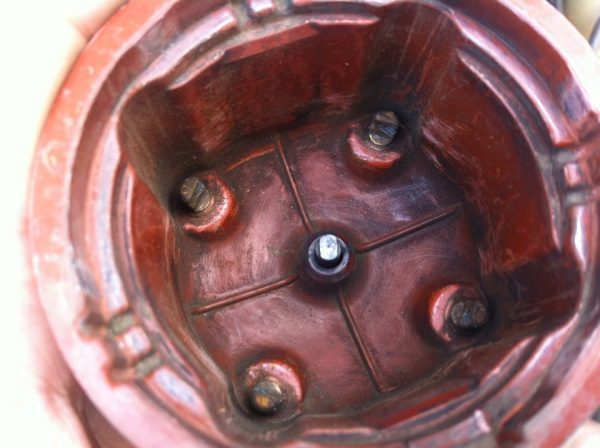
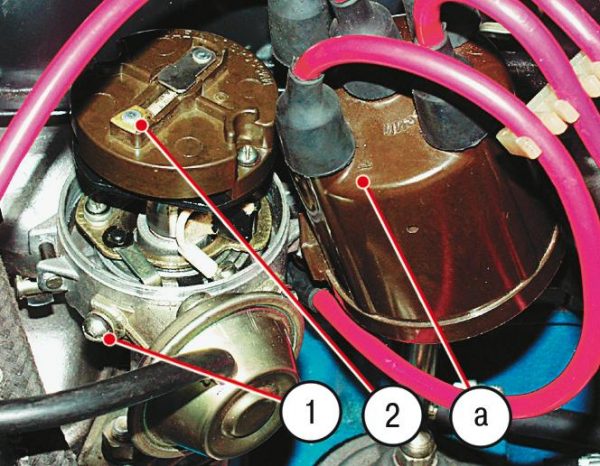
inspection
Like any part of the car, the ignition distributor wears out over time, which affects the operation of the engine. This is expressed in a problematic start, twitching, increased fuel consumption, loss of dynamics. Since such signs generally indicate problems with the ignition system, before proceeding to check the distributor, you need to make sure that the remaining elements (candles, wires) are in good condition. The main parts on which the formation and distribution of a spark depend are the cover and the contact group, so their diagnosis should be dealt with first.
First, inspect the cover of the node in question. If cracks are found, the part is replaced with a good one. Burnt contacts are cleaned with sandpaper.
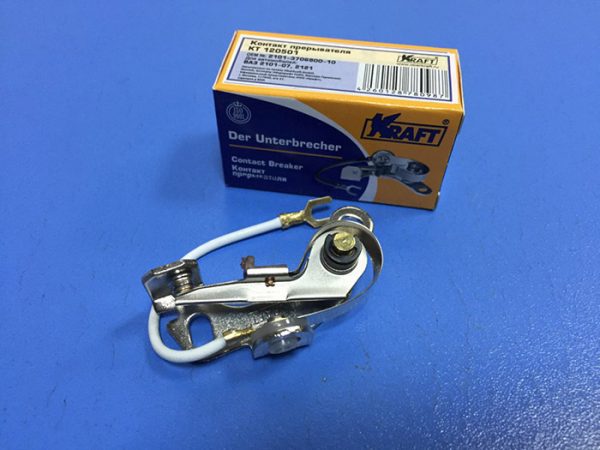
The contact group of mechanical distributors is the “sore spot” of the classic Zhiguli, since the part constantly burns out and needs to be adjusted. Burnt contacts are inspected and cleaned. In case of severe damage, they are changed.
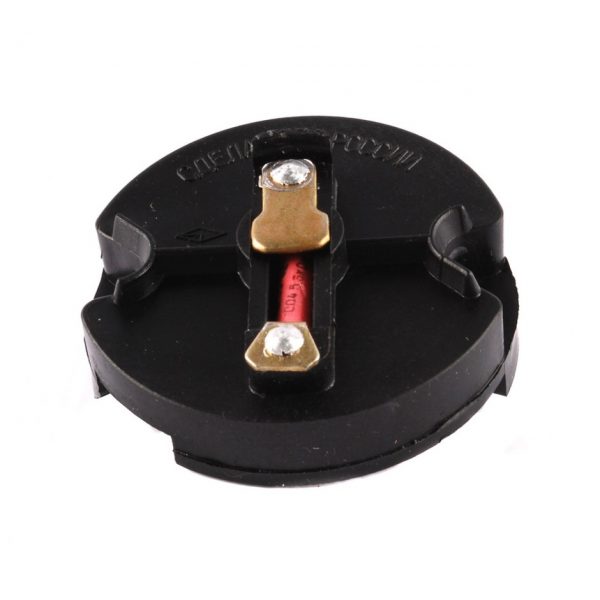
In addition, you should inspect the distributor slider and check the resistor with a multimeter: it should have a resistance of 4-6 kOhm.
Contact gap adjustment
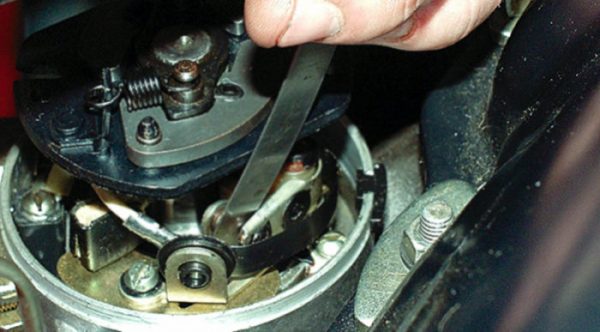
The gap between the contacts is determined in the open state using probes. The adjustment is carried out as follows:
- We remove the cover of the distributor and turn the crankshaft to a position in which the gap between the contacts will be maximum.
- Using a feeler gauge, we check the gap, which should be in the range of 0,35–0,45 mm.We check the gap between the contacts with a probe
- If the gap differs from the norm, use a flat screwdriver to unscrew the fastening of the contact group.
- Unscrew the adjusting screw.
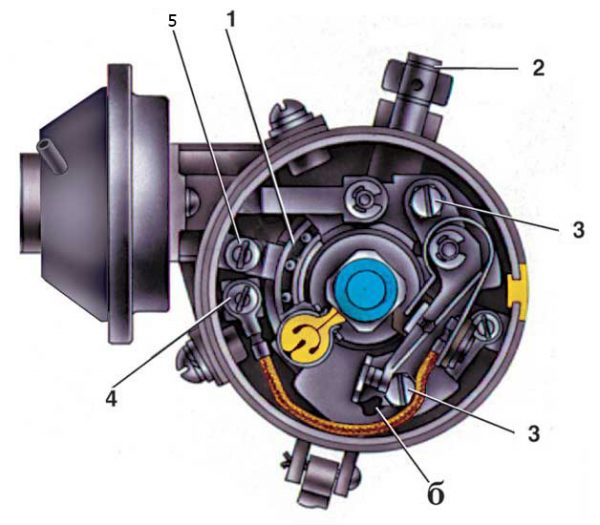
- By moving the contact plate, we select the desired gap, after which we clamp the mount.View of the distributor from above: 1 - bearing of the movable breaker plate; 2 - oiler housing; 3 - screws for fastening the rack with breaker contacts; 4 - terminal clamp screw; 5- bearing retainer plate; b - groove for moving the rack with contacts
- We make sure that the gap is set correctly, we tighten the fixing screw of the contact group.After adjusting and checking the gap, it is necessary to tighten the adjusting and fixing screws
Contactless distributor
The non-contact ignition system is a modernized KSZ. Its main difference is the absence of a contact group, instead of which a Hall sensor is used. The advantages of such a distributor are:
- no need for periodic adjustment;
- more reliable engine start;
- reduced fuel consumption;
- power increase.
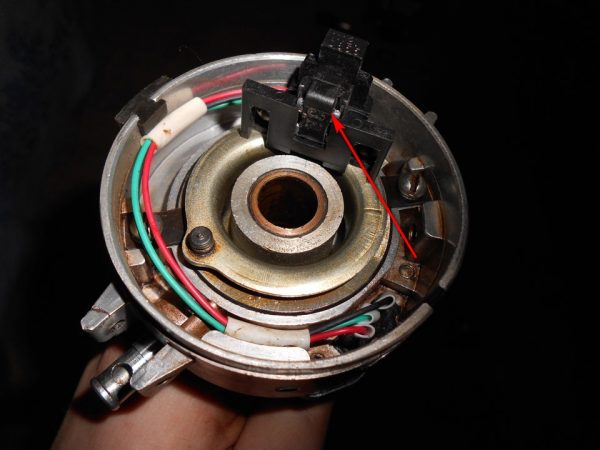
The Hall sensor is mounted on the distributor shaft. Structurally, it consists of a permanent magnet, in which there is a special screen with slots. The number of slots generally corresponds to the number of cylinders. As the shaft rotates, the openings of the screen move past the magnet, causing changes in its field. During the operation of the ignition distributor, the sensor reads the shaft speed, and the received data is fed to the switch, through which the signal is converted into current.
inspection
Checking the contactless mechanism repeats the same steps as with the contact system, excluding the contact group. In addition to the cover and slider, problems may arise with the switch. The main sign indicating problems with it is the absence of a spark on the candles. Sometimes a spark may be present, but very weak or intermittently disappear. At the same time, the engine runs intermittently, stalls at idle, and power is reduced. The same problems can occur if the Hall sensor fails.
Switch
The easiest way to test a switch is to swap it with a known good one. Since this possibility is far from always available, another diagnostic option is also possible.
Before starting the test, you must make sure that the ignition coil is powered, the Hall sensor is in working condition. Of the tools you will need a test lamp and a standard set of keys. We check the switch in the following sequence:
- Turn off the ignition.
- We turn off the nut on the contact of the coil "K" and disconnect the brown wire.
- We connect the control into the gap between the removed wire and the coil contact.
- We turn on the ignition and scroll the starter. The light indicator will indicate the health of the switch. If there is no glow, the switch will need to be replaced.
Video: checking the ignition distributor switch

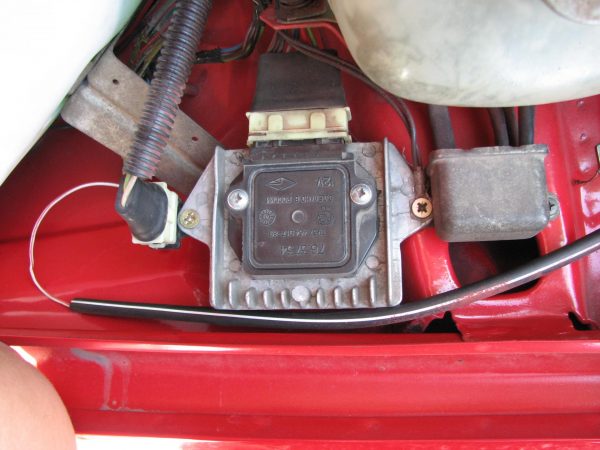
To replace the switching device, it is enough to unscrew the mount to the body, disconnect the connector and install a serviceable part in place of the non-working part.
Hall Sensor
The sensor is located inside the distributor, so you have to remove the cover to access it.
You can check the item in several ways:
- replace the sensor with a known good one;
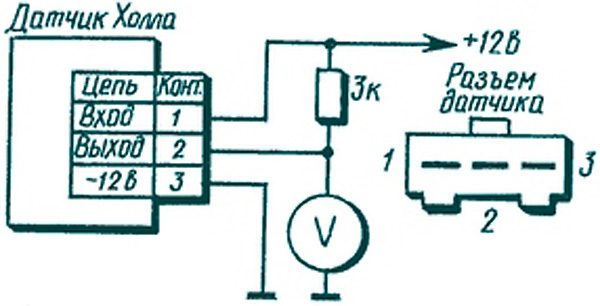
- check the voltage at the output of the element with a multimeter, which should be 0,4–11 V;You can check the Hall sensor with a multimeter by connecting the device to the output of the device
- assemble a circuit that simulates the operation of the sensor by closing contacts 3 and 6 between them, going to the device being diagnosed (the appearance of a spark will indicate a malfunction of the part).
Setting the lead angle
If repair work was carried out with the VAZ 2105 ignition distributor or the device was replaced, adjustment is required after it is installed on the car. This can be done in different ways, which depend on the conditions and the tool at your disposal. Before starting the adjustment process, you need to know that the engine cylinders work in the following order: 1-3-4-2, counting from the crankshaft pulley.
control
For this method, you will need the following tools and fixtures:
- control lamp for 12 V with two wires;
- key 13 and 38 for cranking the crankshaft.
The adjustment is made with the engine turned off and consists of the following steps:
- Remove the cover from the ignition distributor.
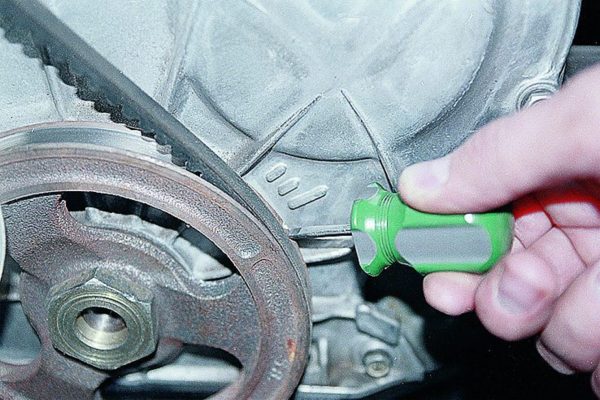
- We rotate the crankshaft until the moment when the mark on the pulley coincides with the average risk on the front of the engine.Before adjusting the ignition, it is necessary to align the marks on the crankshaft pulley and the front cover of the engine
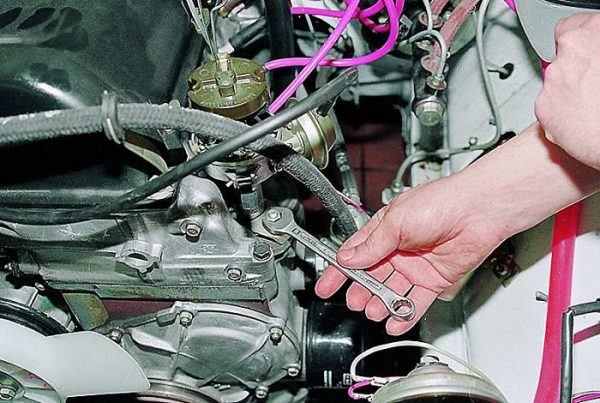
- With a key of 13, we loosen the fastening of the distributor.Before adjusting the ignition, it is necessary to loosen the distributor mounting nut
- We connect one wire from the lamp to ground, the other is connected to the low voltage circuit in the distributor.
- We turn on the ignition by turning the key in the lock, and rotate the device left and right, achieving the light bulb indication. When it lights up, we fix the distributor with the appropriate fasteners.
More precisely, the ignition is adjusted on the move, since the required ignition timing directly depends on the quality of the fuel.
Video: setting the ignition on the control light

by ear
The simplest and most affordable option for setting the ignition is by ear. This method is especially indispensable in the field. The adjustment consists of the following:
- We start the engine.
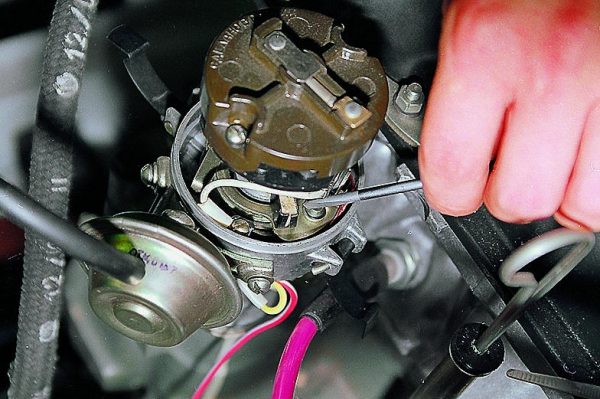
- Slightly unscrew the distributor mount, holding the device from scrolling by hand.
- We are trying to turn the distributor to one side.When adjusting, the distributor is rotated to the right or left
- We find a position in which the engine runs at maximum speed.
- Turn the distributor a little clockwise.
- We clamp the fastening of the mechanism.
Video: installing the ignition "Lada" by ear

By spark
The sequence of actions when setting the spark advance angle consists of the following steps:
- We install the crankshaft according to the marks, as in paragraph 2 when adjusting with a light bulb, while the distributor slider should be directed towards the first cylinder. If he looks at the fourth cylinder, then you need to crank the crankshaft again.The position of the distributor slider: 1 - distributor screw; 2 - the position of the slider on the first cylinder; a - the location of the contact of the first cylinder in the cover
- We take out the central cable from the cover of the distributor and place the contact near the ground.
- We loosen the distributor mount, turn on the ignition and turn the mechanism until a spark jumps between the explosive wire and the mass.
- We gradually move the distributor counterclockwise and find the position at which the spark will not appear, after which we fix the distributor.
By stroboscope
You can most accurately set the ignition timing on the “five” using a stroboscope. The adjustment technique consists of the following steps:
- Slightly unscrew the fasteners of the distributor.
- We connect the negative contact of the device to ground, plus we connect it to the low-voltage part of the ignition coil, and we fix the stroboscope clamp to the cable of the first cylinder.
- We start the engine and turn on the device, pointing it to the crankshaft pulley. With such actions, the label will be noticeable.
- We turn the distributor and achieve the coincidence of the mark from the strobe and the risks on the engine.
- We control the engine speed, which should be 800–900 rpm.
- We fix the adjustable mechanism.
Video: setting the strobe lead angle

The serviceability of each of the elements of the ignition system has a direct impact on the functioning of the engine. Therefore, their verification should be periodically paid attention. If the motor malfunctions, you need to be able to find the cause of the malfunction and eliminate it. To do this, it is enough to prepare a minimum list of tools, familiarize yourself with the step-by-step actions and perform them in the course of work.

