Car body welding: how to do it yourself
Content
The service life of modern car bodies cannot be called long. For domestic cars, it is a maximum of ten years. The bodies of modern foreign cars live a little longer - about fifteen years. After this period, the car owner will inevitably begin to notice signs of destruction, with which something will need to be done. In addition, the body can be damaged during an accident. Whatever the reason, the solution is almost always the same: boil. If you are confident in your abilities, you can try to do the welding of the car body with your own hands.
Content
- 1 Types and features of welding machines
- 1.1 Semiautomatic welding
- 1.2 How to cook with an inverter
- 1.3 So which method should you choose?
- 2 Preparation and verification of equipment
- 2.1 Preparing for semi-automatic welding of a car body
- 2.2 What should be done before starting an inverter
- 3 Welding Precautions
- 4 Semi-automatic car body welding process
- 4.1 DIY tools and materials
- 4.2 Sequence of operations for semi-automatic welding
- 4.3 Weld seam treatment against corrosion
Types and features of welding machines
The choice of welding technology depends not so much on the machine and consumables, but on the location of the damage. Let's take a closer look.
Semiautomatic welding
The vast majority of car owners and car service employees prefer to use semi-automatic machines. The main reason for their popularity is convenience. With a semi-automatic device, you can cook even the smallest damage located in the most inconvenient places on the car body.
Technically, this technology is almost the same as traditional welding: a semi-automatic device also requires a current converter. The only difference is in the consumables. This type of welding does not require electrodes, but a special copper-coated wire, the diameter of which can vary from 0.3 to 3 mm. And the semi-automatic machine needs carbon dioxide to work.
The copper on the wire provides reliable electrical contact and acts as a welding flux. And carbon dioxide, continuously supplied to the welding arc, does not allow oxygen from the air to react with the metal being welded. The semi-automatic has three important advantages:
- the wire feed speed in the semiautomatic device can be adjusted;
- semi-automatic seams are neat and very thin;
- you can use a semiautomatic device without carbon dioxide, but in this case you will have to use a special welding wire, which contains a flux.
There are also disadvantages in the semi-automatic method:
- it is not so easy to find the above electrodes with flux on sale, and they cost at least twice as much as usual;
- when using carbon dioxide, it is not enough to get the cylinder itself. You will also need a pressure reducer, which will need to be very accurately adjusted, otherwise you can forget about high-quality seams.
How to cook with an inverter
In short, the inverter is still the same welding machine, only the current conversion frequency in it is not 50 Hz, but 30–50 kHz. Due to the increased frequency, the inverter has several advantages:
- the dimensions of the inverter welding machine are very compact;
- inverters are insensitive to low mains voltage;
- inverters have no problems with ignition of the welding arc;
- even a novice welder can use the inverter.
Of course, there are also disadvantages:
- in the welding process, thick electrodes with a diameter of 3–5 mm are used, and not wire;
- during inverter welding, the edges of the metal being welded are very hot, which can cause thermal deformation;
- the seam always turns out thicker than when welding with a semi-automatic device.
So which method should you choose?
The general recommendation is simple: if you plan to weld a section of the body that is in plain sight, and the car owner is not constrained by funds and has some experience with a welding machine, then a semiautomatic device is the best option. And if the damage is not visible from the side (for example, the bottom was damaged) and the owner of the machine is poorly versed in welding, then it is better to cook with an inverter. Even if a beginner makes a mistake, its price will not be high.
Preparation and verification of equipment
Regardless of which welding method has been chosen, a number of preparatory operations must be carried out.
Preparing for semi-automatic welding of a car body
- before starting work, the welder must make sure that the guide channel in the welding torch matches the diameter of the wire used;
- the diameter of the wire must be taken into account when choosing a welding tip;
- the nozzle of the apparatus is inspected for metal splashes. If they are, they must be removed with sandpaper, otherwise the nozzle will quickly fail.
What should be done before starting an inverter
- reliability of electrode fastenings is carefully checked;
- the integrity of the insulation on the cables, all connections and on the electric holder is checked;
- the reliability of fastenings of the main welding cable is checked.
Welding Precautions
- all welding work is carried out only in dry overalls made of non-combustible materials, gloves and a protective mask. If welding is carried out in a room with a metal floor, it is mandatory to use either a rubberized mat or rubber overshoes;
- the welding machine, regardless of its type, must always be grounded;
- in inverter welding, special attention should be paid to the quality of the electrode holder: good electrode holders can withstand up to 7000 electrode clips without damaging the insulation;
- regardless of the type of welding machine, circuit breakers should always be used on it, which independently break the electrical circuit when an idling current occurs;
- The room in which welding is carried out must be well ventilated. This will avoid the accumulation of gases released during the welding process and representing a particular danger to the human respiratory system.
Semi-automatic car body welding process
First of all, let's decide on the necessary equipment.
DIY tools and materials
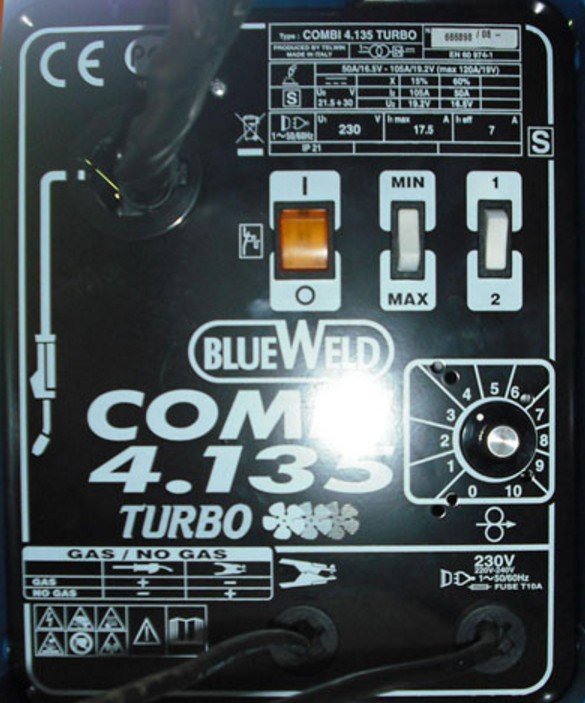
- Semi-automatic welding machine BlueWeld 4.135.
- Welding wire with copper coating, diameter 1 mm.
- Large sandpaper.
- Reducer for pressure reduction.
- Cylinder of carbon dioxide with a capacity of 20 liters.
Sequence of operations for semi-automatic welding
- before welding, the damaged area is cleaned of all contaminants with sandpaper: rust, primer, paint, grease;
- the welded metal sections are tightly pressed against each other (if necessary, it is allowed to use various clamps, temporary bolts or self-tapping screws);
- then you should carefully read the front panel of the welding machine. There are: a switch, a welding current regulator and a wire feed speed regulator;

Location of switches on the front panel of the BlueWeld welder
- now the reducer is connected to the carbon dioxide cylinder as shown in the photo;
The reduction gear is connected to a carbon dioxide cylinder
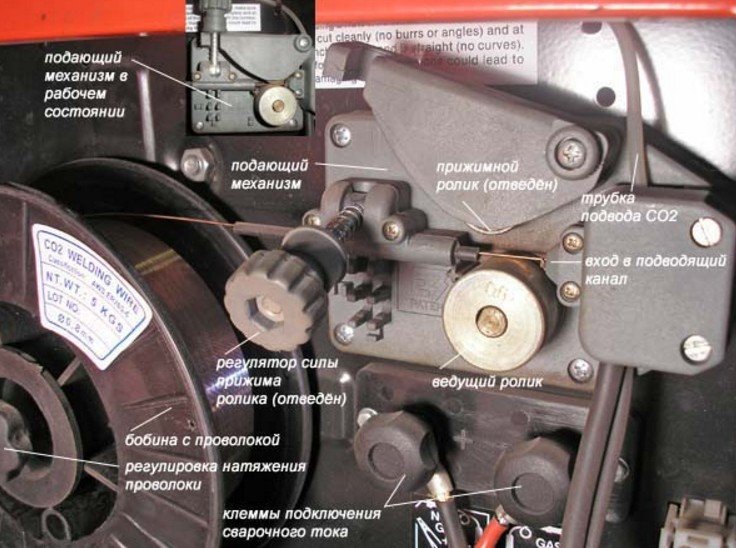
- the bobbin with welding wire is fixed in the apparatus, after which the end of the wire is wound into the feeder;
Welding wire is fed into the feeder
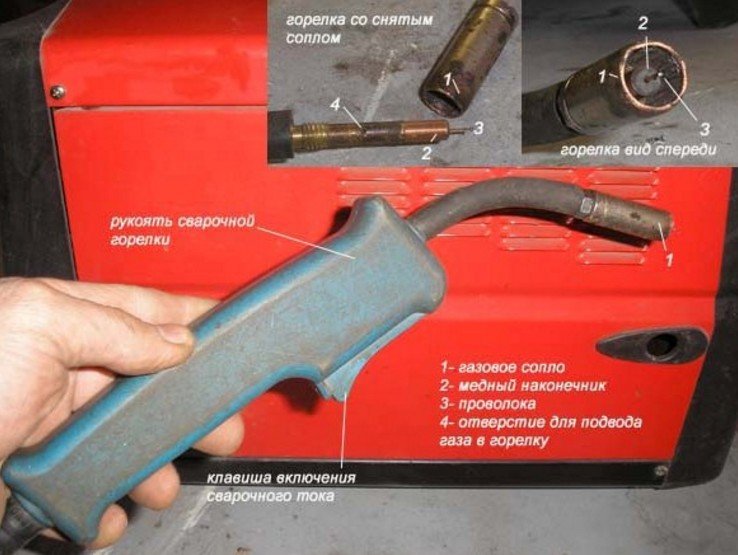
- the nozzle on the burner is unscrewed with pliers, the wire is threaded into the hole, after which the nozzle is screwed back;
Removing the nozzle from the welding torch
- after charging the device with a wire, using the switches on the front panel of the device, the polarity of the welding current is set: the plus should be on the electrode holder, and the minus on the burner (this is the so-called direct polarity, which is set when working with copper wire. If welding is done with ordinary wire without a copper coating , then the polarity must be reversed);
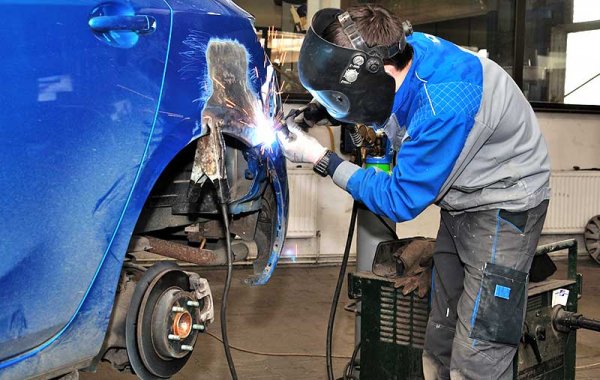
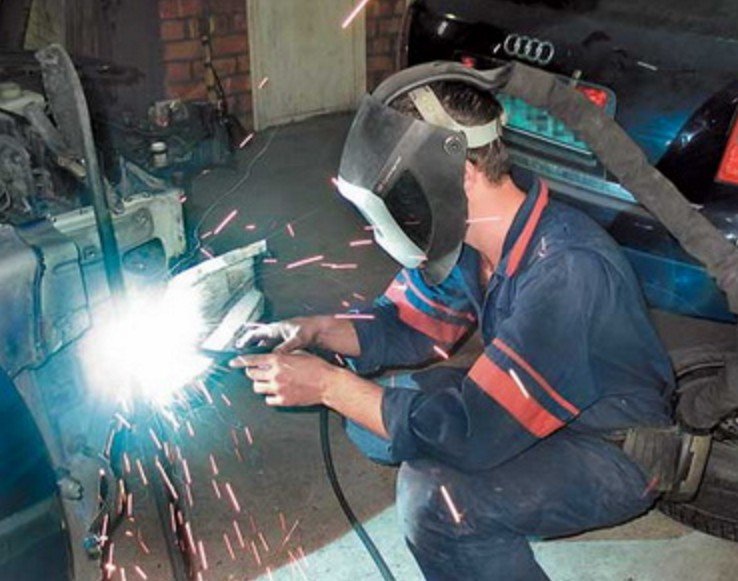
- the machine is now connected to the network. The torch with the electrode holder is brought to the previously prepared area to be welded. After pressing the button on the electrode holder, the hot wire begins to move out of the nozzle, at the same time the supply of carbon dioxide opens;
The process of welding a car body with a semi-automatic machine
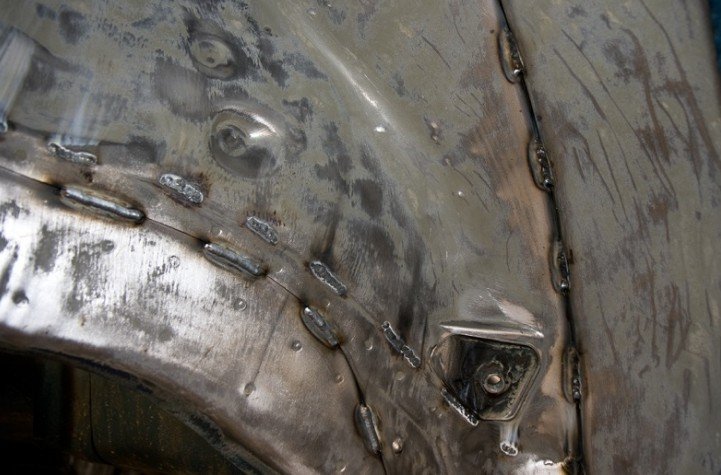
- if the weld is long, then welding is done in several stages. First, the area to be welded is “tacked” at several points. Then 2-3 short seams are made along the connection line. They should be 7-10 cm apart. These seams should be allowed to cool for 5 minutes;
Several short pre-seams
- and only after that the remaining sections are finally connected.
The edges of the damaged body are permanently welded

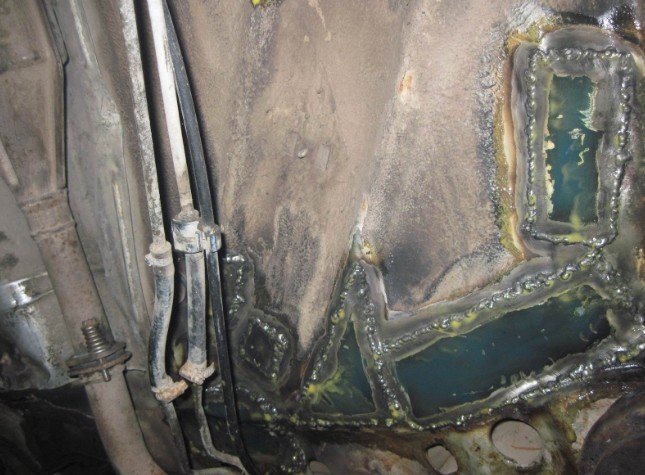
Weld seam treatment against corrosion
At the end of welding, the seam must be protected, otherwise it will quickly collapse. The following options are possible:
- if the seam is out of sight and in an easily accessible place, then it is covered with several layers of automotive seam sealant (even a budget one-component option, such as Body 999 or Novol, will do). If necessary, the sealant is leveled with a spatula and painted;
- if the weld falls on an internal hard-to-reach cavity that needs to be processed from the inside, then pneumatic preservative sprayers are used. They consist of a pneumatic compressor, a spray bottle for pouring a preservative (such as Movil for example) and a long plastic tube that goes into the treated cavity.
So, you can weld a damaged body yourself. Even if a beginner has absolutely no experience, you should not be upset: you can always practice on pieces of scrap metal first. And special attention should be paid not only to personal protective equipment, but also to fire safety equipment. A fire extinguisher should always be at hand for a novice welder.
3 comment
Sayyed
What do these obscene pictures have to do with the car and the topic of the article?
Remove it, shame on you
anonym
What are these other pictures, please do not broadcast them
Mamad
They are very good and refreshing