
Do-it-yourself seat heating installation - tips and tricks!
Content
In autumn and winter, traditional car heating is not enough for many drivers. The additional seat heating creates additional comfort and a pleasant atmosphere while driving. In this article, you can read all about retrofitting heated seats in older cars.
Is it even possible and worth retrofitting heated seats?
Regardless of the year of manufacture and model range, adding the comfort of seat heating is possible in any car. The main question is how much money are you willing to spend and what type of heated seats you buy on them. There are several options for heating your car seat during the cold season, and you'll need to weigh your preference for upgrading your car against the cost.
Particularly in very old vehicles with a limited lifespan before being thrown into a landfill, complex retrofitting is unlikely to make sense. In this case, it is better to use simple solutions such as seat covers. In newer vehicles, it is possible to replace or adapt the seat, since all modern car manufacturers have model ranges with heated seats and are therefore technically suitable for retrofitting with their accessories.
What versions of seat heating are available?
For driving in the winter months with comfort heating You have a choice of three seat heating options:
| – Removable cover with heated seat – Built-in heated seat mats – Seat replacement |
Using seat covers is a very simple and cheap way to heat seats. Cables can get in the way since these covers work through the cigarette lighter. The integration of a layer of heated metal or carbon fibers is technically the most difficult option, although it makes the best impression when professionally executed. Replacing the seat with a heated model is the most expensive solution if you choose a new article from a branded manufacturer. Another option is to visit the landfill. Here you can find the heated seat for your series. Another thing is if he still looks presentable.

Do-it-yourself installation or in the garage?
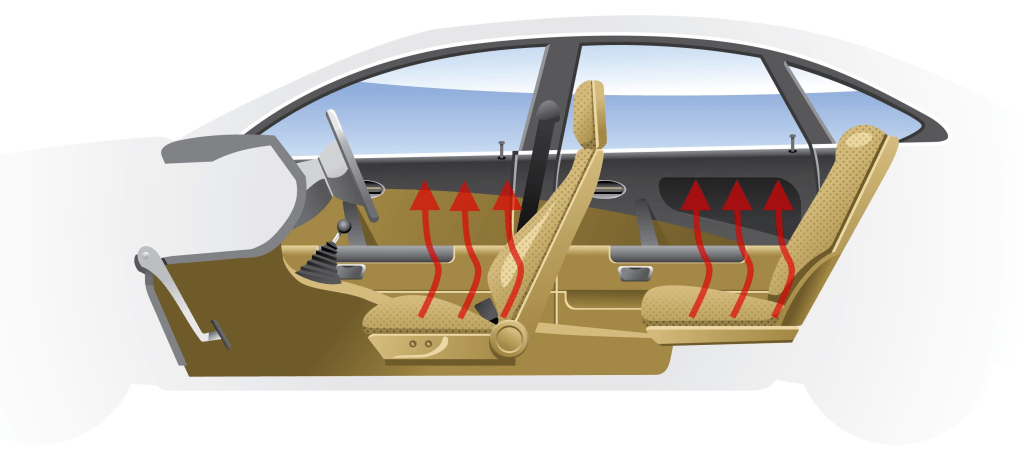
Installing a simple heated seat cushion is easy . Installing heated seat mats requires a great deal of knowledge and skill. The main problem is the seat side airbags. Built-in rugs should not interfere with them. The airbags will no longer be able to perform their function, resulting in a loss of safety in the passenger compartment. At worst, the airbags themselves can become a safety hazard.
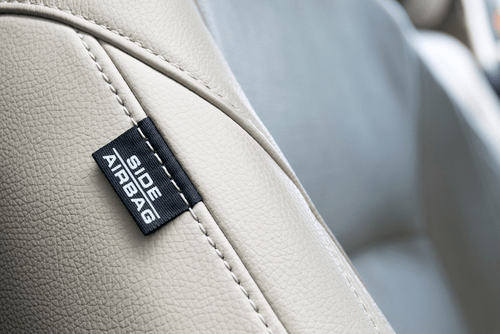
If your old car's seats are equipped with side airbags retrofitting must be agreed with a professional. Difficulties arise only when the seat heating is integrated into the seat. Wiring and connecting to automotive electronics can be compared to retrofitting with other electrical components. If you want to save money and avoid the hassle of going to the garage, you might be better off opting for removable heated cushions.
Our step-by-step guide to retrofitting heated seats
The exact steps to install a new seat heater depend on the vehicle model and the heater itself. However, the upgrade can be described regardless of the model in the following steps:
1) Removing the cover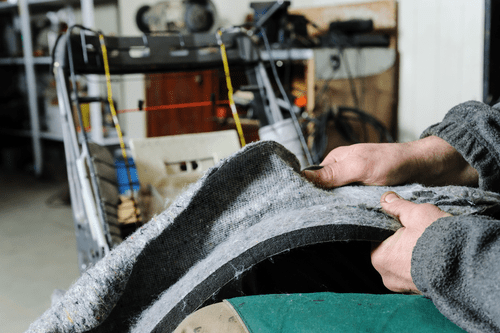 seats Car seats consist of two standard parts - the seat and the backrest. To integrate the heating elements, the cover of both parts must be removed. This is only possible if it is not a glued upholstery. Removing these covers and then installing them safe and sound is hardly possible and would require garage services. On all other models, the fabric or leather cover can be easily removed by sliding it over the zippered central filling. Then remove the center fillers from the seats, exposing the surfaces on which the heating mats are laid. |
2) Application and connection of seat heating Seat heaters are manufactured by the manufacturer for a range of seat sizes. They may need to be cut to size. It is very important to accurately mark the cutting, taking into account the exact course of the seating seam of the heating elements. When cutting, the side strips must remain continuous as they function as the positive and negative pole of the seat heating. The use of heating mats is provided by most manufacturers using double-sided adhesive tape, which in most cases is also included in the delivery. The run of the seating joint must first be covered with insulating tape and then laid in the corresponding joint. When it is in place, the seating seam should be shortened to prevent any contact with the positive or negative pole. If shortening is not possible, the seam needs additional insulation. |
| 3) Connection and verification In most models, the backrest heating elements are connected to the seat heating mat. Electricity is supplied from a battery with a typical current of five to ten amperes. Depending on the model, you have the choice between direct connection and relay connection. The corresponding wiring diagram is supplied with the heating elements. It is technically more difficult to wire with the corresponding switch in the dashboard. Unlike heater pads, which are connected via the cigarette lighter, it is preferable to hide the cables so that they do not pass through the interior. It may be necessary to extend the included cable for a neat flush connection. When the connection is correct, check the installed seat heating. The heating effect is only due to the accumulation of heat, so you or someone else must sit on the seat during the testing phase. Full performance can only be obtained with the engine running. Let yourself drive for a bit to check the operation of the heated seats and check the electronics when in doubt. |

Final tips for your new seat heating
– If you prefer heater pads to a real retrofit, choose OEM quality . Their format takes into account the presence of side airbags and is equipped with appropriate cavities. This certainty does not exist with cheap products.
– Regardless of the type of modernization, investment in a more advanced model can be justified. This guarantees an even distribution of heat over the entire surface of the seat. By doing so, you also increase the life expectancy of the seat heating, and after a few months it will not need to be replaced.
