
Do-it-yourself replacement, malfunctions and repair of the instrument panel VAZ 2101
Content
- Description of the torpedo on the VAZ 2101
- Dashboard VAZ 2101
- Malfunctions of the dashboard VAZ 2101
- Steering column switch VAZ 2101
One of the most important devices in the interior of any car is the dashboard, since it contains the necessary indicators and instruments that help the driver to drive the vehicle. It will be useful for the owner of the VAZ "penny" to get acquainted with possible improvements to the instrument panel, malfunctions and their elimination.
Description of the torpedo on the VAZ 2101
The front panel of the VAZ “penny” or dashboard is the front part of the interior trim with the instrument panel located on it, the air ducts of the heating system, the glove box and other elements. The panel is made of a metal frame with an energy-absorbing and decorative coating applied to it.
What torpedo can be put instead of the regular one
The front panel of the "penny" by today's standards looks boring and out of date. This is due to both the minimum set of devices, the shape, and the quality of the finish. Therefore, many owners of this model make a cardinal decision to replace the panel with a part from another car. There are actually a lot of options, but torpedoes from foreign cars look the most advantageous. The minimum list of models from which the front panel is suitable for the VAZ 2101:
- VAZ 2105–07;
- VAZ 2108–09;
- VAZ 2110;
- BMW 325;
- Ford Sierra;
- Opel Kadett E;
- Opel Vectra A
It is important to understand that the installation of a torpedo on the first Zhiguli model from any other car is inextricably linked with many improvements. Therefore, it will have to be cut somewhere, filed, adjusted, etc. If you are not afraid of such difficulties, then you can introduce the part in question from almost any foreign car.
How to remove
The need to dismantle a torpedo may arise for various reasons, such as repair, replacement or tuning. To work, you will need the following tools:
- Phillips and flat screwdrivers;
- open end wrench 10.
The sequence of actions is as follows:
- We remove the terminal from the negative battery.
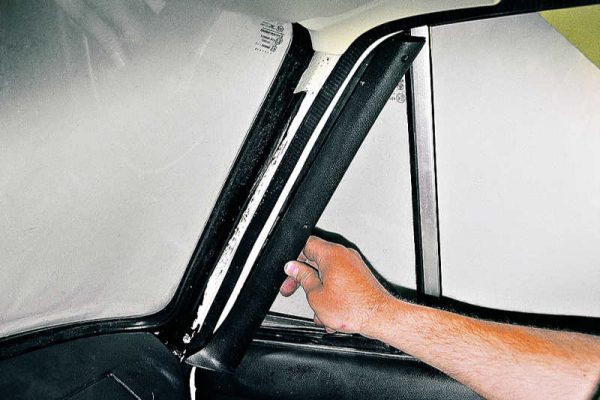
- We unscrew the mount and dismantle the decorative lining of the steering shaft and windshield pillars.
 We unscrew the mount and remove the decorative trim on the sides of the windshield
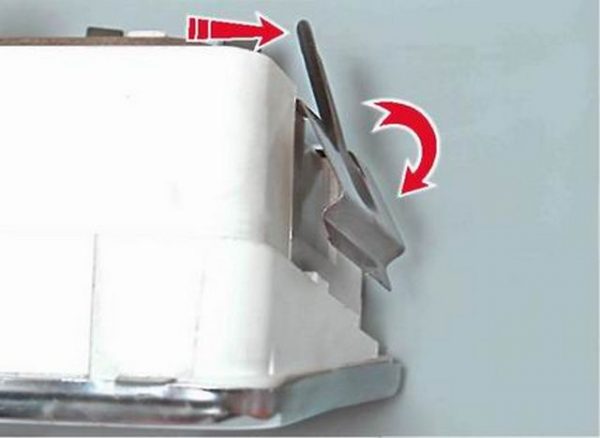
 - We carefully pry off the decorative element of the radio receiver socket with a screwdriver and through it we press with our hand on the right lock of the dashboard, after which we take out the shield, disconnecting the speedometer cable and connectors.We remove the speedometer cable, disconnect the pads, and then dismantle the dashboard
- With a flat screwdriver, pry off the stove switch, disconnect the wiring and remove the button.We pry off the heater button with a screwdriver and remove it (for example, VAZ 2106)
- We turn off the power of the glove box cover and unscrew the fastening of the glove box housing to the front panel.Turn off the power to the glove box backlight and unscrew the glove box mount
- Tighten the heater control knobs.We pull the stove control knobs from the levers
- We unscrew the fastening of the torpedo from below and from above.The front panel is attached to the body in several places
- We dismantle the front panel from the passenger compartment.
- We install in the reverse order.
Video: removing the torpedo on the "classic"

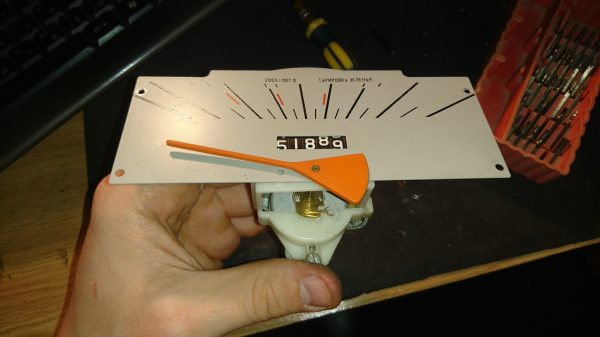
Dashboard VAZ 2101
The dashboard makes driving more comfortable, so it should be easy and simple to use, displaying important information to the driver.
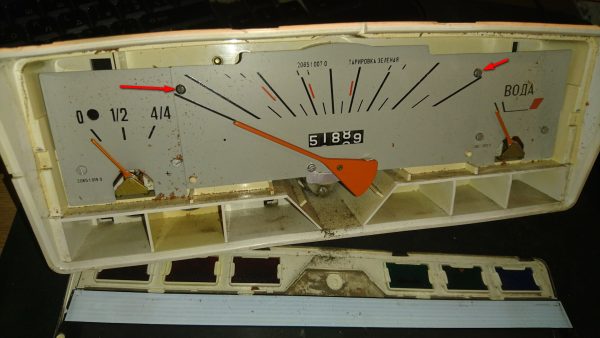
The instrument panel of the VAZ "penny" consists of the following elements:
- 6 indicator lights;
- 3 pointer devices;
- 1 digital indicator.
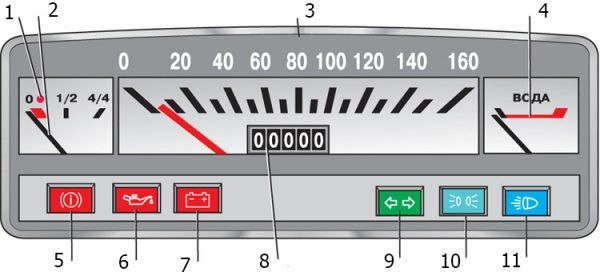
The panel also includes:
- speedometer;
- odometer;
- coolant temperature gauge;
- fuel level indicator;
- fuel reserve control lamp;
- block of control lamps:
- turning on the parking brake and signaling an insufficient level of brake fluid in the reservoir;
- oil pressure in the engine lubrication system;
- battery charge;
- turning on direction indicators;
- included gauge world;
- turning on the high beam headlights.
Which one can be put
If you are not satisfied with the design of the VAZ 2101 dashboard, it can be replaced or updated as follows:
- buy and install a more modern version, which is equipped with an on-board computer, which will not be cheap;
- update the shield by replacing the instrument scales and arrows;
- put tidy from another car.
When choosing a dashboard, you need to take into account that the configuration can differ significantly and is not at all suitable for the “classics”. In this case, it will be necessary to make an adjustment according to the seat in the front panel.
From another VAZ model
On the VAZ 2101, it is possible to install a home-made shield using instruments from the VAZ 2106. It can use a speedometer, a tachometer, a temperature and fuel level indicator, which will look more informative than a standard tidy. Connecting pointers should not raise questions, with the exception of the tachometer: it must be connected in accordance with the "six" scheme.

More about the instrument panel VAZ 2106: https://bumper.guru/klassicheskie-modeli-vaz/elektrooborudovanie/panel-priborov/panel-priborov-vaz-2106.html
From "Gazelle"
To install the dashboard from the Gazelle, you will need to make quite serious changes to it, since it is very different in size from the standard product. In addition, the wiring diagrams and terminals for cars do not match at all.
From a foreign car
The best option, but also the most difficult one, is to introduce a dashboard from a foreign car. In most cases, this requires changing the entire front panel. The most suitable options for a “penny” will be tidy from models that were produced in the late 1980s and early 1990s, for example, the BMW E30.
Malfunctions of the dashboard VAZ 2101
The instrument panel of the "Zhiguli" of the first model, although it consists of a minimum number of indicators, but they allow the driver to control the vital systems of the car and, in case of problems, see their display on the panel. If a device starts to work incorrectly or stops functioning altogether, it becomes uncomfortable to drive a car, because there is no certainty that everything is in order with the car. Therefore, in the event of problems with the node in question, they must be identified and eliminated in a timely manner.
Removing the instrument panel
It may be necessary to remove the tidy to replace the backlights or the devices themselves. To carry out the procedure, a slotted screwdriver will suffice. The process itself consists of the following sequence of actions:
- Remove the terminal from the negative of the battery.
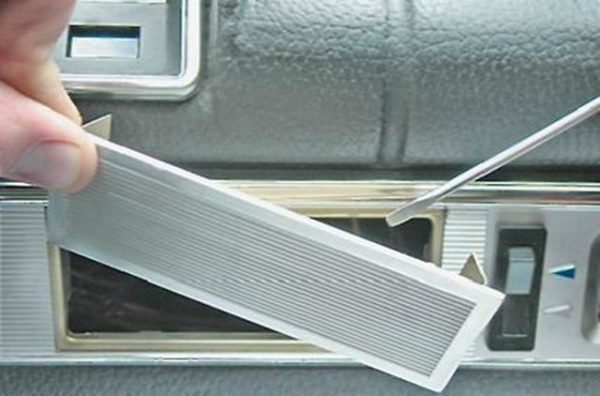
- Using a screwdriver, dismantle the decorative element.Remove the decorative element by prying it with a screwdriver
- Putting your hand into the hole formed, press the right lever that holds the dashboard in the dash, and then take out the tidy.To remove the instrument panel, you must press a special lever by sticking your hand into the hole on the front panel (for clarity, the shield is removed)
- We extend the instrument panel as much as possible, unscrew the fastening of the speedometer cable by hand and remove the cable from the socket.
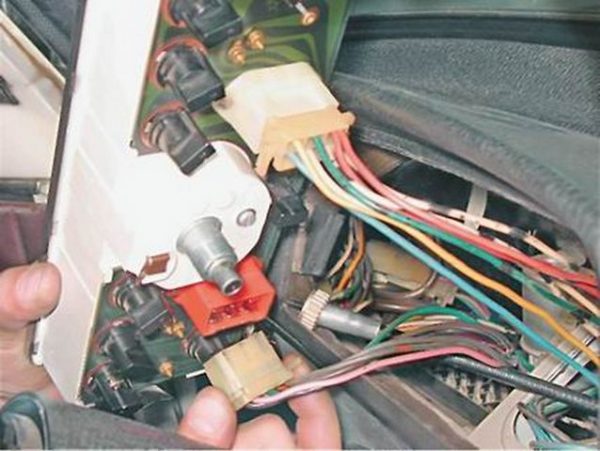
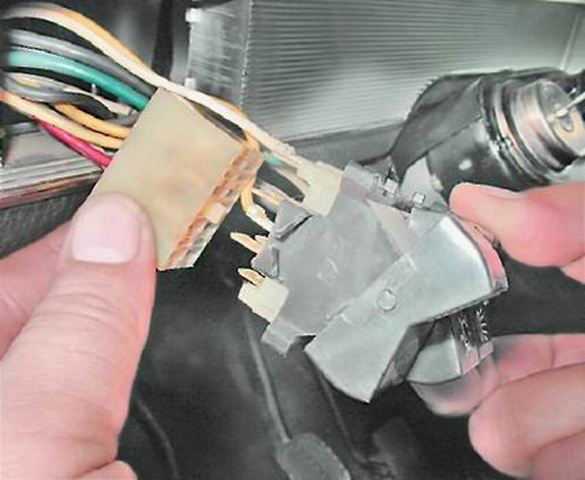
- We take out two connectors with wiring.The dashboard is connected using two connectors, remove them
- We dismantle the shield.
- After completing the necessary actions with tidy, we assemble in the reverse order.
Replacing light bulbs
Sometimes the indicator lights burn out and need to be replaced. For better illumination of the dashboard, you can put LEDs instead.
The sequence of actions for replacing light bulbs is as follows:
- Dismantle the dashboard.
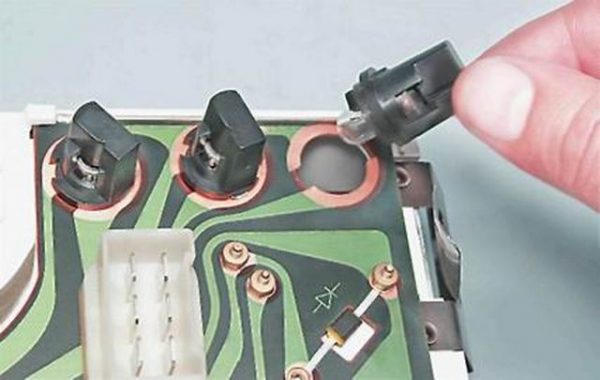
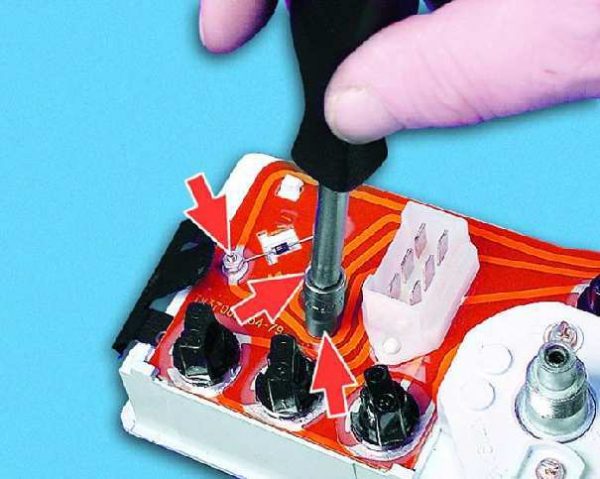
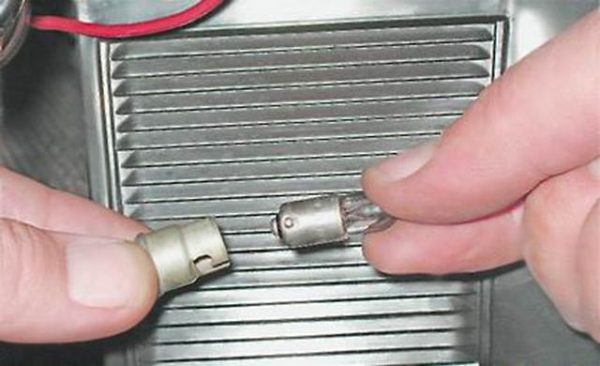
- We rotate the cartridge with a non-working light bulb counterclockwise and take it out.We take out the socket with a non-working light bulb from the dashboard board
- Slightly pressing and turning, remove the lamp from the socket and change to a new one.Click on the light bulb, turn and remove it from the cartridge
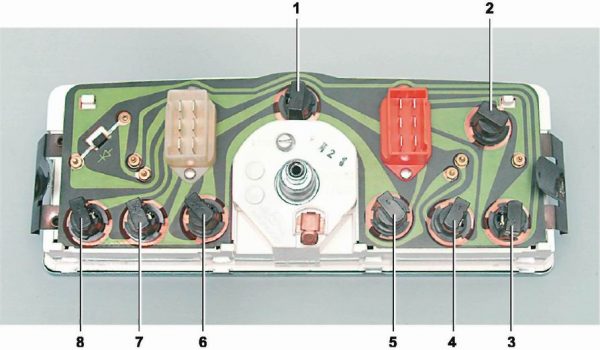
- If necessary, change the rest of the bulbs in the same way.The location of the lamp holders on the instrument cluster: 1 - instrument illumination lamp; 2 — a control lamp of a reserve of fuel; 3 - control lamp for turning on the parking brake and insufficient fluid level in the reservoir of the hydraulic brake drive; 4 - control lamp of insufficient oil pressure; 5 — a control lamp of a charge of the accumulator battery; 6 — a control lamp of inclusion of indexes of turn; 7 — a control lamp of inclusion of external illumination; 8 — a control lamp of inclusion of a high beam
You can try to change the bulbs without completely removing the instrument cluster, for which we push the panel as far as possible towards ourselves and take out the necessary cartridge.
Video: LED backlight in the instrument panel VAZ 2101

Checking and replacing the instrument panel lighting switch
The dashboard lighting on the VAZ 2101 is turned on by the corresponding switch located on the left side of the steering wheel. Sometimes the performance of this element is disrupted, which is associated with wear of the contacts or damage to the plastic mechanism. In this case, it has to be dismantled and replaced with a new one.
The tidy light switch is made in the form of a single unit with buttons for turning on the wipers and outdoor lighting.
To remove the part you will need:
- narrow-nose pliers;
- flat screwdriver;
- multimeter.
The process consists of the following steps:
- We remove the negative terminal from the battery.
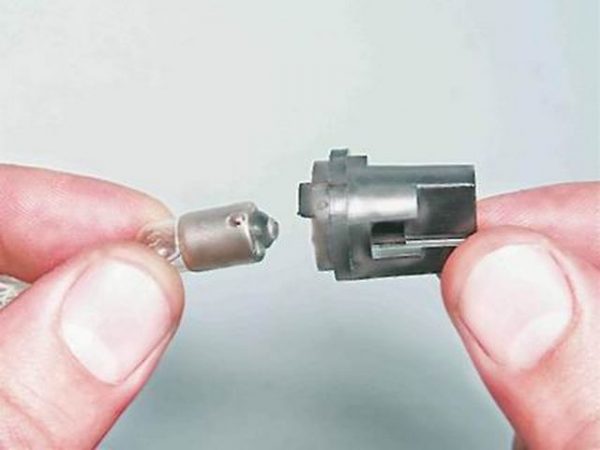
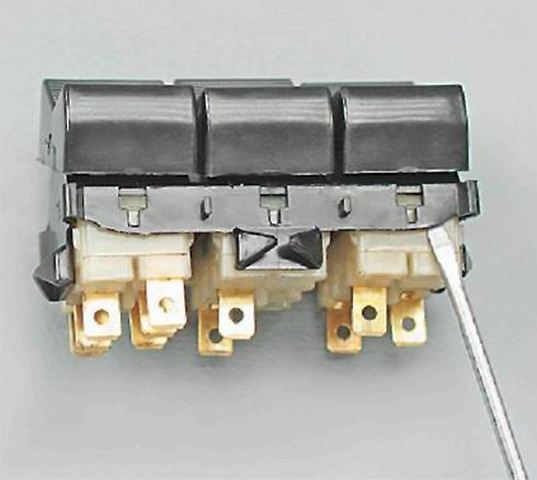
- Carefully pry off the switch block with a flat screwdriver and remove it from the hole in the front panel.We pry off the key block with a screwdriver and remove it from the panel
- For the convenience of checking the light switch, remove the terminals from all switches by prying them with a screwdriver or tightening them with narrow-nose pliers.Remove the block and terminals from the switches
- With a multimeter at the limit of continuity, we check the switch by touching the probes with the contacts. In one position of the switch, the resistance should be zero, in the other - infinite. If this is not the case, we repair or change the switching element.
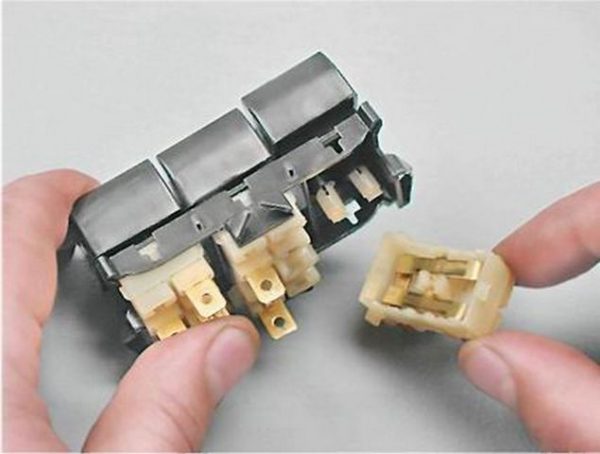
- To disassemble the switch, pry off the contact holder with a flat screwdriver.We pry off the contact holder with a screwdriver using the example of an outdoor lighting switch
- We dismantle the holder together with the contacts.Remove the holder with contacts
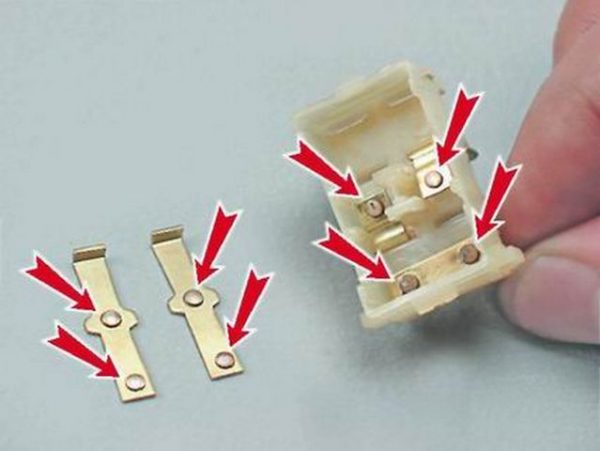
- With fine sandpaper, we clean the contacts of the switch. If they have become unusable (broken, badly burnt), we change the key block assembly.We clean burnt contacts with fine sandpaper
- Installation is carried out in the reverse order of dismantling.
Checking and replacing individual devices
The "Lada" of the first model is far from a new car, therefore, malfunctions with its nodes often occur. In the event of such a repair, it is not worth postponing. For example, if the fuel gauge fails, it will be impossible to determine how much gasoline is left in the tank. Replacing any device with a "classic" can be done by hand.
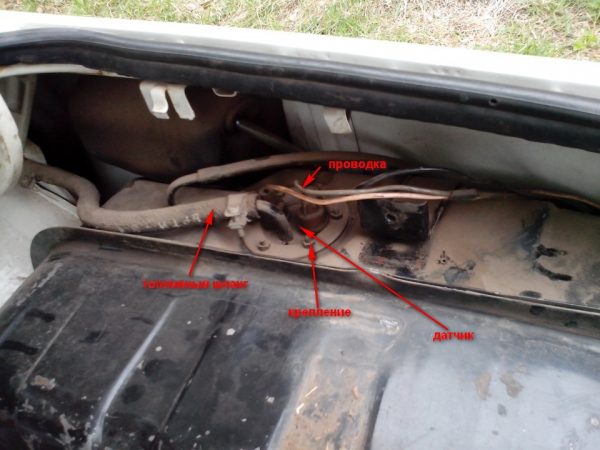
Fuel gauge
A fuel level gauge of the UB-2101 type is installed in the instrument panel of the VAZ 191. It works in conjunction with the BM-150 sensor located in the gas tank. The sensor also ensures that the fuel reserve warning lamp turns on when the remaining fuel is about 4–6,5 liters. The main pointer problems are caused by sensor malfunctions, while the arrow constantly shows a full or empty tank, and can also sometimes twitch on bumps. You can check the performance of the sensor using a multimeter by selecting the resistance mode:
- the pointer needle should be at the beginning of the scale with a sensor resistance of 285–335 ohms;
- in the middle of the scale - 100-135 ohms;
- deviate to the end of the scale - 7–25 ohms.
To replace the fuel level sensor, it is necessary to loosen the clamp and pull off the fuel pipe, remove the wires and unscrew the fastening of the element.
The arrow pointer practically does not fail. But if it becomes necessary to replace it, you will need to remove the instrument panel, unscrew the mount and remove the faulty part.
When all repairs are completed, install the working indicator in its original place.
Video: replacing a fuel gauge with a digital one

temperature gauge
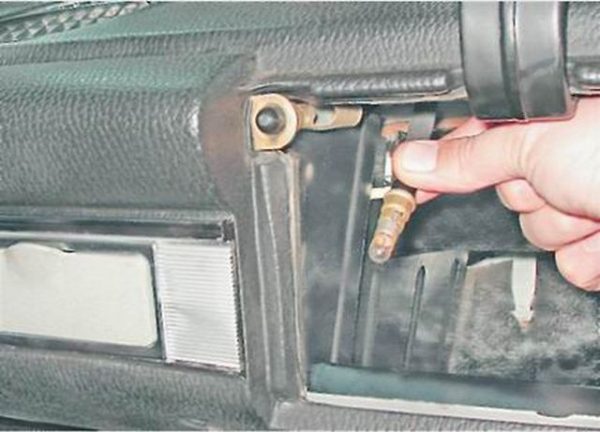
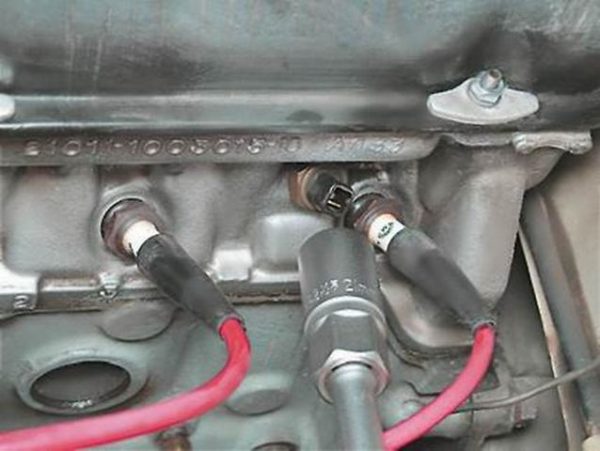
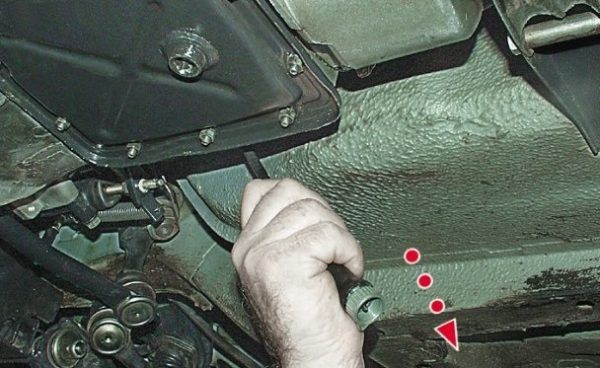
The temperature of the coolant (coolant) of the power unit is measured using a sensor mounted on the cylinder head on the left side. The signal received from it is displayed by means of an arrow pointer on the dashboard. If there is any doubt about the correctness of the coolant temperature readings, it is necessary to warm up the engine and check the operation of the sensor. To do this, turn on the ignition, pull off the terminal from the sensor and close it to ground. If the element is defective, the pointer will deviate to the right. If the arrow does not react, then this indicates an open circuit.
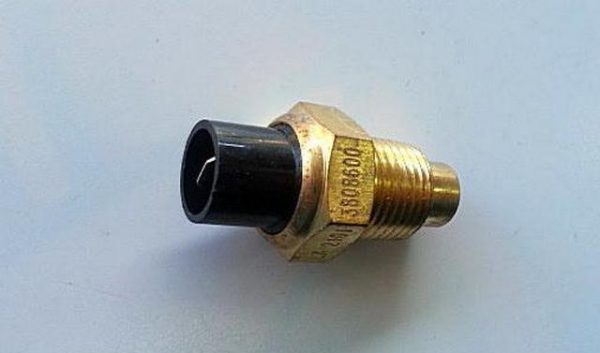
To replace the coolant sensor on a "penny" perform the following steps:
- We remove the negative terminal from the battery.
- Drain the coolant from the engine.
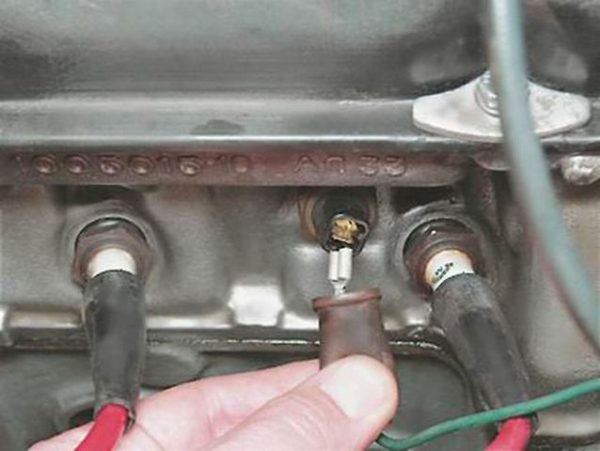
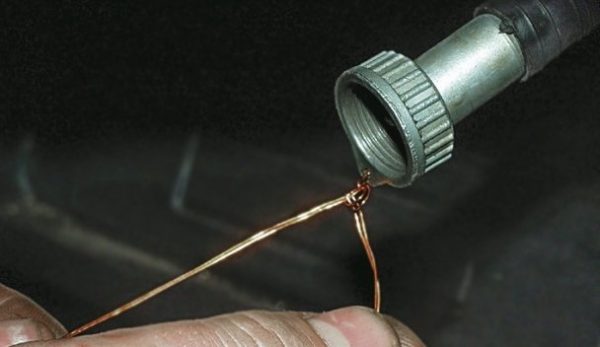
- We tighten the protective cap and remove the wire with the connector.Only one terminal is connected to the sensor, remove it
- We unscrew the sensor from the cylinder head with an extension with a deep head.We unscrew the coolant sensor with a deep head
- We change the part and install it in the reverse order.
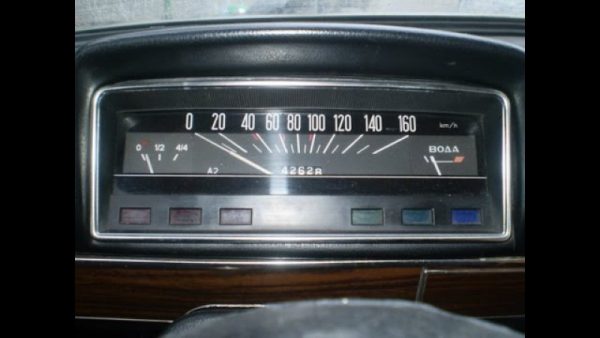
Speedometer
On the VAZ 2101 there is a speedometer of the SP-191 type, consisting of a pointer device that displays the speed of the car in km / h and an odometer that calculates the distance traveled in kilometers. The mechanism is driven by a flexible cable (speedometer cable) connected through the drive to the gearbox.
The performance of the speedometer may be impaired for the following reasons:
- malfunction of the mechanism as a result of gear breakage;
- failure of the speedometer cable;
- failure of the speedometer drive.
To check the correctness of the speedometer readings, you need to compare them with the reference ones.
Table: data for checking the speedometer
| Drive shaft speed, min-1 | Speedometer readings, km/h |
| 250 | 14 – 16,5 Feet |
| 500 | 30 – 32,5 Feet |
| 750 | 45 – 48 Feet |
| 1000 | 60 – 63,5 Feet |
| 1250 | 75 – 79 Feet |
| 1500 | 90 – 94,5 Feet |
| 1750 | 105 – 110 Feet |
| 2000 | 120 – 125,5 Feet |
| 2250 | 135 – 141 Feet |
| 2500 | 150 – 156,5 Feet |
How to remove the speedometer
If you need to dismantle the speedometer, you will need to remove the instrument panel, separate the body parts and unscrew the corresponding fasteners. A known-good device is used for replacement.
Replacing the cable and speedometer drive
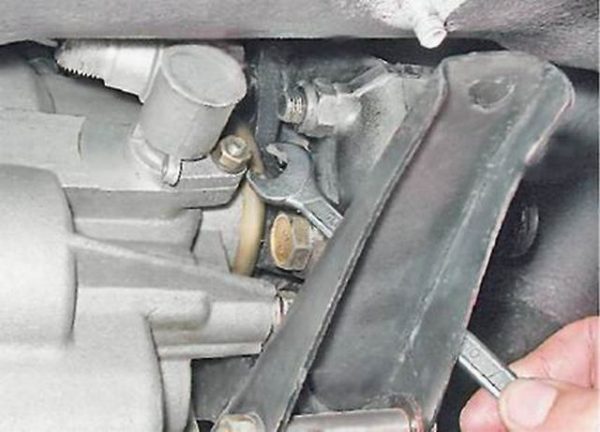
The speedometer cable and its drive are changed using pliers and a flat screwdriver. The procedure is as follows:
- We go down under the car and unscrew the cable nut from the drive with pliers, and then remove the cable.From below the cable is fixed to the speedometer drive
- We remove the instrument panel from the front panel and in the same way disconnect the cable from the speedometer.
- We tie a piece of wire or a strong thread into the lugs of the nut on the side of the speedometer.We tie a piece of wire to the eye of the speedometer cable
- We pull out the flexible shaft under the machine, untie the thread or wire and tie it to a new cable.We take out the cable under the car and tie the wire to a new part
- We retract the cable into the cabin and connect it to the shield, and then to the drive.
- If the drive needs to be replaced, then unscrew the nut, remove the part from the gearbox housing and install a new one with the same number of teeth on the gear instead of the worn mechanism.To replace the speedometer drive, unscrew the corresponding mount
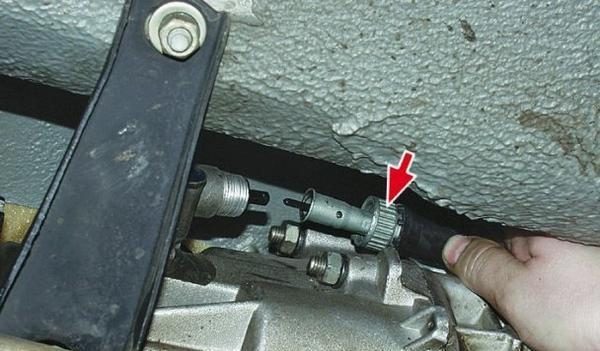
Before installing a new cable, it is recommended to lubricate it, for example, with gear oil. Thus, the service life of the part can be extended.
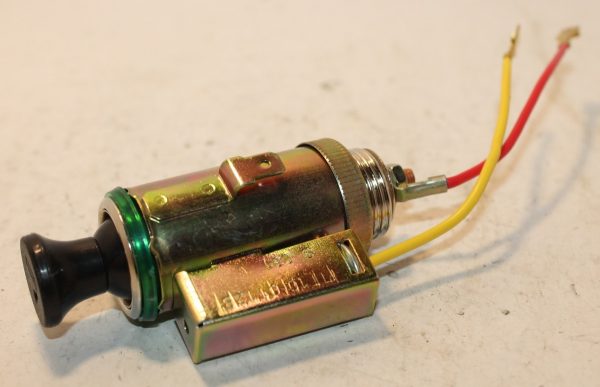
Cigarette lighter
The cigarette lighter can be used both for its intended purpose and for connecting various modern devices: a tire inflation compressor, charger for a phone, laptop, etc. Sometimes there are problems with a part due to the following reasons:
- blown fuse No. 1 at 16A, located in the fuse box;
- oxidation of the contacts holding the fuse;
- malfunctions in the cigarette lighter itself, for example, a broken spiral or wire that supplies power.
Learn more about the design of the VAZ 2101 fuse box: https://bumper.guru/klassicheskie-modeli-vaz/elektrooborudovanie/predohraniteli-vaz-2101.html
How to replace
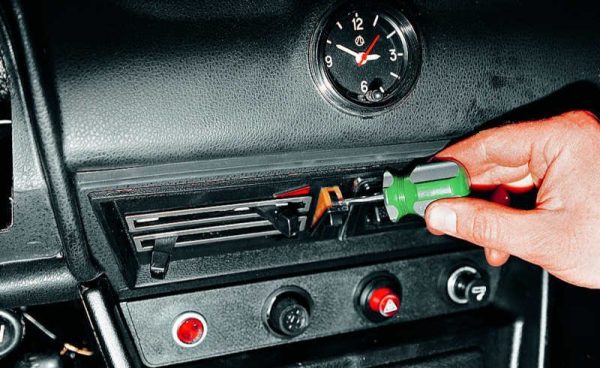
Replacing the cigarette lighter does without any tools and consists of the following steps:
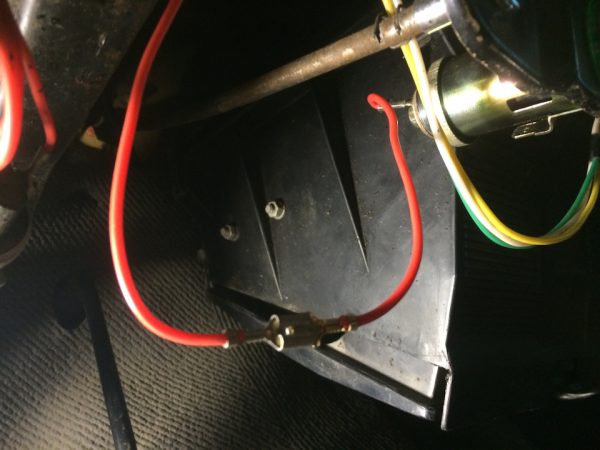
- Disconnect the power wire.Disconnect power from cigarette lighter
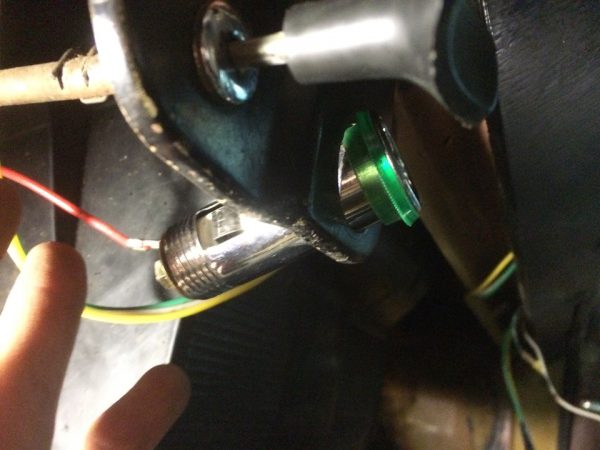
- We unscrew the fastening of the case to the bracket.Unscrew the cigarette lighter housing
- We remove the casing and take out the main part of the cigarette lighter.Unscrew the mount, take out the case
- Assemble in the reverse order.
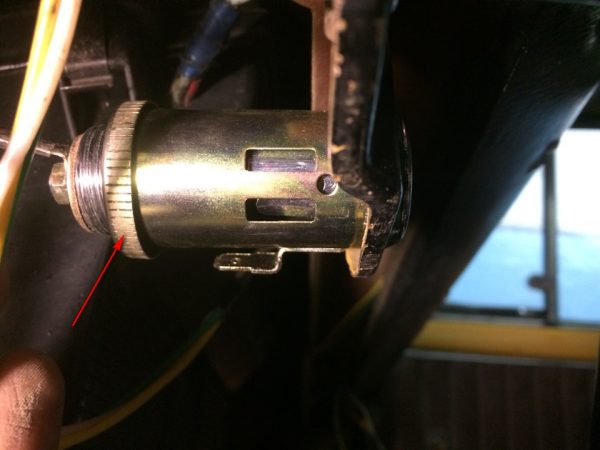
- If you need to replace the light bulb in case it burns out, we squeeze the walls of the casing and remove it from the cigarette lighter housing.The light bulb is in a special casing, remove it
- Remove the bulb holder.
- Slightly press and turn the bulb clockwise, remove it from the cartridge and change to a new one.We remove the bulb from the socket and change it to a new one.
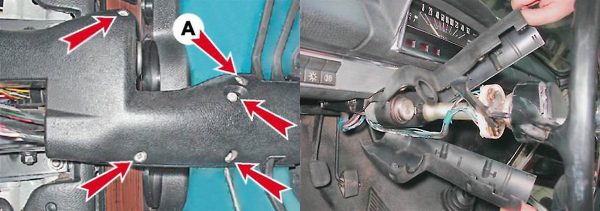
Steering column switch VAZ 2101
VAZ 2101 from the factory was equipped with a two-lever steering column switch type P-135, and on the VAZ 21013 models and parts of the VAZ 21011 they installed a three-lever mechanism 12.3709.
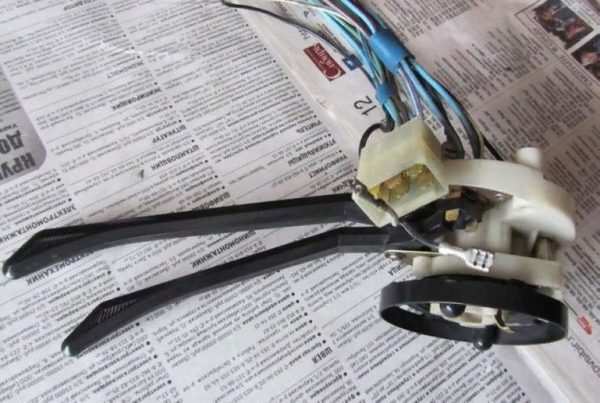
In the first case, the turn signals and headlights were controlled with the help of a lever, and there was no switch on the wipers. Instead, a button on the front panel was used, and the windshield was washed manually by pressing the appropriate button. The three-lever version is more modern, since it allows you to control not only the headlights and turn signals, but also the wipers and the windshield washer.
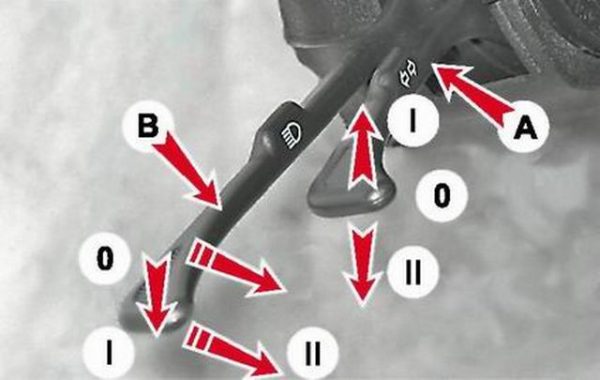
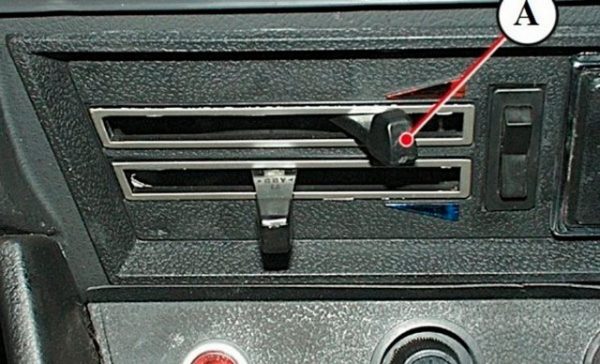
Positions of the turn signal stalk switch "A":
- 0 - direction indicators are off;
- I — indicators of the right turn are included;
- II - left turn indicators are on.
Read about the device of the VAZ 2101 generator: https://bumper.guru/klassicheskie-modeli-vaz/generator/generator-vaz-2101.html
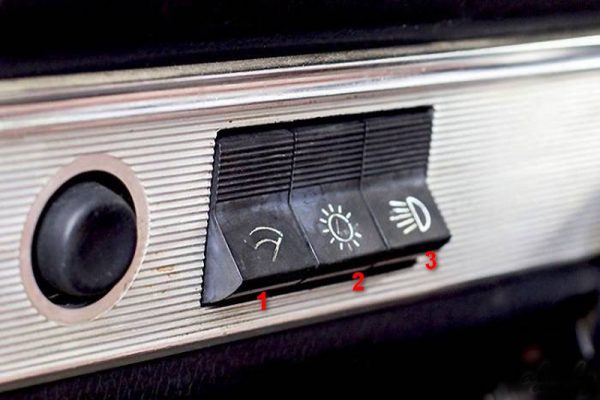
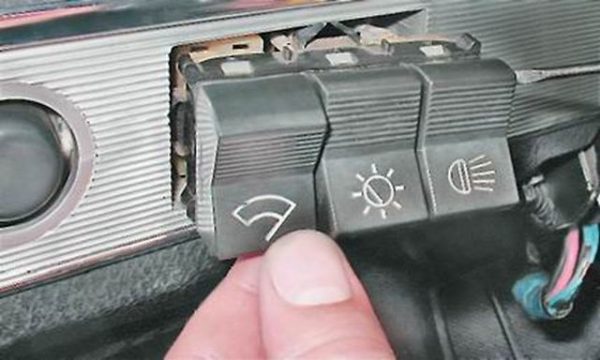
The position of the headlight stalk switch "B", works when you press the button for the exterior lighting switch on the dashboard:
- 0 - outdoor lighting and dipped headlights are on;
- I - outdoor lighting and high beam headlights are on;
- II - high beam headlights are on (non-fixed position).

How to remove
There may be several reasons why it may be necessary to remove the steering column switch:
- malfunction of contacts responsible for turns or optics;
- wear of the horn contact;
- breakage of one of the levers;
- installation of a three-lever switch.
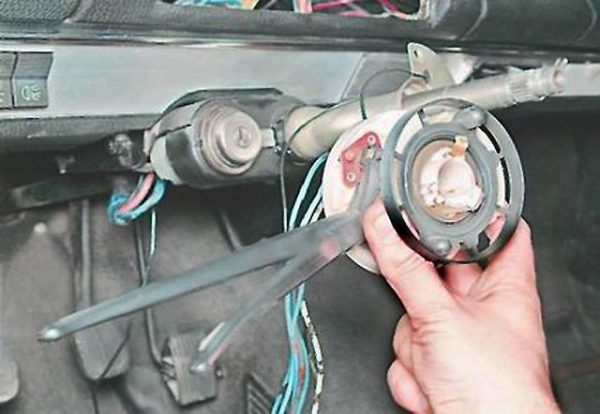
For any defects, the assembly needs to be removed from the car, which will require a Phillips and minus screwdriver. The procedure consists of the following steps:
- We remove the negative terminal from the battery.
- Remove the plastic cover from the steering shaft.We turn off the fastening of the decorative casing of the steering shaft, and then remove the lining
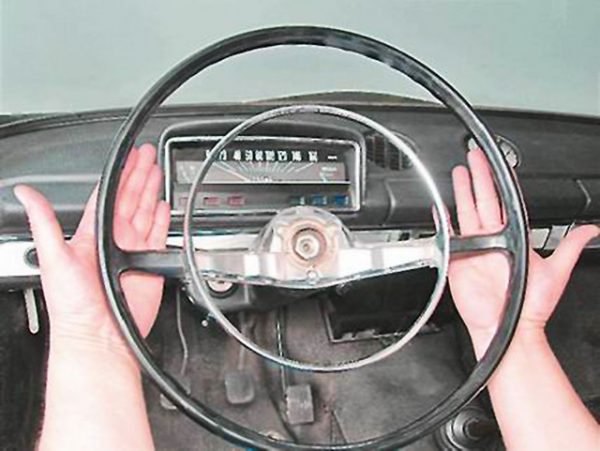
- We dismantle the steering wheel.Unscrew the mount and remove the steering wheel from the shaft
- Disconnect the wiring and remove the instrument panel.
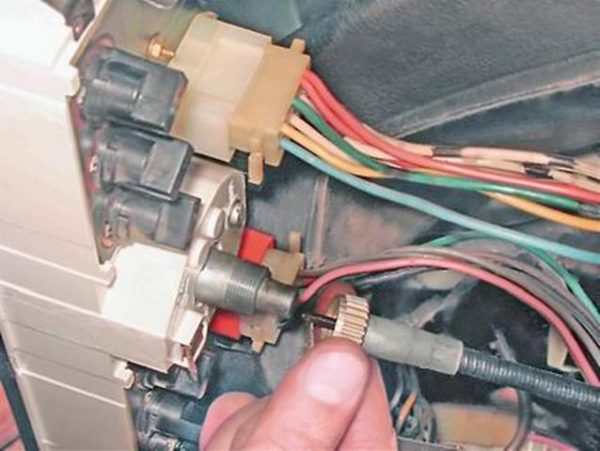
- The switch is fixed with two screws, unscrew them with a Phillips screwdriver.We unscrew the fastening of the switch to the shaft
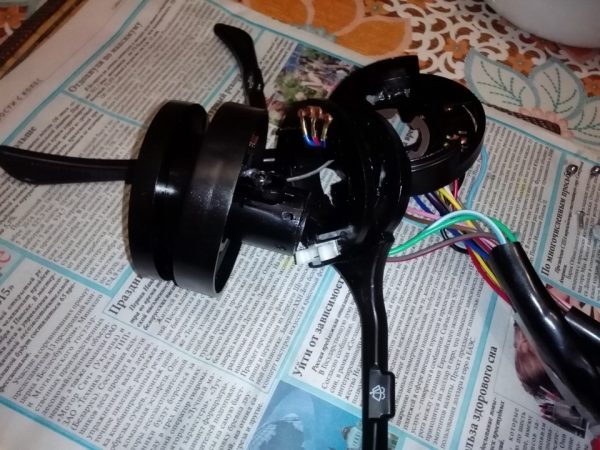
- We remove the contact with the black wire.We remove the contact with the black wire from the steering column switch
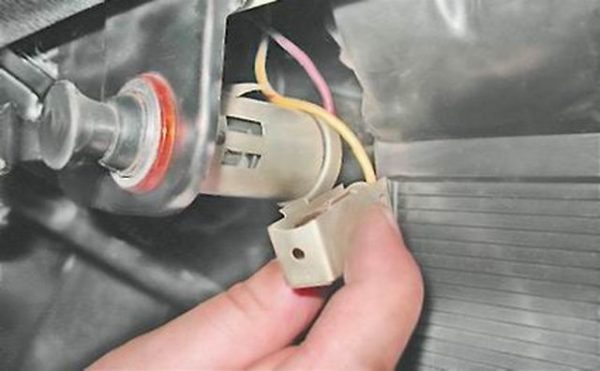
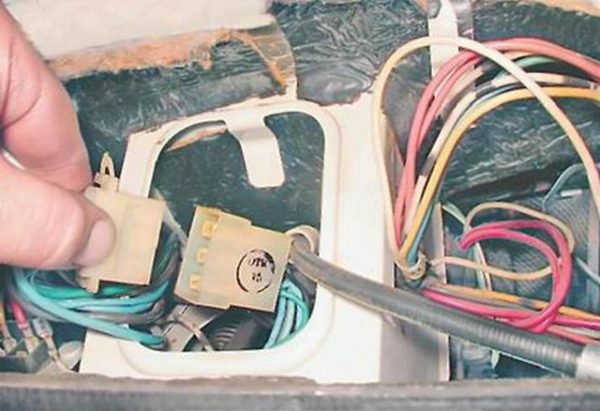
- Under the dashboard, remove the block with wires from the switch.We remove the block with wires from the switch
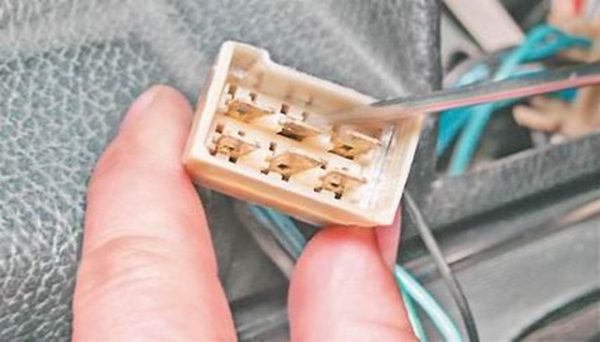
- Use a small flathead screwdriver to pry off the black wire terminal and remove it.Remove the black wire from the block.
- We dismantle the switch from the shaft by removing the wiring harness from the front panel.After disconnecting the wires and unscrewing the mount, remove the switch from the steering shaft
- We change or repair the mechanism and assemble in the reverse order.


How to disassemble
The steering column switch VAZ 2101 was originally designed as a non-separable device. If you are confident in your abilities, then you can try to repair it, for which they drill rivets, clean and restore the contacts. The repair procedure is not as complicated as it requires attention and perseverance. If there are problems with the switch, but there is no desire to repair, then you can purchase a new unit. Its cost is about 700 rubles.
How to replace with a three-lever
To equip the VAZ 2101 with a three-lever switch, you need to prepare:
- switch;
- steering column bushing;
- casing of the steering column VAZ 2103, 06;
- block "mother" for 8 contacts;
- block "mother" for 2 contacts.
In addition, you will additionally have to purchase a washer reservoir and a mount for it. We install in the following sequence:
- We remove the negative terminal from the battery.
- We dismantle the steering wheel and the old switch along with the tube, having previously disconnected the pads.
- Remove the instrument panel from the panel.
- We put the three-lever switch on the new tube with the reverse side and tighten the mount.
- We mount the device on the steering shaft and fix it.We install the switch from the VAZ 2106 and mount it on the shaft
- We lay the wiring and run under the tidy.
- Remove the wiper switch.
- We install the washer reservoir under the hood, stretch the tubes to the nozzles.
- We connect the 6-pin switch block with the 8-pin connector, and also connect the other two wires outside the block (black and white with a black stripe).We connect the pads for 6 and 8 pins to each other
- We get a block from the old wiper switch under the dashboard.
- According to the diagram, we connect the connector removed from the button.We connect the wiper in accordance with the diagram
- We call the wires from the gearmotor with a multimeter and connect them.
- Putting everything together in the reverse order.
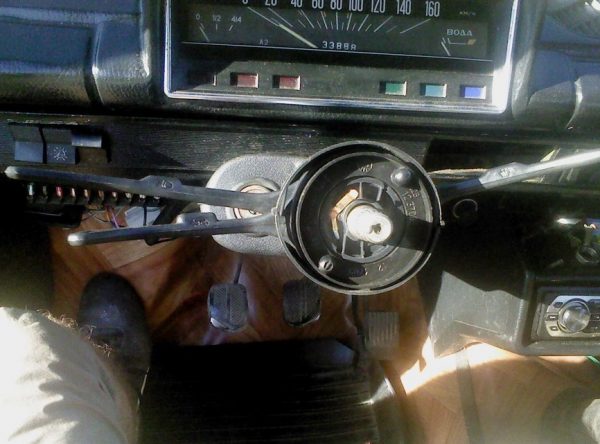
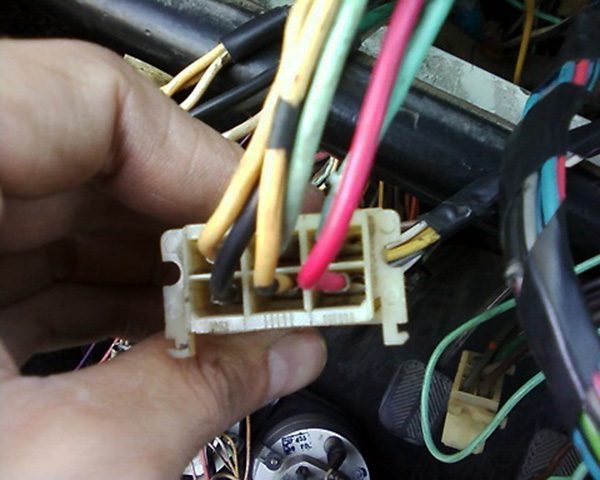
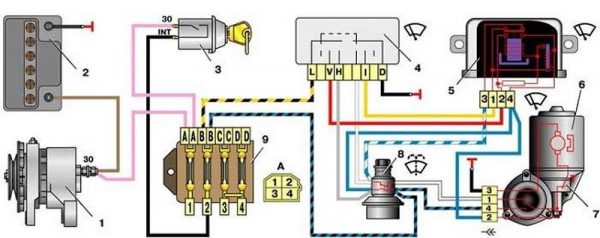
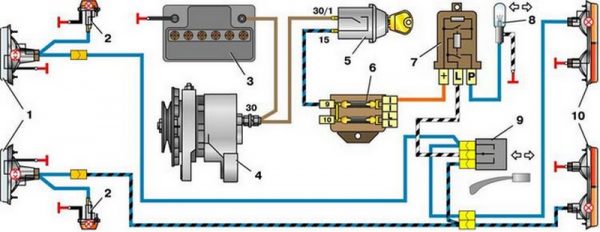
Table: VAZ 2101 wiring correspondence for mounting a three-lever switch
| Contact number on the steering column switch block | Electrical circuit | The color of the wire insulation on the wiring VAZ 2101 | ||||
| Block 8-pin (switches for headlights, direction indicators and sound signal) | ||||||
| 1 | Left turn signal circuit | Blue with black | ||||
| 2 | High Beam Switch Circuit | Blue (single) | ||||
| 3 | Horn enable circuit | The black | ||||
| 4 | Headlight dipped circuit | Gray with red | ||||
| 5 | External lighting circuit | Green | ||||
| 6 | High Beam Switching Circuit (Light Signaling) | Black (freelance pads) | ||||
| 7 | Right Turn Signal Circuit | Blue (double) | ||||
| 8 | Direction signal power circuit | White with black (freelance pads) | ||||
| 6-pin block (wiper mode switch) | ||||||
| 1 | Blue with gray | |||||
| 2 | Red | |||||
| 3 | Blue | |||||
| 4 | Yellow with black | |||||
| 5 | Yellow | |||||
| 6 | weight | The black | ||||
| Block 2-pin (windshield washer motor switch) | ||||||
| 1 | The order of inclusion does not matter. | Pink | ||||
| 2 | Yellow with black | |||||
To repair the instrument panel of the VAZ 2101 or individual indicators, special tools and skills are not required. With a set of screwdrivers, pliers and a multimeter, you can fix the most common problems by following step-by-step instructions. If there is a desire to equip the car with a more attractive tidy, then by choosing the right option, you can significantly transform the interior of the “penny”.

