Replacing a VAZ 2107 torpedo with your own hands: instructions for replacing a panel and individual devices
Content
The torpedo is the most important component of the car's interior: it contains all the instruments and indicators that help the driver to control his car. It will be useful for the owner of a VAZ 2107 to be able to identify and troubleshoot devices, and, if necessary, replace them on their own.
Torpedo VAZ 2107 - its description and purpose
A torpedo (or torpedo) is the front panel of the car, which contains the instrument panel, various indicators and indicators, air ducts, etc.
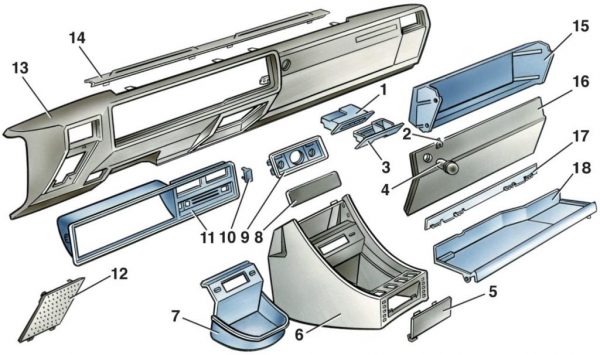
The VAZ 2107 torpedo consists of a large number of various elements:
- Ashtray body.
- Bracket for fastening the lock of the cover of the glove box.
- Ashtray.
- Glove compartment cover lock.
- Insert decorative panel for mounting a radio receiver.
- Radio receiver mounting panel.
- Inlay for the bottom panel of the radio receiver.
- Facing of the radio receiver mounting panel.
- Insert for the top panel of the radio receiver.
- Cover plate for the heated windscreen symbol.
- Dashboard.
- Loudspeaker cover.
- Dashboard.
- Instrument panel insert.
- Glove box body.
- Glove compartment cover.
- Hinge link for glove compartment lid.
- Instrument panel shelf.
 To remove and replace a VAZ 2107 torpedo, you need to know what components it consists of
Options for installing a torpedo from another car instead of the standard one
Many car owners are not satisfied with the design and technical performance of the VAZ 2107 torpedo. Indeed, the panels of modern cars contain devices that provide much more information and look more advantageous. In this case, you can decide on drastic measures and install the front panel from another model. However, it should be understood that not a single torpedo is ideal for the "seven", you have to cut something, file it, adjust it.
Despite the difficulties, there are enough options for installing a torpedo on the "seven" instead of the standard one.
Of the domestic products, the Lada 2110 torpedo is best suited. When it is installed, only small gaps remain, which are easy to fill with mounting foam. From foreign ones, the “tidy” from BMW models E28 and E30 is best suited. It looks more impressive and impressive as expected. However, its width is larger than the standard one, so it will have to be trimmed at the bottom left and right. In addition, it will interfere with power windows and the standard installed gear knob. Therefore, when replacing a torpedo, you will have to install power windows and move the gear lever.
With sufficient imagination and financial resources, craftsmen install torpedoes from almost any foreign car on the VAZ 2107. The question is whether it will be worth the investment and effort.
Instructions for removing the torpedo VAZ 2107
Dismantling and reinstalling a torpedo is a rather time consuming process, so follow the instructions and be careful. To remove the torpedo, you will need a flat and Phillips screwdriver and a 10 mm wrench.
Removing the VAZ 2107 torpedo involves the sequential execution of the following operations:
- Disconnect the negative terminal from the battery. This operation should be performed before starting any work related to intervention in the electrical circuits of the car.
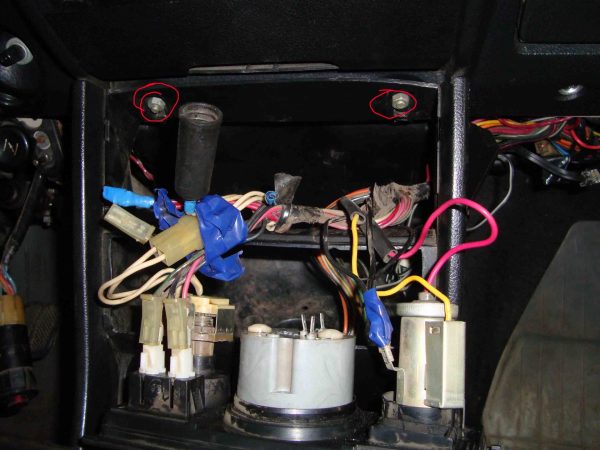
- We turn off the self-tapping screws of the shelf in front of the passenger seat - two on the right, one on the left and one located deep inside.Three shelf mounting screws are located directly in front of the passenger seat, and the fourth is deep inside
- Carefully remove the shelf.Having unscrewed the screws, we take out the front shelf of the VAZ 2107 torpedo
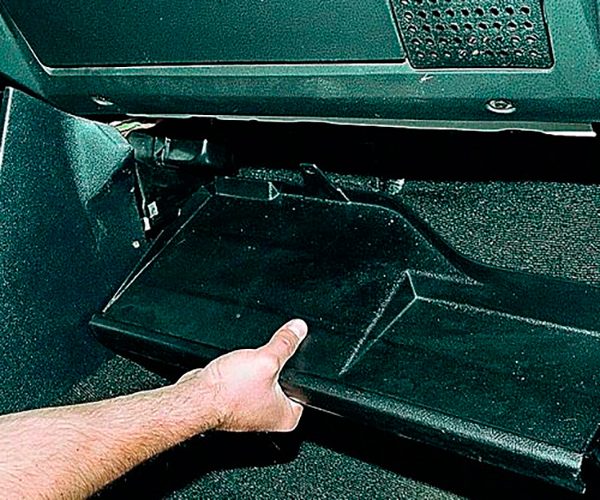
To pull out the glove box body, unscrew the two screws on the side and take it out.
Having unscrewed the two screws on the right, we take out the glove compartment housing- If there is a glove box illumination, be sure to remove the terminals from the ceiling lamps.After removing the glove compartment housing, disconnect the terminals of the ceiling lamps of its illumination
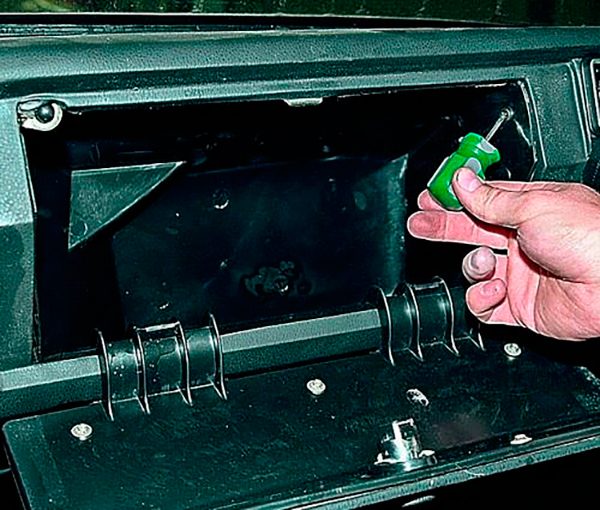
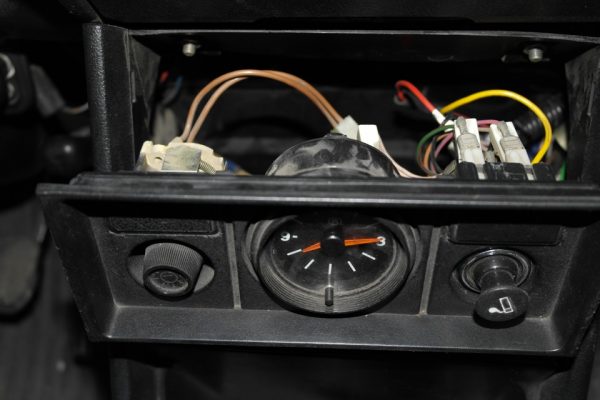
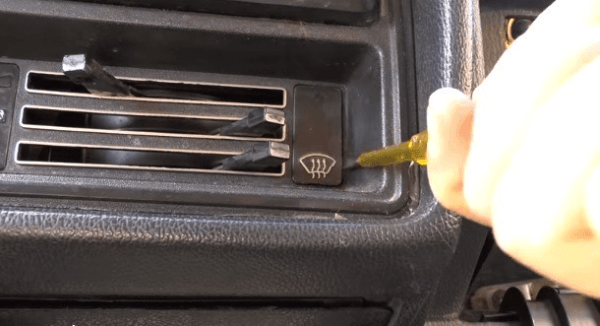
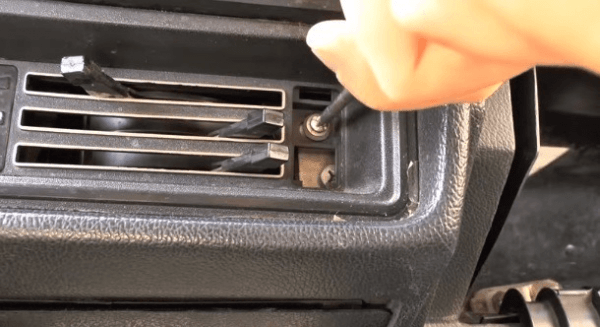
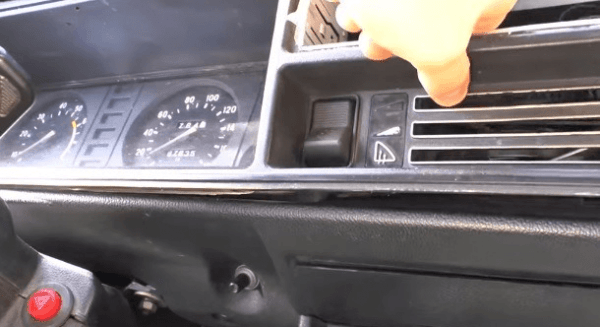
- We proceed to remove the center panel. We pry it with a flat screwdriver and pull it out, then disconnect the light switch.The central panel is mounted in the mounting socket on latches that are wrung out with a flat screwdriver
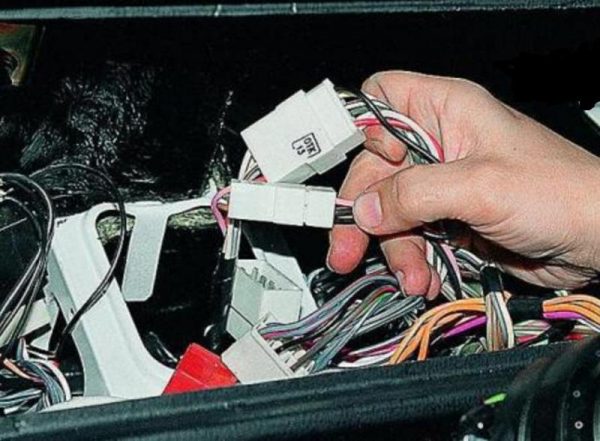
- We mark all the wires before disconnecting, otherwise it will be very problematic to connect them back.All wires suitable for the central panel must be marked so that later you know what and where to connect
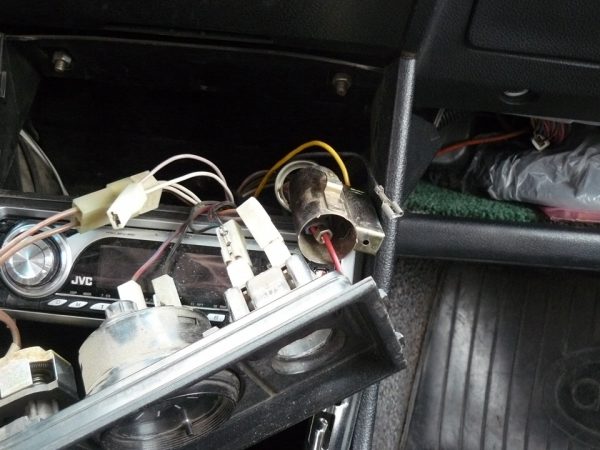
- Having disconnected all the wires, including from the cigarette lighter, we take out the panel.Carefully disconnect all connectors in turn and remove the central panel
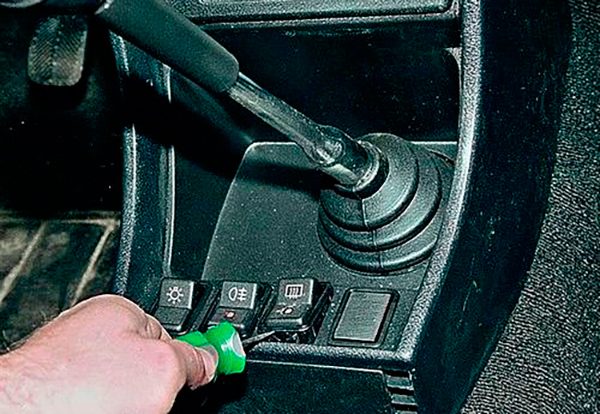
- Using a flat screwdriver, pry off the switches near the gearshift lever and remove them.We pry off the buttons of the center console with a flat screwdriver and pull them out
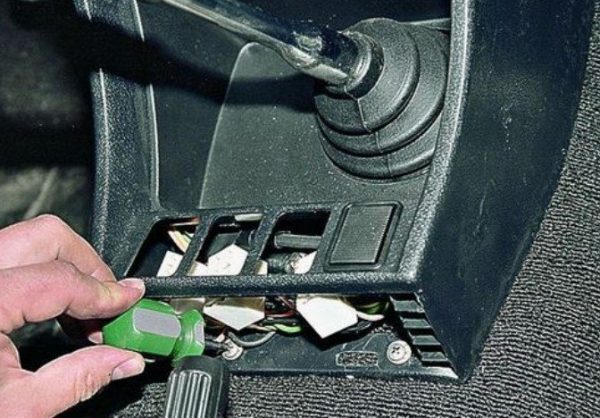
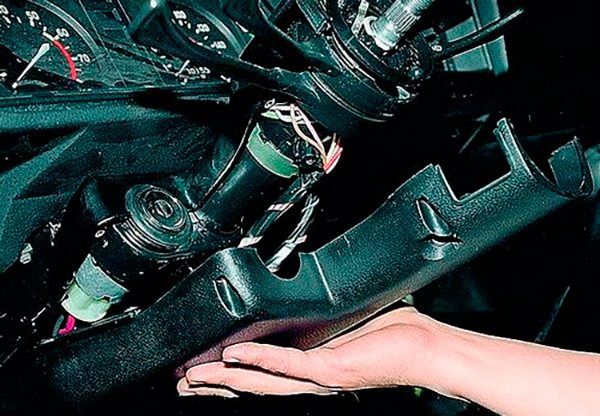
- We separate the lower bar of the center console by pressing on the fasteners with a flat screwdriver, then we unscrew the screws on which the console is attached.We pry off the fasteners of the lower bar of the center console with a flat screwdriver, then unscrew the screws on which the bar is attached, and remove it
- Using a 10 mm wrench, unscrew the nuts on top of the console and push it out.The nuts securing the upper part of the center console are unscrewed with a 10 mm wrench
- We separate the casing of the steering column into two halves: we unscrew the four screws from the top and one more from the bottom and remove it.Having unscrewed five self-tapping screws, we remove a casing of a steering column
Next, the instrument panel is removed according to the following algorithm:
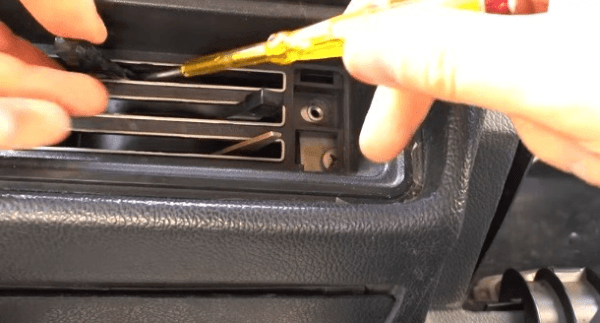
- Prying with a flat screwdriver, remove the handles responsible for heating and ventilation of the cabin.Using a flat screwdriver, remove the three interior heating control knobs
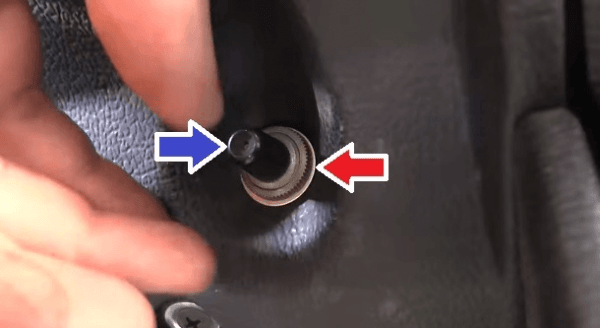
- We unscrew the nut securing the handle of the mileage reset button, and push the handle itself deep into the panel.We unscrew the nut, remove it together with the washer, and then push the handle of the mileage reset button inside the panel
- Use a flathead screwdriver to remove the plug covering the panel mounting screw.We pry off the plug with a flat screwdriver, behind which there is a screw for fastening the panel to the torpedo bracket
- Loosen the screw under the cover.We unscrew the screw securing the panel to the torpedo bracket
- We extend the freed part of the panel as much as possible.We take out the dashboard housing from its seat
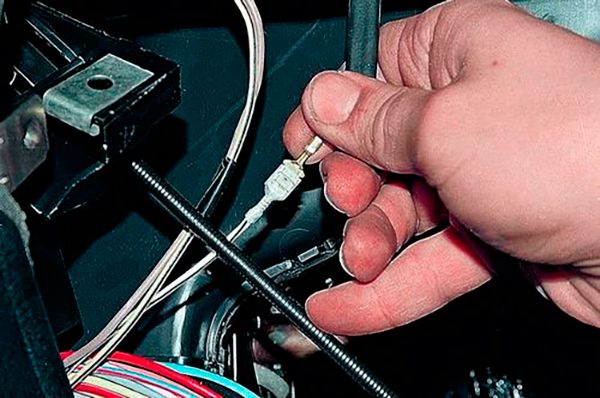
- We separate the speedometer drive cable (it is better to wear gloves so as not to get your hands dirty with oil).Unscrew the nut that secures the speedometer cable to the back of the dashboard
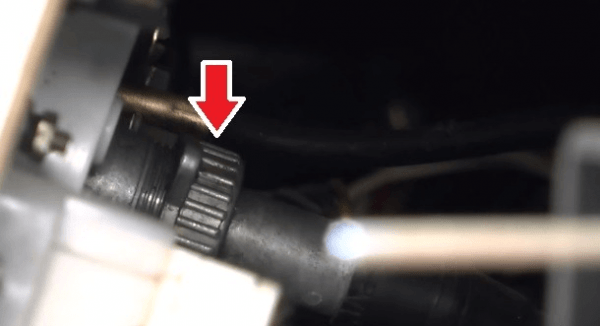
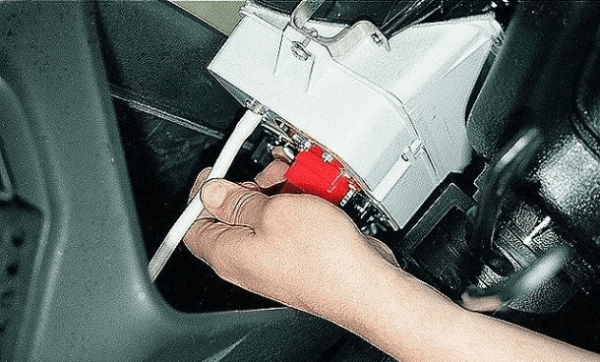
- Disconnect the air supply hose from the left side of the panel. To do this, you need to apply a little effort, but be careful not to break the hose.Disconnect the air supply hose located on the left side of the dashboard
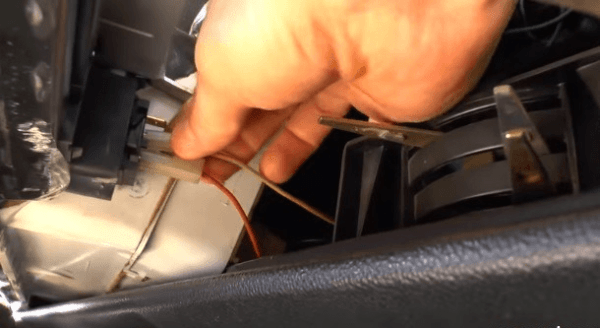
- We separate the wire connectors from the devices. Before that, it is better to note where they are connected, otherwise, if the connection is incorrect, the entire panel will have to be disassembled again.Before disconnecting the wires, write down or photograph the order of their connection.
- Pull out the instrument panel.
Installing the torpedo after completing all the troubleshooting or improvement steps is done in the reverse order.
Video: removing the VAZ 2107 torpedo

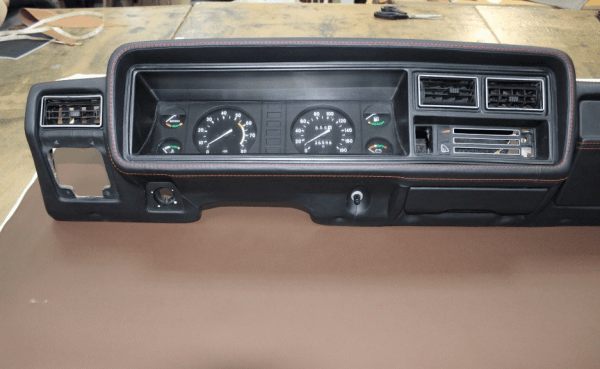
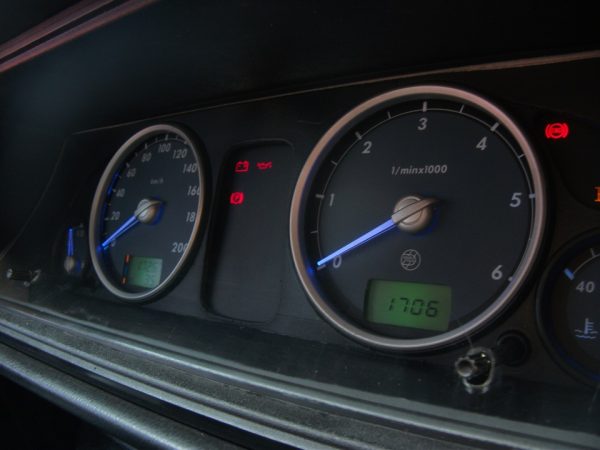
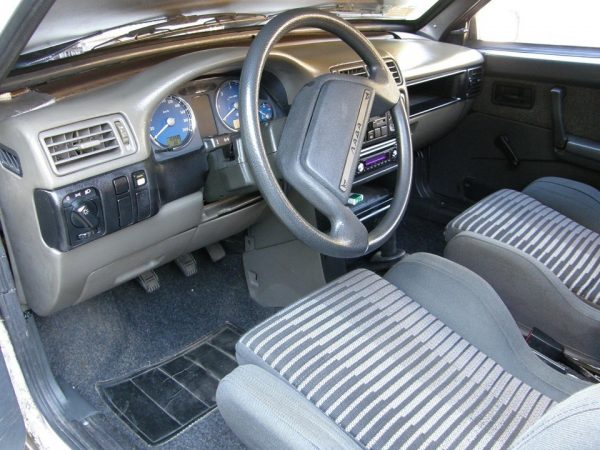
Dashboard VAZ 2107
The instrument panel is designed for the convenience of driving, so it should be easy to use and promptly provide the driver with all the necessary information. This is first of all:
- the state of systems responsible for safe driving (brakes, airbags, etc.);
- movement characteristics (speed, fuel consumption);
- additional information (time, temperature, remaining gasoline, etc.).
Dashboard VAZ 2107: description and photo
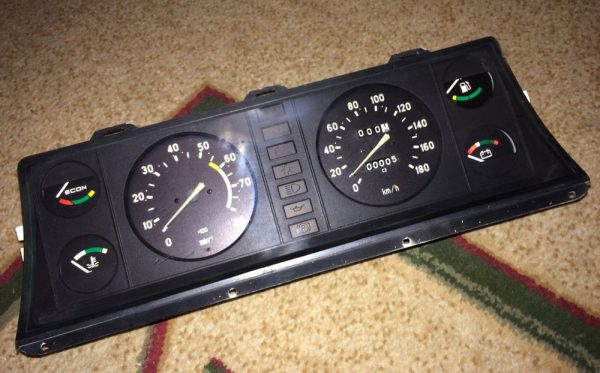
The regular dashboard of the VAZ 2107 is rather concise and gives the driver only the most basic information about the car and the characteristics of its movement.
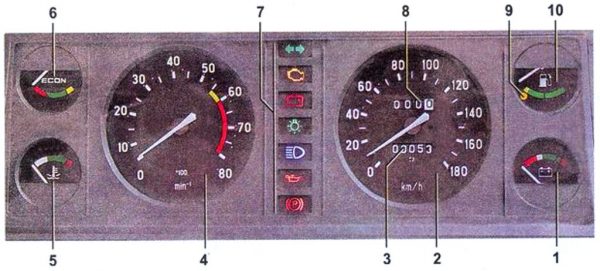
Instrument panel VAZ 2107 includes:
- 7 indicator lights;
- 6 pointer indicators;
- 2 digital indicators.
The following devices are located on the panel:
- Voltmeter - voltage indicator in the vehicle's on-board network.
- Speedometer - an indicator of the speed of movement.
- An odometer is a meter for the total mileage of a car.
- Tachometer. Indicates the crankshaft speed (engine speed).
- Coolant temperature gauge.
- Econometer. Helps to choose the most economical mode of operation in terms of fuel consumption.
- Control lamp block:
- turning on direction indicators;
- malfunctions of the engine management system;
- low battery;
- included gauge world;
- turning on the high beam headlights;
- insufficient oil pressure;
- turning on the parking brake;
- Daily distance counter.
- Fuel reserve control lamp.
- Fuel level indicator.On the front panel of the VAZ 2107 there are instruments and indicators that provide the driver with information about the state of various vehicle systems and the characteristics of its movement.
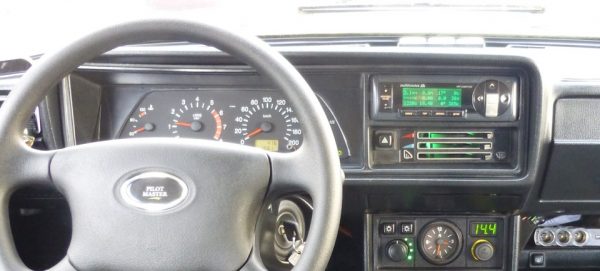
Installing the dashboard on a VAZ 2107 from another car
If there is a desire or need to replace the GXNUMX dashboard, there are several ways:
- purchase a new, more modern dashboard. This is a rather expensive pleasure, for example, the Ferrum panel with an on-board computer costs about 23 thousand rubles;
- update the “tidy” by replacing stickers and arrows;
- install the instrument panel from another machine.
Having decided to choose and install a torpedo from another model on the VAZ 2107, you need to take into account that the dashboard of each car has its own configuration. For its installation, additional work will have to be done to fit the size and shape.
Dashboard from another VAZ model
The simplest replacement will be a panel from the VAZ 2110. There are no problems with the performance of the work, but the resulting result looks much more interesting. There will be no complications with electrical wiring: the wires are almost identical and are connected in the same way.
I climbed on the drive, I see everyone puts the tidy from ten to seven. Well, I think I'll buy it and put it on myself. Did a year ago. As a result, instead of 6 devices, a whole panel with dozens fit into the panel of the seven. At first I wanted to put it with priors, but I liked it more with dozens, because it is symmetrical.
Dashboard from "Gazelle"
On the "seven" you can install the dashboard from the "Gazelle". This is a more complex option, it is very different in size and shape. In addition, adapters will be needed to connect the wires, since the electrical circuits are also very different.
I have been thinking about this device for a long time in my car, and then a tidy with a range of 19600 km turned up for a tasty price. The first thing I did was the pinout of the adapter. The next step — the implantation of tidy in place, I think this is the most difficult thing for me. Let me tell you, it's a lot of hard work. Used a jigsaw, a soldering iron.
What can I say, there are jambs, flaws, but it's all hidden from view. And if you do not peer, then I think you might think that the instrument panel was the same from the factory =)
I am glad with this device, it took exactly 2 weeks.
Dashboard from a foreign car
The most difficult, but effective option is to install tidy from other foreign car models. Here it is necessary to take into account the correspondence of the devices of the "seven" and the selected foreign car. It is most likely that a similar set of dashboard indicators will be found in models produced in the late 1980s and early 1990s.
Dashboard Faults and Troubleshooting
The instrument panel allows, while in the driver's seat, to detect most problems with vehicle systems. When familiar devices fail, the driver becomes uncomfortable, as part of the information about the state of the car will not be available. Therefore, you need to be able to quickly diagnose and troubleshoot the dashboard.
Replacing light bulbs
Good lighting is indispensable when driving a car in the dark. At night, the driver is partly blinded by the headlights of oncoming cars, so it is very difficult to navigate in the dark interior without lighting. It takes seconds to find the right button, which can be decisive in assessing the traffic situation.
It is not difficult to replace the backlight of the VAZ 2107 dashboard, just follow the instructions:
- Remove car dashboard.
- There are 9 backlights on the panel. Each is removed by pressing and turning the cartridge. The new bulb is screwed directly into the socket.The backlight is removed by pressing and turning the cartridge, then a new one is installed in its place
- After replacing the bulbs, the panel is assembled back.

Video: replacing the dashboard lights VAZ 2107

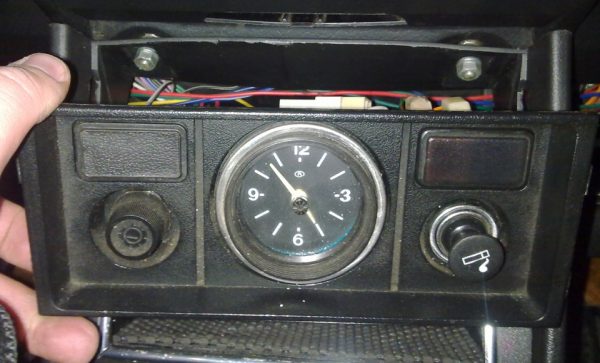
Replacing the instrument panel light switch
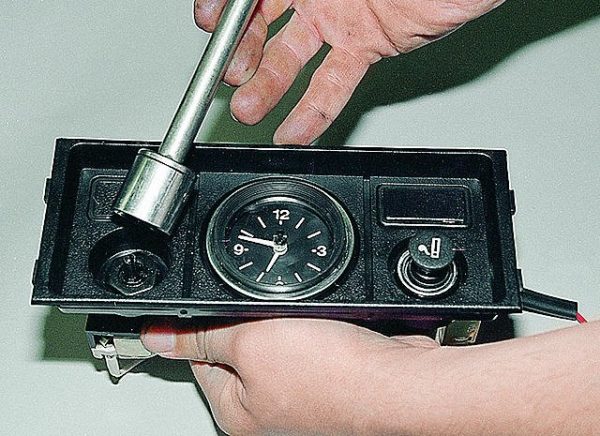
In the center of the VAZ 2107 panel there is a plastic case on which the clock and the instrument lighting switch are placed. In the event of failure, these devices must be replaced.
The sequence of operations for replacing the light switch:
- As with any electrical work on a car, disconnect the battery.
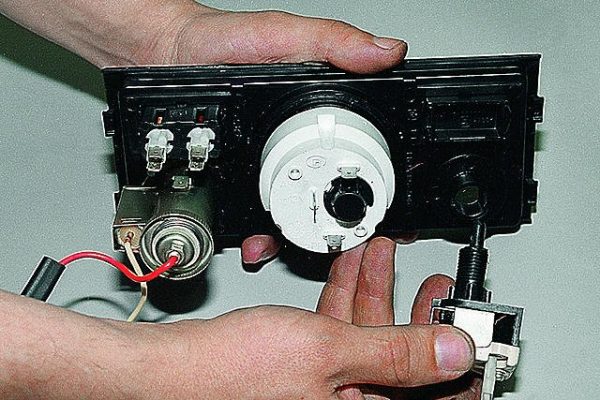
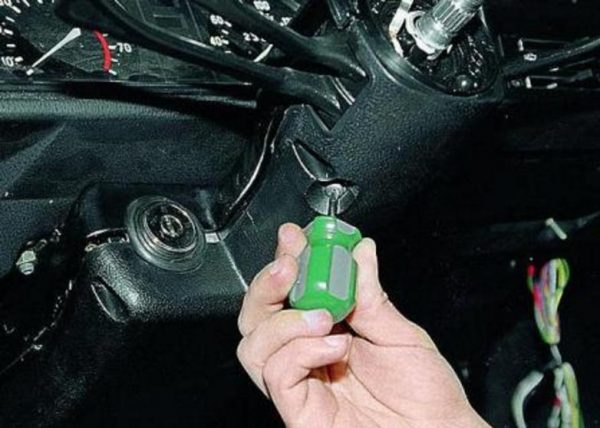
- Use a flathead screwdriver to pry off the edge of the insert, pull out the panel and unscrew the switch handle.We dismantle the plastic panel on which the light switch is located, and remove the switch handle
- Use a 24mm wrench to loosen the switch mounting nut.Loosen the switch mounting nut
- Disconnect all wires and remove the switch.The light switch can be removed from the dashboard without additional effort
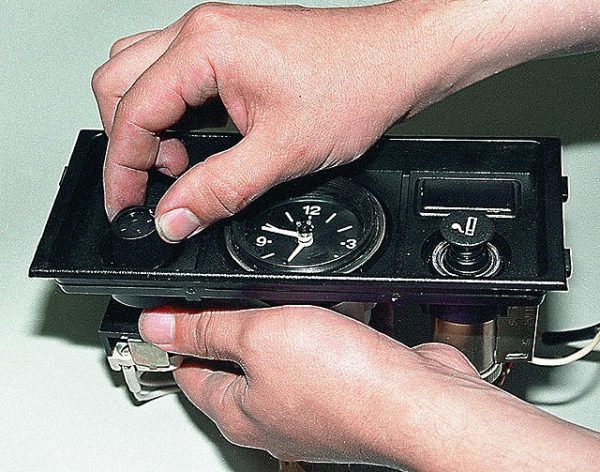
Switch removal work completed. Installing a new switch is carried out in the reverse order.
Checking and replacing individual devices
VAZ 2107 is far from a new car, so devices can suddenly fail. If the watch is not a device of paramount importance and does not require urgent repair, then, for example, you should not hesitate with a fuel gauge. Devices can be replaced independently without much effort.
Fuel gauge
Signs of a malfunctioning fuel gauge may include:
- the pointer shows "0", even if there is definitely fuel in the tank;
- the arrow of the device twitches;
- The low fuel light does not come on when you run out of gas.
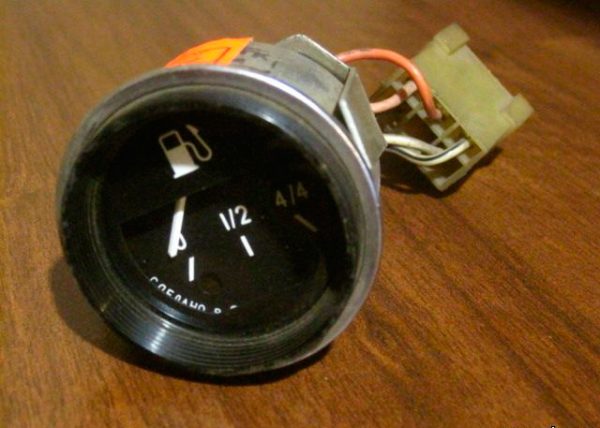
If a malfunction of the fuel level indicator is detected, it should be replaced. The cost of a new pointer is 400-500 rubles. In this case, you can purchase a more modern device with a digital indicator.
Tachometer
The tachometer shows the speed of the crankshaft per minute, in colloquial speech, this parameter is usually called engine speed.
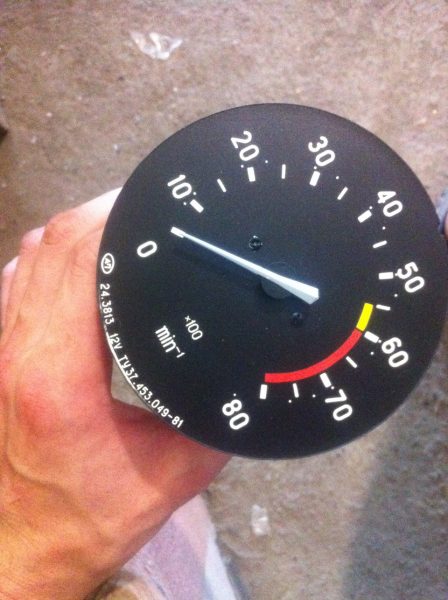
It is not difficult to replace the tachometer with a new one with your own hands. Dismantle the dashboard, remove the tachometer from it and install a new one. If all actions are performed correctly, the device will display the data correctly.
Voltmeter
Incorrect voltmeter readings (the needle is constantly in the red zone) most often indicate problems with the generator. But the regular pointer is unreliable and does not always work correctly. Therefore, it is desirable to replace it with a digital device.
Video: installation of a digital voltmeter on a VAZ 2107

Watches
The clock on the "tidy" VAZ 2107 is not the most necessary device, but many motorists are simply used to it.
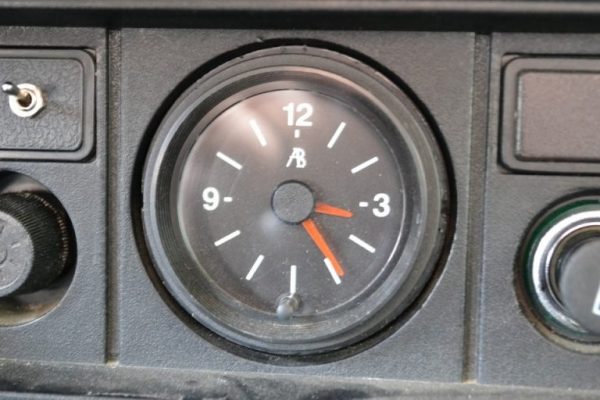
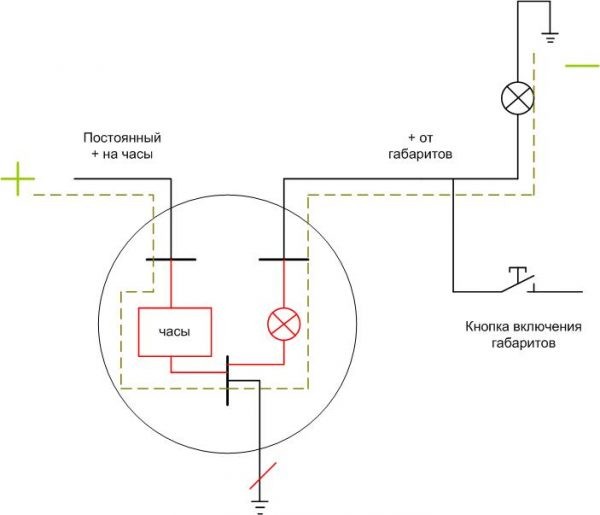
Removal and installation of the clock is carried out in the same way as the light switch. Connecting the clock following the diagram is not difficult. Three wires are connected to the device:
- "minus", is connected to the terminal, which is output to the car body;
- clock nutrition;
- backlight power.
The last two wires can be connected in any order. If the clock does not work, but there is a backlight, you should change the wires.
Replacing the steering column switch VAZ 2107
On the VAZ 2107, the steering column switch (also called the tube) is three-lever. With it, the driver controls the turn signals, headlights, windshield wiper and headlight washer.
The reasons for replacing the steering column switches may be:
- contact malfunction (turns do not work, headlights do not work);
- mechanical wear of the horn contact;
- broken control lever.
Replacing the steering column switches is carried out as follows:
- We remove the negative terminal from the battery.
- Set the steering wheel to a straight position.
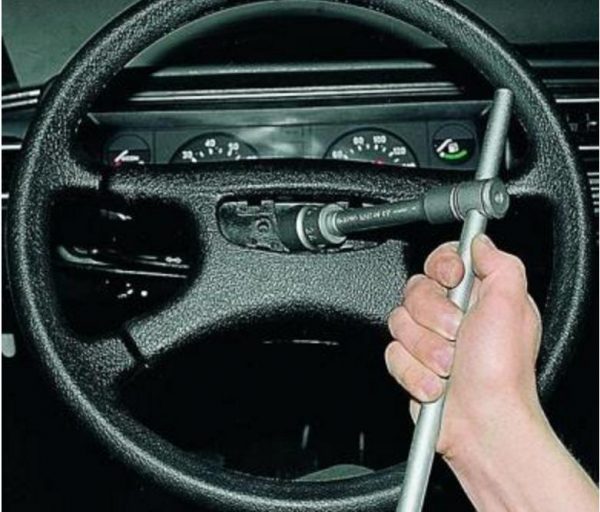
- Remove the decorative trim from the steering wheel.To gain access to the steering column switch, use a flat screwdriver to remove the steering wheel trim.
- Using a 24 mm wrench, loosen the steering wheel nut.Loosen the steering wheel nut with a 24 mm wrench, but do not unscrew it completely
- Loosening the steering wheel with both hands, pull it towards you. In this case, you need to act carefully so that the steering wheel does not fly out sharply.Loosen with both hands, remove the steering wheel
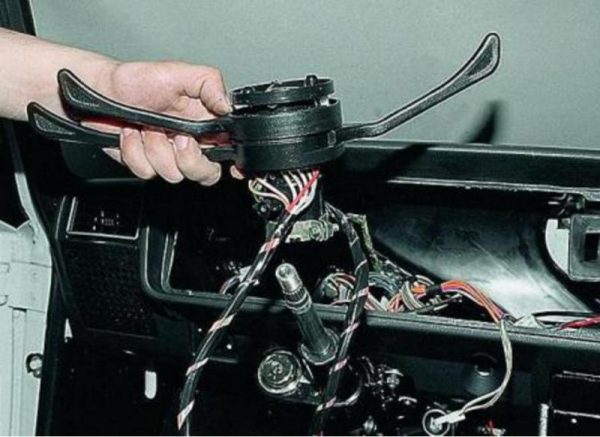
- Using a Phillips screwdriver, unscrew the four screws and one self-tapping screw of the steering column casing, then remove both halves.Using a Phillips screwdriver, unscrew the four screws and one self-tapping screw securing the steering column
Inside, we disconnect the pads of the power supply harness - eight-, six- and two-pin and remove them from the bottom of the dashboard.
Disconnect all connectors with wires and pull them out from the bottom of the dashboard- Loosen the tube clamp bolt with an 8 mm head and remove it together with the wiring harnesses.In the last step, remove the steering column switch along with the steering column wires


After dismantling the old steering column switch, install a new one. After putting on the steering wheel, tighten the fixing nut. With the normal functioning of all levers and the signal, the work can be considered completed.
A torpedo is the most important part of any car. Without indicators showing the fuel level, speed, malfunctions in the car, it is impossible to manage it well. If desired, the owner of the VAZ 2107 can replace the dashboard with a more beautiful, comfortable and ergonomic one. In addition, it is useful for every car enthusiast to know how to replace individual dashboard instruments in case of a malfunction.

