Decalinate and valve cleaning
Tutorial: Disassembling, Cleaning and Bypassing Valves
6 Kawasaki ZX636R 2002 Sports Car Restoration Saga: Episode 12
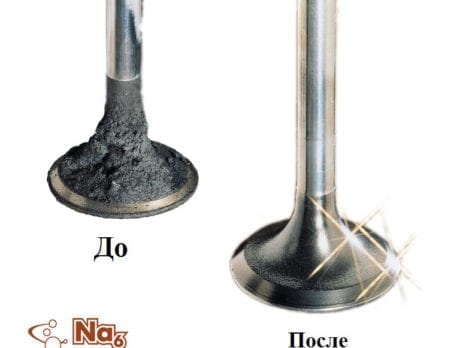
The problem with internal combustion engines is the unburned hydrocarbons that settle in the engine's combustion chamber and crystallize with heat to form carbon residue. It is indeed contamination that interferes with the proper functioning of the engine, with the first result of loss of power as well as valve wear. Therefore, it is necessary to clean, or more precisely, decalamine, so that the engine returns to normal operation.
The intake valve, whether original or custom, is expensive. Expect from 40 to 200 euros for a valve, depending on its workmanship and material. Therefore, it is worth it, especially when the engine is already dismantled, to spend time there cleaning and rebuilding them well. The valve is a small part, but it consists of many parts that have their own meaning.
Our 4-cylinder engine has 16 valves. This corresponds to each small circle shown in the photograph of the disassembled cylinder head. Imagine the cost, or rather the savings through food.
Conversely, I would not want to miss myself when cleaning or disassembling / reassembling. Moreover, a special tool is required to unpack the spring and remove it.
Fortunately, despite my failure, which often haunts me, I meet beautiful people. Edouard, the gentleman mechanic of the Rollbiker in Boulogne, Billancourt, offers me his help. It is on his wise and friendly advice that I go to his house, cylinder head in hand, for an accelerated mechanical course and a demonstration of complete cleaning and overtaking with a valve. Their state of pollution is important and their appearance is not very bright, let's see what our noble chef and mechanic from Boulogne can do.
He shows me gestures, calms me down and throws me in a big bath so I can learn to swim. Better yet, he kindly provides the necessary tools so that I can drive him back to the garage to participate. Let him be thanked a thousand times. So I'll leave with a spring loaded valve tappet and winding. On the other hand, the lapping paste is at the privileged resort ZX6R 636, where Alex and I will finish the maneuver. For the uninitiated, I delve into this tutorial in detail.
Specific search tools
Adapted tools are available online. I looked, just in case.
The spring loaded compressor valve is displayed at a base price of approximately 20 euros. Rate to which the valve lapping rate should be added. It is a suction cup that attaches to the valve cage (its head) and is used to pivot it towards itself in order to remake the perfect seal between its reach (the part that comes in contact with the cylinder head) and the body in the cylinder head. There are basically two models of rods: a manual rodent and a rodent adaptable to a drill or compressor. Prices range from 5 to 300 euros ... For me it will be a classic, just to keep a good sense of resistance and grain during friction.
Indeed, we must add the famous lapping paste to the maneuver. This will allow the two contact surfaces to adapt, eliminating them and eliminating them always and in any game. Thus, any risk of leakage. This operation is critical and the peeling paste can be of two types: coarse-grained and fine-grained. In my case, the fine grain worked wonders. We put it on the surface a little to "polish" it and rotate it, rotate it until you feel no particular resistance from the valve, until everything slides off, reflecting the smooth surface. Great, it's noted.
Steps to revitalize valves
Return to the garage to participate with the other 15 valves. Obviously, in simpler terms, the 636 has 4 valves per cylinder (two intake valves, 2 exhaust) and therefore a total of 16 valves that need to be redistributed. Edward showed me one of them, watching everything go well, so I had 14 things to do. He promised to be tedious and risky, it is not.
From the first past fears, I feel comfortable. Renovating them was an enjoyable operation. It touches the bicycle core valves. It requires precision, focus, safe gestures, and an assertive technique that refined quickly as the pleasure increased.
Remove each valve with a spring loaded compressor valve
The handling is simple. I am positioning the cylinder head "bottom". Therefore, the valves are located on the “carpet” side of the workbench and are always held firmly in place by pressing their spring against the cylinder head wall.
I position a valve lifter that automatically centers when I tighten its clutch. The round and hollowed out part, mobile, is in contact with the "cup" that holds the crescents. The other rests on the other side of the cylinder head. As I tighten the hug, he presses the cup (the cup that tightens the keys) and compresses the valve spring. This releases the keys (which I also call crescents), which usually hold the tail of the valve at the bleeding level provided for their placement.
This is a kind of criterion mine principle held by pressure, springs until you hit the rubber or cap.
The valve falls naturally and I rebuild it by lifting the cylinder head. In order not to lose the crescent moon, I release a spring compressor. They are prisoners again. They can also be removed to facilitate future escape. Well, just in case, I asked, even if it is very difficult to mislead them when dismantling, we can buy them back, from 2 to 3 euros ... each.
Valve polishing
At this point, once each valve is disassembled and removed from the body (what a beautiful room, anyway!), I gently retract it into the drill chuck (wired or cordless) and turn my head! A carousel that matches the occasion with a well-sharpened wood chisel. A device for decalminating the outside of the valve could also be used, but I didn't have a chemical solution or anything as effective as what I am currently doing. No fear of attacking the structure: it is solid from solid. On the other hand, I am very careful with the edges of the valve: do not attack them, like the seat (bottom). Obviously, taking a photo with both hands is not easy to illustrate the point, but you get the principle.
I am happy to pay attention to how I fit the rear valve into the cartridge. This takes 5 to 10 minutes per valve, depending on its condition and the precautions I am taking. I appreciate finding the correct rotation mode efficiently to adjust the appropriate speed to be able to remove scales and residues. I literally run away, refining the gesture. I observe, I study carefully, I observe, in short, I like it!
Replacing Tail Valve Seals
Once the valve is back to its original form (excellent!), It's time to put it back in place, I entrust the task to Alex. He is responsible for replacing and replacing the valve tail seals. He puts it on in his house without putting the crescent back on. This allows it to rotate freely around its tail axis.
Valve stems
You should now place the stem suction cup over the valve head and install the undergravel (bottom and beveled portion of the valve head) using a rubbing dough with your finger.
As the name suggests, its role is to use two contact surfaces to match perfectly and create a strong seal. How do we know this is done?
Frictional movement is carried out (alternating rotations from left to right), the valve is in place in its body. Initially, you feel through the stem of the stem as a roughness.
A grain that disappears as the surfaces match and the dough works. This is a kind of polishing that smooths the surfaces. When the valve patinates like butter, the turning is complete. To have a pure heart, you can test it once by returning some dough: the grain is gone.
As a reminder, Alex, an apprentice mechanic in his first year at the motorcycle mechanics school in Angoulême, is on vacation at home. Thorough, diligent, he takes the task seriously. An indispensable seriousness for such an operation, vital. A valve that twists, comes loose or something, and the engine is dead. Working in parallel allows us to have a good time together.
Come on, let's go for 10-15 minutes of treatment ... with a valve! And there are 14 ... I'll pass Alex, the gesture is worn out in the long run. Gently, using seaming, lapping paste and elbow oil will be done neatly. We think we are Cro Magnon trying to light the fire when we turn the rod in our hands as we go up and down to ensure it is perfectly placed. It takes off from time to time, but again, the action is captivating.
Crescent recovery
Therefore, we can put the crescents back in place, and this is not always easy: they tend to be tilted. A small screwdriver can help orient them and ease the situation. Be careful to put everything back in place: the valve tail seal that bounces, or the crescents that make the barrel, and we are bad: it will release the valve into the combustion chamber, and there ... hello, damage.
Cylinder head leak test
Once all valves are in place and out of service, it will be verified that the raised cylinder head will create a completely enclosed and non-sealed space. They provide good compression as well as good combustion and evacuation of gases from the explosion created by the spark plug. To do this, this time I turn the cylinder head and the valves pointing to the sky and pour gasoline into the crucible. If I see them flowing on the other side, on the work bench or on the fabric, there is a problem and you have to either check for proper valve placement or repeat the longer and applied lapping with a more aggressive paste, coarse grain to start and then fine grain. If that still doesn't work, we'll have to consider replacing the valve (s) in question, or reworking the cylinder head, or replacing it, or ... shouting a good shot.
If nothing happens, it means that everything is fine. And in my case, everything is fine. A small win to enjoy as much as the moments spent in training on the "old-fashioned" heavy mechanics, and those shared with Alex. For me, of course, it is also a mechanic: exchange.
We will be able to lift the cylinder head and distribution. To be continued…
Remember
- Checking the condition of the valves is a plus when returning the engine
- Replacing the tail valve seals is easier than it sounds and is especially recommended once you get there.
- The drilling option may not be the most academic, but it has proven itself
- Do not mix valves or put them back in their original place
- Clean only the top of the valve, pay attention to the border, the bypass will take care of the rest
To avoid
- Bad climb on the crescent holding the valves
- Assemble the coiled or leaky valve
- Use the drill at an inconsistent speed and too fast (low speed required)
- Damaged valve (even if it's not easy ...)
- Turn the valve tail
Tools:
- Spring Loaded Compressor Valve,
- organizer,
- cordless or cordless drill,
- Rodoir
- lapping dough