Timing UAZ Patriot
Content

Until recently, both the ZMZ-40906 gasoline engine and the ZMZ-51432 diesel engine were installed on the car. In October 2016, the manufacturer announced that due to low demand for the diesel version, only the ZMZ-40906 gasoline engine (Euro-4, 2,7 l, 128 hp) will remain in the factory line.
Features of the gas distribution mechanism UAZ Patriot
UAZ Patriot engines traditionally have a timing chain drive. The ZMZ-40906 engine is factory equipped with double-row leaf chains. This type of timing chain, in comparison with single-row or double-row roller-link chains previously used on UAZ engines, is not considered the most reliable and usually requires replacement after about 100 thousand kilometers. When operating a car, especially under conditions of increased loads, timing chains wear out and stretch. The main signal that it is time to replace the chains with new ones is strange metallic sounds under the hood (“rattling” of the chains), which are accompanied by a loss of engine power at low speeds.

Another unpleasant feature of leaf chains is that when the chain is loosened, an unexpected break can occur. After this, a serious repair cannot be avoided, therefore, if a timing problem is detected, it must be replaced immediately. When replacing a timing chain with a UAZ Patriot, experts recommend installing a more reliable roller chain, which has a longer service life and warns of wear long before there is a real danger of a chain break.
Preparing to replace the timing
The presence of two chains in the gas distribution mechanism - upper and lower - makes the process of repairing the gas distribution mechanism quite laborious. You can replace the UAZ Patriot timing belt with your own hands only if you have an equipped repair shop and mechanic skills.
You will need:
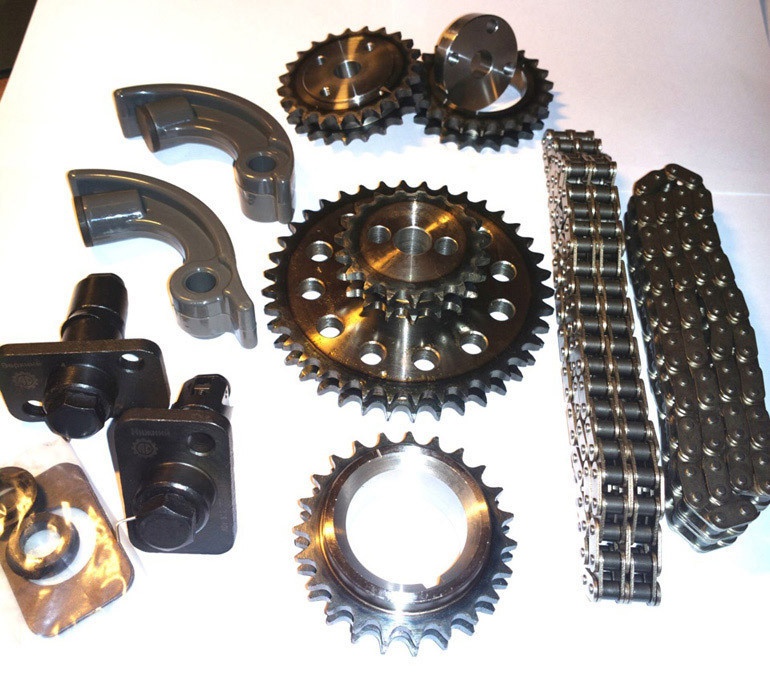
- Transfer kit repair kit: levers, sprockets, chains, shock absorbers, gaskets.
- Threadlocker and seam sealer
- Some new motor oil
Required Tools:
- Allen key 6mm
- Key set (from 10 to 17)
- Necklace and heads for 12, 13, 14
- Hammer, screwdriver, chisel
- Camshaft setting tool
- Accessories (antifreeze drain pan, jack, puller, etc.)
Before replacing, install the car so that you have access to the engine compartment from all sides, including from below. Turn off the ignition and remove the "negative" wire from the battery terminal.
In order to gain direct access to the gas distribution mechanism of the ZMZ-409 engine, you first need to dismantle several nodes located on or near the engine.
First of all, you need to drain the engine oil and antifreeze into suitable containers, after which you can remove the radiator. Partially unscrew the oil pan bolts or completely disassemble the pan; this will further facilitate the installation of the gas distribution mechanism. Next, remove the power steering pump drive belt, and also remove the fan pulley. Next, remove the drive belt from the generator and water pump (pump). After disconnecting the supply hose from the pump, it is necessary to remove the cylinder head cover. Disconnect the high voltage cables, unscrew the four screws and remove the cylinder head front cover together with the fan. Then, unscrewing the three bolts, disconnect the pump. Remove the crankshaft position sensor from its socket in the cylinder block by unscrewing the bolt that secures it. Remove the crankshaft pulley. Experienced mechanics recommend jacking up the engine.
Timing disassembly procedure
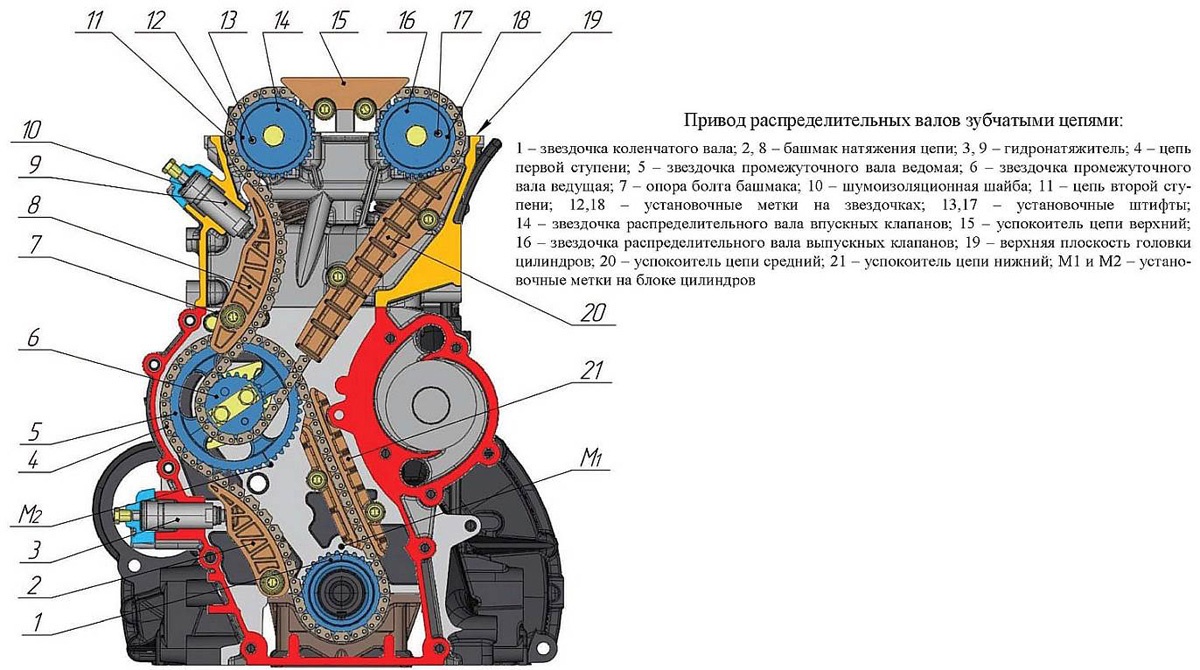
Then proceed to remove the parts of the handout. For orientation in the location of timing parts relative to the engine, use the attached timing diagram of the ZMZ-409 engine.
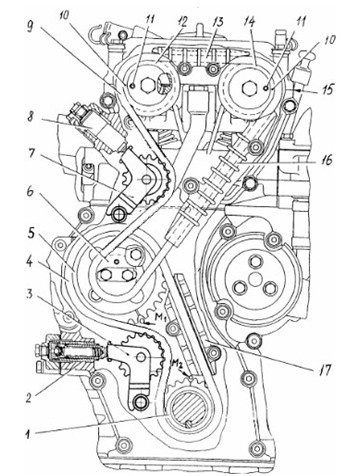
Disconnect gears 12 and 14 from the camshaft flanges using a special puller. Having unscrewed the bolts, remove the intermediate chain guide 16. Gears 5 and 6 are fixed on the intermediate shaft with two bolts and a locking plate. Loosen the bolts by bending the edges of the plate and preventing the shaft from turning with a screwdriver through the hole in gear 5. Remove gear 6 from the shaft using a chisel as a lever. Remove gear together with chain 9. Remove gear 5 from the shaft, remove it and chain 4. To remove gear 1 from the crankshaft, first remove the sleeve and remove the O-ring. After that, you can press the gear. Gears 5 and 6 are attached to the intermediate shaft with two bolts and a locking plate. Loosen the bolts by bending the edges of the plate and preventing the shaft from turning with a screwdriver through the hole in gear 5. Remove gear 6 from the shaft using a chisel as a lever. Remove gear together with chain 9. Remove gear 5 from the shaft, remove it and chain 4. To remove gear 1 from the crankshaft, first remove the sleeve and remove the O-ring. After that, you can press the gear. To remove gear 1 from the crankshaft, first remove the bushing and remove the O-ring. After that, you can press the gear.
Timing assembly
After the disassembly of the timing is completed, all worn timing parts should be replaced with new ones. Before installing the chain and gear must be treated with engine oil. When assembling, great attention should be paid to the correct installation of the timing gears, since the correct operation of the engine depends on this. If gear 1 was removed from the crankshaft, then it must be pressed in again, then put on the sealing ring and insert the sleeve. Position the crankshaft so that the marks on the gear and M2 on the cylinder block match. With the correct position of the crankshaft, the piston of the first cylinder will take the position of the top dead center (TDC). Attach the lower shock absorber 17 while not tightening the screws yet. Engage chain 4 on sprocket 1, then insert sprocket 5 into the chain. Place sprocket 5 on the intermediate shaft so that the sprocket pin aligns with the hole in the shaft.
Pass the upper chain through the hole in the cylinder head and engage gear 6. Then insert gear 14 into the chain. Slide gear 14 onto the exhaust camshaft. To do this, the shaft must first be turned slightly clockwise. After making sure that the pin 11 entered the gear hole, fix it with a bolt. Now rotate the camshaft in the opposite direction until the gear mark is aligned with the top surface of the cylinder head 15. The remaining gears must be stationary. Putting the chain on gear 10, fix it in the same way. Adjust the chain tension by installing dampers 15 and 16. Fit and secure the chain guard. Before installation, apply a thin layer of sealant to the edges of the chain cover.
Then attach the pulley to the crankshaft. Tighten the pulley mounting bolt by shifting the transmission to fifth gear and applying the parking brake. Then turn the crankshaft by hand until the piston of the first cylinder reaches the TDC position. Once again check the coincidence of the marks on the gears (1, 5, 12 and 14) and on the cylinder block. Replace the front cylinder head cover.
End of assembly
After installing all the timing parts and the cylinder head cover, it remains to mount the previously removed components: crankshaft sensor, pump, alternator belt, power steering belt, fan pulley, oil pan and radiator. After assembly is completed, fill in oil and antifreeze. Connect the high voltage cables and connect the "negative" cable to the battery terminal.