How to use a hair dryer to remove a dent
Even the most conscientious drivers get into accidents sometimes. Whether you hit a pole while exiting the grocery store or someone parked next to you pushed their car door open on yours, the reasons don't change the fact that you're left with an unsightly dent. Often these minor or not so minor defects are worth less than your insurance deductible, but more than you are willing to spend out of pocket. In such situations, many dents can be repaired without the help of an auto repair shop. You can use materials you already have on hand, such as a hair dryer.
While you can't work as a bodybuilder with just a hair dryer and a few other tools on hand, you can save a significant amount by trying to fix your car yourself. The mechanics of how this works is quite simple: the hair dryer generates heat, and at certain temperatures the metal is malleable. This means that you can shape metal, including body parts of your car, when it is hot enough.
Part 1 of 3: Damage Assessment
The blow dryer dent removal method will not work on a car that has been wrecked, but it will generally work well for small dents and dents in certain parts of your car. To assess whether your particular dent is suitable for this repair method, first look at its location.
Step 1: Mark where the dent is on the car.. Smoother surfaces such as the trunk, hood, roof, doors, or fenders are good candidates (dents in curved or wrinkled areas are much more difficult, though not impossible, to remove with this method).
Step 2: Measure the dent. If your indentation is three inches or more in diameter (and therefore relatively shallow) and has no visible paint damage, you will likely be able to remove it with a hair dryer.
There are actually two ways to use a hair dryer to remove dents from a car. One uses compressed air combined with the heat generated by a hair dryer, while the other uses dry ice. Both methods are generally effective in removing dents, which are good candidates for such removal, but many people are more comfortable using compressed air rather than dry ice. In addition, dry ice may be more difficult to obtain in some regions. In any case, it is important to have suitable gloves to protect your skin while you work - ideally insulated gloves with a rubber coating.
Part 2 of 3: Compressed Air
Necessary materials
- Sheer, soft fabric
- Compressed air
- Hairdryer
- Insulated, heavy-duty rubber-coated gloves.
Step 1: Make the area available. If possible, make both sides of the dent easily accessible. For example, open the hood if it is there.
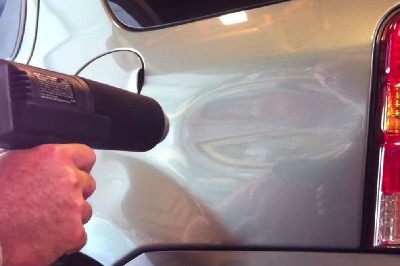
Step 2: Heat up the dent. Turn on the hair dryer at medium temperature and keep it five to seven inches away from the body of the car. Depending on the size of the dent, you may need to wave it back and forth or up and down to warm the area thoroughly.
Step 3: Evaluate Plasticity. Wearing gloves, evaluate the malleability of the metal after two minutes of heating by applying light pressure to the underside or outside of the dent. If you feel movement, move on to the next step. Otherwise, heat the area with a hair dryer for another minute and try again.
Step 4: Spray the dent with compressed air. Shake the can of compressed air and treat the dent by holding the can upside down (wearing heavy gloves). Continue spraying on the area until the metal returns to its original shape, usually 30 to 50 seconds.
Step 5: Wipe dry. Gently wipe any residual fluid released by compressed air from the surface with a clean, soft cloth.
Part 3 of 3: Dry Ice
Necessary materials
- aluminium foil
- Dry ice
- Hairdryer
- Insulated, heavy-duty rubber-coated gloves.
- Masking tape
Step 1: Heat Indented Area. As with the previous method, do your best to get access to both sides of the dent and heat the dent with a hair dryer until the metal is shaped.
Step 2: Place aluminum foil over the dent. Place a piece of aluminum foil over the dent, using duct tape around the corners to secure it in place. This will protect the paintwork from damage caused by dry ice.
Step 3: Wipe dry ice. For protection, put on protective gloves, take a piece of dry ice and rub it on the aluminum foil until you hear a pop, which usually lasts less than one minute.
Step 4: cleaning. Remove the aluminum foil and throw it in the trash.
While most people understand how to use a blow dryer to make dented metal soft enough to be reshaped, the purpose of using compressed air or dry ice is not always so quickly understood. Both products are very cold, so when the hair dryer heats the metal enough to expand, the sudden drop in temperature causes it to contract and return to its original shape.
- Functions: If after using one of the methods of removing dents with a hair dryer, discomfort or depression has decreased, but not completely recovered, you can repeat the procedure. When repeating one of these methods, be sure to take a break of at least a day between attempts. This is because it can damage the paintwork if the temperature in the area of the dent changes drastically in a short amount of time.