How to measure crown moldings with a miter saw protractor?
Content
In the conversion table, spring and corner angle values are converted to bevel and bevel angles so that compound cuts can be made.
Read on to learn how to use a lookup table to get compound cuts when installing moldings.

Step 1 - Find the Angle of the Spring
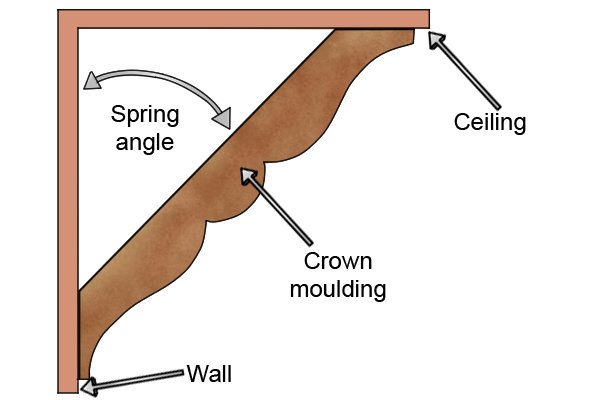
First, you need to know the spring angle of the crown molding. This is the angle between the wall and the ceiling where the molding is located. The angle is measured from the back of the molding to the wall.
 The typical angle for a crown molding is 45 or 38, simply because they are sold with those particular spring angles. Measure the angle of the spring by placing the bottom of the crown molding on a flat surface. If you are using the downloaded conversion table and a miter saw protractor to measure the angle of the spring, you will need to use an angle gauge such as a digital angle ruler.
Only combination protractors contain a protractor that can measure the spring angle.
Please note that this is just an example. You can use any type of goniometer that can adjust the angle up to 45 degrees.
Step 2 - Check the angle of the spring
Once you have measured the crown moulding, turn the instrument over and read the display to determine the spring angle.
Check the display or scale of the goniometer if you are using a downloaded conversion table.Step 3 - Measure the Corner Angle
Place the protractor beams against the corner corner where you are going to install the crown moulding.
Use the spring angle and miter angle and transfer them to the conversion table.Step 4 - Use a conversion table
Using the conversion table on the combo protractor will help you find the correct bevel and bevel angle so you can make a compound cut to install the crown mouldings. Find the column with the appropriate spring angle.
Then go down the left side of the table to find the bevel setting. For the bevel angle, hold on to the appropriate section of the degree crown, then look through the appropriate bevel cut row until you see the first column labeled "bevel angle". This will give you the correct bevel angle for the crown moulding. Now repeat the above step, but this time read the second column under the crown of the appropriate degree, labeled "bevel angle".For example, the bevel angle for a 38 degree crown and a 46 degree bevel is 34.5 degrees.
Step 5 - Transfer the corners to the miter saw
Finally, using the bevel and bevel angles from the conversion table, adjust the miter saw settings. After that, you will be ready to cut out the crown moldings.

