How to measure camber
Camber is the angle between the vertical axis of the wheel and the axis of the wheels as seen from the front. If the wheel is tilted outward at the top, the camber is positive. If the wheel at the bottom is tilted outward, the camber is negative. Most cars come from the factory with slightly positive camber at the front and negative camber at the rear.
Camber can lead to tire wear and slip. A camber set too positive will cause the vehicle to steer to that side and may also cause excessive tire wear on the outer edge of the tire. Too negative camber can cause excessive wear on the inner edge of the tire.
Most workshops use high tech equipment to measure camber and other set up angles. However, you can measure camber at home with a digital camber meter.
Part 1 of 2: Prepare the car for measurement
Necessary materials
- Camber gauge Long Acre Racing
- Free Autozone Repair Manuals
- Jack stands
- Protective gloves
- Chilton repair manuals (optional)
- Safety glasses
- Tire pressure gauge
Step 1: Prepare the car. Before measuring camber, park the vehicle on a level surface.
The vehicle must also have a normal curb weight, without excess cargo, and the spare wheel must be properly stowed.
Step 2: Adjust tire pressure. Check and adjust tire pressure according to manufacturer's specifications.
You can find the tire pressure specifications for your vehicle on the tire label affixed next to the driver's side door or in your vehicle's owner's manual.
Step 3: Check your vehicle's camber specifications.. Camber is measured in degrees. Check the alignment chart to confirm the desired camber values for your vehicle.
This information can be found in your vehicle repair manual and can be used to confirm that your camber is within specifications.
Step 4: Check the vehicle for wear on the steering and suspension.. Jack up the vehicle to check for excessive wear. Then rock the wheel up and down and side to side.
If you feel any play, have an assistant shake the wheel so you can determine which parts are worn.
- Attention: Determine which components are worn and replace them before measuring camber.
Part 2 of 2: Measure the camber
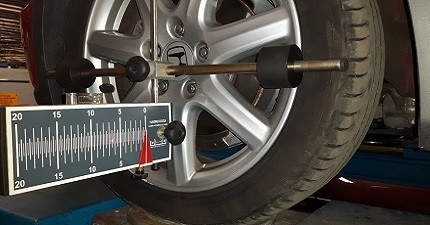
Step 1: Attach the camber sensor to the spindle.. Point the wheels straight ahead. Then attach the sensor to the wheel or spindle according to the instructions that came with the tool.
If the sensor comes with a magnetic adapter, make sure you attach it to a surface that is at right angles to the spindle.
Step 2: Align the sensor. Rotate the gauge until the bubble at the end of the gauge indicates that it is level.
Step 3: Read the sensor. To read the sensor, look at the two vials in the vials on either side of the sensor. They are marked with + and -. A line near the center of each bubble indicates the camber value. Each line represents 1/4º.
- FunctionsA: If you have a digital pressure gauge, just read the display.
If you prefer to have the alignment checked by a professional rather than buying an expensive do-it-yourself tool, seek the help of a mechanic. If you notice uneven tire wear, have a certified AvtoTachki mechanic have them inspected and repositioned for you.
Always consult a professional and experienced mechanic for any tire problems such as buckling, seizing or excessive wear on the outer edges of the tire.