How to tune drum brakes?
Content
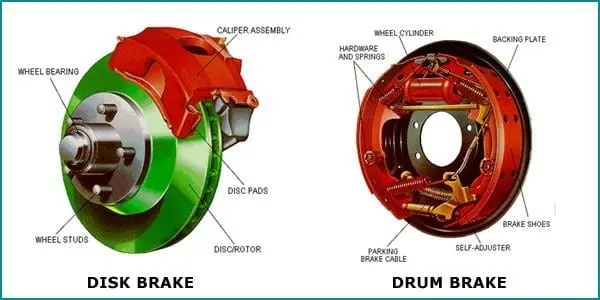
Although the new car models that are currently being manufactured at manufacturers' factories are equipped with disc brakes (front and rear), the percentage of cars equipped with front disc and rear drum brakes is still much higher.
We assume that your car is also equipped with front disc and rear drum brakes, and if our assumption is true, at least once you wondered how to adjust this type of brakes.
Therefore, we will try to tell you a little more about drum brakes and show how to configure them yourself (if you want to try).
What is the purpose of drum brakes?
The purpose of this type of brake is the same as that of disc brakes, or, in other words, the main purpose of drum brakes is to ensure smooth braking of the car when the brake pedal is pressed.
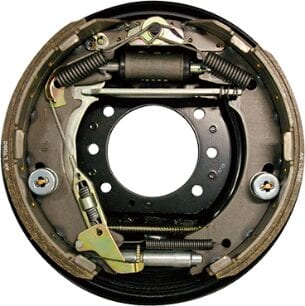
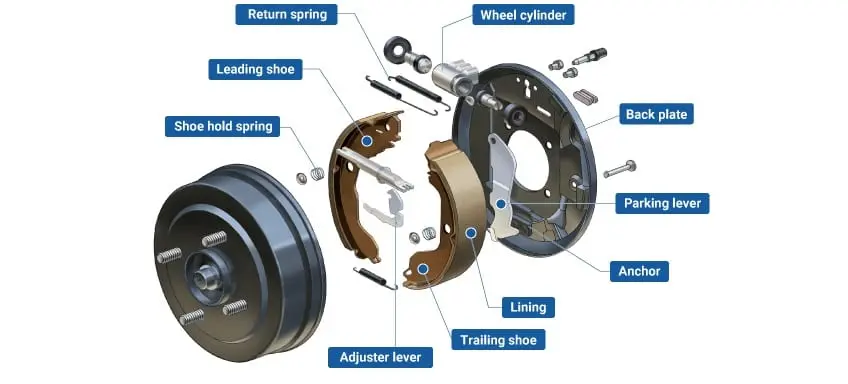
Unlike disc brakes, which consist of a brake disc, pads and brake caliper, the drums have a slightly more complex device, which includes:
Brake drum - made of cast iron and its purpose is to stop the car when you press the brake pedal. The drum brake is bolted to the wheel hub and rotates with it.
Stopping support - this is the friction part of the drum brake, without which its operation is absolutely impossible. During the application of the brake, the shoe is in contact with the brake drum. The brake shoe consists of a primary brake shoe (primary shoe) and a secondary brake shoe (secondary shoe)
- used to ensure that the brake caliper applies a load to the drum when the brake is applied. This cylinder contains a piston that, when the brake pedal is depressed, causes the brake shoe to press against the inner surface of the drum to stop the vehicle's wheel from moving.
Return springs – Brake shoe retraction is used when the brake is released. There are usually two springs, one for the primary shoe and one for the secondary shoe.
Self adjusting mechanism – it maintains a minimum distance between the brake caliper and drum so that they do not touch each other when the brake pedal is not depressed. In the event that the pads begin to wear and the distance between the caliper and the drum increases, this mechanism can adjust it to a certain point so that the brakes continue to work effectively.
You can make sure that the device of this type of brakes is a little more complicated, but if you take good care of them and regularly adjust them, they can work for a long time without the need to replace them.
How do drum brakes work?
When you press the brake pedal, the pressure of the working fluid in the system increases and puts pressure on the pistons of the working brake cylinder. This, in turn, overcomes the power of the connecting (return) springs and activates the brake pads. Pillows strongly pressed against the working surface of the drum, slowing down the speed of the wheels of the car. Due to the frictional forces that are created between the pads and the drum, the wheel stops.
After releasing the brake pedal, the return springs return the pads to their original position.
Why should you adjust drum brakes?
For this type of brake to function properly, the brake pads must remain close to the drum without touching it. If they move too far away from it (if the pad wears out) when you depress the brake pedal, the piston will need more fluid to keep the pads pushing against the drum, and the brake pedal will sink to the floor when you depress it to brake.
It is true that there is a self-adjusting mechanism in drum brakes, but over time its functions decrease, and therefore the brakes have to be adjusted manually.
How to set up drum brakes?
Before we tell you the basic steps for setting up this type of brake, you should be aware that not all drum brakes are adjustable. Therefore, it is very important to read the documentation about your car before you do anything to find out if your make and model of car have adjustable drum brakes or not.
Adjusting the brakes does not require the use of special tools, and the time you need to adjust them (especially if you are a beginner) is approximately one hour.
So here's how to adjust drum brakes
Step 1 - Provide the necessary tools
As we mentioned some time ago, the tools that you will need to complete the setup are the most common, and you will probably find them in the home workshop. This jack and stand for lifting the car, a set of keys, a screwdriver with a flat blade or an adjustment tool, a torque wrench, several clean rags and safety glasses.
Step 2 - Raise the rear of the car
Choose a level place and first lift it with a jack, then install the stand to raise the car so that it is convenient for you to work.
Make sure that you have correctly lifted the car and secured it securely so that it will not cause problems when adjusting the brakes.
Step 3 - Remove Tires
To gain access to the rear drum brakes, after lifting the vehicle, the rear wheels of the vehicle must be removed. Using a wrench, unscrew the wheel nuts and set them aside. Do the same with the other wheel. Remove the nuts and place them where you can easily find them later.
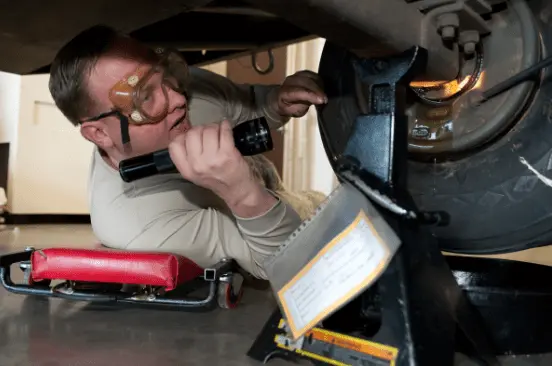
Step 4 - Locate the drum brake control
The brake adjuster is located inside the drum. If you do not see it, use a flashlight to light it up and better view. Once you find it, remove the rubber cap that protects it and insert the end of the adjusting tool or a flat screwdriver into the hole. You should feel the teeth of the star wheel with the tip of a screwdriver.
Step 5 - Adjust the brakes
Using an adjusting tool or a flat-blade screwdriver and start adjusting the brakes by turning the star wheel.
When you set up a star wheel, you need to know what you are actually doing. Therefore, turn the drum by hand so that the wheel rotates. If you feel that the tension is increasing, it means that your approach is correct and you are indeed adjusting the brakes. However, if you feel the voltage drop and the drum spins very freely, the adjustment has failed and you must turn the star wheel in the opposite direction.
Step 6 - Check the tension of the shoe against the drum.
To make sure the settings are correct, perform another test by turning the drum every four to five revolutions of the star wheel. The drum should move freely, but you can feel the slipping of the pad that touches it when you turn the wheel.
Step 7 - Align the brake pads and parking brake
After making sure that you have completed the adjustment, carefully get into the car and simultaneously press the brake and parking brake pedals to center the calipers and integrate the parking brake correctly.
Step 8 - Check Brake Tension Balance
Ask a friend to help you with this step by pressing the brake pedal. The pressure on the pedal should be sufficient to tighten the brake pads, but still allows you to rotate the drum. If both drums operate at the same voltage, this means that your brakes are adjusted. If not, you'll have to work a little harder to set them up correctly.
Step 9 - Replace the rubber bushing, put on the wheels and tighten the nuts.
This step is the penultimate one. After adjusting, just insert the sleeve into the hole, insert the wheels and tighten the nuts well.
Step 10 - Remove the machine and test
Use the jack again to raise the car so that you can extend the stand on which you originally placed it. Then carefully remove the jack and your car is ready for testing.
Before starting the test, “pump” the brake pedal several times to make sure that the pedal is working correctly. Check the brakes in a safe place. If the pedal lowers or you feel its sticking, this indicates that the adjustment failed, but if everything went well, you can proudly congratulate yourself on the fact that you completely managed to adjust the drum brakes of your car.

Before we part, let's see what are the advantages and disadvantages of drum brakes.
This type of brake has a simpler production and definitely lower price (compared to the price of disc brakes). In addition, they are quite effective, because the contact area between the pads and the drum is larger.
Among their main disadvantages: their large mass compared to disc brakes, weaker cooling and instability when braking when water or dirt gets into the drum. Unfortunately, these shortcomings are quite serious, so in recent years, almost all car manufacturers have switched to using only disc brakes.
Questions and answers:
Can drum brakes be replaced with disc brakes? Yes. In this case, you will need a new hub and installation kits, consisting of calipers, pads, discs, hoses, bolts and fasteners.
How to set up drum brakes correctly? It depends on the modification of the braking system. In many modern cars, there is a service window for adjusting the pads (closed with a rubber plug). The pads are brought down through it.
How to recognize disc or drum brakes? If the shape of the wheel rim allows, you need to look at the hub part from the side of the wheel arch liner. You can see a polished disc with a caliper - a disc system. You can see a closed drum - drum.