How to set up and adjust the carburetor
While all modern cars use computer-controlled fuel distribution systems, there are still many cars on the road that use the traditional carburetor method of fuel delivery. To electronically controlled fuel systems…
While all modern cars use computer-controlled fuel distribution systems, there are still many cars on the road that use the traditional carburetor method of fuel delivery. Before electronically controlled fuel systems were developed, automobiles used mechanical fuel delivery systems, often in the form of carburetors, to supply fuel to the engine.
Although carburetors are no longer considered common, for many decades they were the preferred method of delivering fuel and working with them was much more common. While there aren't many cars left on the road with carburetors, it's imperative that those that do are properly tuned and adjusted for optimum performance.
Carburettors can fail for several reasons. Adjusting a carburetor, however, is a relatively simple job that can be done with a basic set of hand tools and some technical knowledge. This article shows you how to adjust air-fuel mixture and idle speed, two of the most common adjustments when setting up a carburetor.
Part 1 of 1: Carburetor Adjustment
Necessary materials
- Safety glasses
- Screwdriver assortment
Step 1: Remove the engine air filter.. Locate and remove the engine air filter and housing to gain access to the carburetor.
This may require the use of hand tools, however in many cases the air filter and housing are attached with just a wing nut, which can often be removed without the use of any tools.
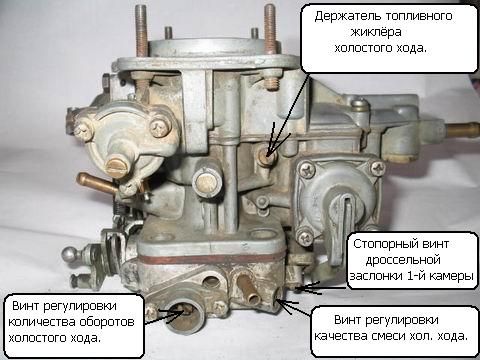
Step 2: Adjust Air-Fuel Mixture. Use a flathead screwdriver to adjust the air/fuel mixture.
With the air filter removed and the carburetor open, locate the air-fuel mixture adjustment screws, often simple flathead screws.
Depending on the make and model of the car, different carburetors may have several, sometimes up to four, air-fuel mixture adjusting screws.
These screws are responsible for controlling the amount of fuel entering the engine and improper adjustment will result in reduced engine performance.
- Functions: Carburettors can have multiple screws, so check your service manual to make sure you position the screws correctly to avoid misadjustment.
Step 3: Monitor Engine Condition. Start the car and let it warm up to operating temperature.
Pay attention to the working condition of the engine. Use the table below to determine if the engine is running lean or rich.
Determining whether the engine is running lean or rich will help you properly tune it for the best engine performance. This will let you know if it is running out of fuel or if it is using an excessive amount.
- FunctionsA: If you are still not sure about the condition of your engine, you can enlist the help of a certified mechanic to inspect the engine to avoid misadjusting the carburetor.
Step 4: Re-adjust the air/fuel mixture screws.. Once the engine is up to operating temperature, go back to the carburetor and adjust the air/fuel ratio screw or screws.
Tightening the screw increases the amount of fuel, and loosening it decreases the amount of fuel.
When making any adjustments, it is also important to make them in small quarter-turn increments.
This will prevent any major fuel changes that could significantly affect engine performance.
Loosen the adjusting screws until the engine runs lean.
- Functions: When the engine is running lean, the rpm drops, the engine starts to run rough, rattle and rattle until it stalls.
Loosen the mixture screw until the engine starts to show signs of a lean mixture, then tighten it in quarter-turn increments until the engine runs smoothly.
- Functions: When the engine is running smoothly, the idle speed will remain constant and the engine will run smoothly, balanced, without misfiring or shaking. It should also spin smoothly throughout the rev range without misfiring or juddering when the throttle is pressed.
Step 5: Check the engine at idle and RPM.. RPM the engine after each adjustment to make sure it continues to run smoothly at higher RPMs.
If you notice vibration or shaking, continue adjusting until the engine runs smoothly at both idle and rpm throughout the rev range.
Your throttle response should also be crisp and responsive. The engine should rev smoothly and quickly as soon as you step on the gas pedal.
If the vehicle exhibits any sluggish performance or misfiring when depressing the gas pedal, further adjustment is required.
- A warning: If there are multiple screws, it is important to try to adjust them all in the same increment. By keeping all adjusted screws as close together as possible, you will ensure the most even distribution of fuel in the engine, ensuring the smoothest operation and operation at all engine speeds.
Step 6: Locate the idle mixture screw.. Once the air/fuel mixture screws have been properly adjusted and the engine runs smoothly at both idle and RPM, it's time to locate the idle mixture screw.
The idle screw controls the air-fuel mixture at idle and is often located near the throttle.
- FunctionsNote: The exact location of the idle mixer screw can vary greatly depending on the make and model, so check your owner's manual if you are not sure where the idle mixer screw is located. This ensures that incorrect adjustments are not made that could adversely affect engine performance.
Step 7: Adjust the idle mixture screw until you get a smooth idle.. Once the idle mixture screw has been determined, adjust it until the engine idles smoothly, without misfiring or shaking, and at the proper speed.
In much the same way as when adjusting the air-fuel mixture, loosen the idle mixture screw to a lean state, and then adjust it in quarter-turn increments until the desired idle speed is reached.
- Functions: If you are not sure what the idle speed should be, refer to the owner's manual for directions or simply adjust the screw until the engine idles smoothly without a sudden drop in rpm or stalls when the rpm is increased from idle. . Consider having your engine idling professionally inspected if you still have problems.
Step 8. Replace the air filter and test the car.. After all adjustments are made and the engine runs smoothly at all engine speeds, install the air filter and housing to the carburetor and test drive the vehicle.
Pay attention to any changes in vehicle power output, throttle response and fuel consumption. If necessary, go back and make any necessary adjustments until the vehicle runs smoothly.
All things considered, adjusting a carburetor is a relatively simple task that you can do yourself. However, if you are not comfortable making adjustments that are critical to the operation of your engine, this is a task that any professional technician, such as those from AvtoTachki, can perform. Our mechanics will be able to check and adjust your carburetor or even replace the carburetor if any major problems are found.