How to tighten the drive belt
If you've just changed your drive belt and notice a high-pitched squeak or squeal under the hood, or if you notice that the drive belt doesn't fit well on the pulleys, your drive belt may be loose. . This article will show you how to tighten your drive belt to get rid of that annoying squeak or squeal.
- Attention: Cars with belts that require manual tightening usually have multiple belts such as an AC belt and an alternator belt. In vehicles with a single V-ribbed belt that uses an automatic belt tensioner, it is not possible to tension the drive belt manually.
Part 1 of 3: Belt Check
Materials
- Eye protection
- Gloves
- Large screwdriver or pry bar
- Ratchet and sockets
- Governor
- Set of wrenches
Step 1: Put on protective gear and locate the drive belt. Wear safety goggles and gloves.
Locate the drive belt - there may be several in the car. Make sure you are working with a belt that needs to be tensioned.
Step 2: Measure belt deflection. Place a ruler along the longest section of the belt on the vehicle and press down on the belt.
While pressing down, measure how far the belt goes. For most vehicles, the belt should not push more than ½ inch. If it can be pressed lower, then the belt is too loose.
- AttentionA: Manufacturers have their own specifications regarding the degree of belt deflection. Be sure to check the owner's manual for your specific vehicle.
Also make sure the drive belt is in good condition before you begin to tension it. Look for any cracks, wear, or oil on the belt. If damage is found, the drive belt will need to be replaced.
- Functions: An alternative way to check if the drive belt needs tension is to rotate the belt. It should not rotate more than 90 degrees; if it can turn more, you know the belt needs to be tightened.
Part 2 of 3: Tighten the belt
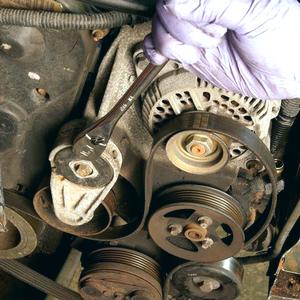
Step 1: Locate the drive belt tensioner.. The drive belt assembly will have a special component that tensions this belt.
The tensioner can be found on the alternator or pulley; it depends on the car and on which belt is tensioned.
This article will use the alternator belt tensioner as an example.
The generator will have one bolt that fixes it in a fixed place and allows it to turn. The other end of the alternator will be attached to a slotted slider that allows the alternator to change position to tighten or loosen the belt.
Step 2: Loosen the alternator bolts. Loosen the pivot bolt as well as the bolt that goes through the adjustment strap. This should relax the generator and allow some movement.
Step 3: Add tension to the drive belt. Insert a pry bar over the alternator pulley. Push up lightly to tighten the drive belt.
Once the drive belt is tensioned to the desired tension, tighten the adjusting bolt to lock the belt in place. Then tighten the adjusting bolt to manufacturer's specifications.
After tightening the adjusting bolt, check the belt tension again. If the tension remains stable, proceed to the next steps. If the tension has decreased, loosen the adjusting bolt and repeat step 3.
Step 4: Tighten the pivot bolt on the other side of the generator.. Tighten the bolt to manufacturer's specifications.
Part 3 of 3: Final Checks
Step 1: Check Belt Tension. When all bolts are tightened, recheck the belt deflection at the longest point.
It should be less than ½ inch when pushed down.
Step 2: Start the engine and listen for extraneous sounds.. Make sure that no noise is heard from the drive belt.
- Attention: The belt may be adjusted several times to reach the correct tension level.
If you have difficulty with any of these steps, our certified mobile mechanics at AvtoTachki will be happy to come to your home or office to adjust the drive belt tension or perform any other drive belt maintenance you may need.