How to clean the EGR valve
The EGR valve is the heart of the engine's exhaust aftertreatment system. EGR is short for Exhaust Gas Recirculation, and that's exactly what it does. This wonderful environmentally friendly device opens under certain engine operating conditions ...
The EGR valve is the heart of the engine's exhaust aftertreatment system. EGR is short for Exhaust Gas Recirculation, and that's exactly what it does. This remarkable environmentally friendly device opens at certain engine operating conditions and allows the exhaust gases to be recirculated back through the engine a second time. This process drastically reduces harmful emissions of nitrogen oxides (NOx), which greatly contribute to the formation of smog. In this article, you will find information about the function of the EGR valve, as well as how to clean the valve and why it often needs to be cleaned or replaced.
The EGR valve lives a hard life. In fact, it is probably one of the most complex parts of a modern engine. It is constantly punished with the hottest temperatures a car can create and is clogged with particles of unburned fuel, better known as carbon. The EGR valve is delicate enough to be controlled by engine vacuum or a computer, while being able to withstand the 1,000-degree carbon-laden exhaust gas temperature every time the engine is running. Unfortunately, there is a limit to everything, including the EGR valve.
After thousands of cycles, the carbon begins to deposit deposits inside the EGR valve, limiting the valve's ability to do its job as an EGR gatekeeper. These carbon deposits get bigger and bigger until the EGR valve stops functioning properly. This can lead to a variety of handling problems, none of which are desirable. When this malfunction occurs, there are two main remedies: cleaning the EGR valve or replacing the EGR valve.
Part 1 of 2: Cleaning the EGR valve
Necessary materials
- Basic hand tools (ratchets, sockets, pliers, screwdrivers)
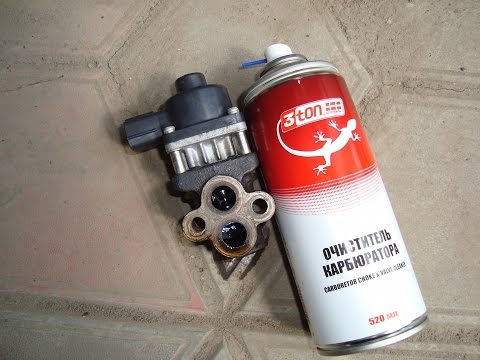
- Carburetor and throttle cleaner
- Scraper gasket
- needle nose pliers
- Rubber gloves
- Safety glasses
- small brush
Step 1 Remove all electrical connectors.. Start by removing any electrical connectors or hoses that are attached to the EGR valve.
Step 2: Remove the EGR valve from the engine.. The complexity of this step depends on the type of vehicle, as well as the location and condition of the valve.
It usually has two to four bolts holding it to the intake manifold, cylinder head, or exhaust pipe. Loosen these bolts and remove the EGR valve.
Step 3: Inspect valve ports for blockage and deposits.. Also inspect the corresponding ports on the motor itself. They often become clogged with carbon almost as much as the valve itself.
If clogged, try removing large pieces of carbon with needle nose pliers. Use a carburetor and throttle body cleaner in combination with a small brush to clean up any extra residue.
Step 4: Inspect the EGR valve for deposits.. If the valve is clogged, clean it thoroughly with a carburetor and choke cleaner and a small brush.
Step 5: Check for heat damage. Inspect the EGR valve for damage caused by heat, age and of course carbon buildup.
If it is damaged, it must be replaced.
Step 6: Clean the EGR valve gasket.. Clean the gasket area on the EGR valve and engine with a gasket scraper.
Be careful not to get small pieces of gasket into the EGR ports on the engine side.
Step 7: Replace the EGR gaskets.. Once everything is cleaned and inspected, replace the EGR gasket(s) and attach it to the engine to factory specifications.
Step 8: Check for leaks. Check operation according to factory service manual and check for vacuum or exhaust leaks.
Part 2 of 2: EGR valve replacement
EGR valves can sometimes be problematic to replace due to the age, condition, or type of vehicle itself. If you're having difficulty with the steps below, it's always best to see a professional.
Necessary materials
- Basic hand tools (ratchets, sockets, pliers, screwdrivers)
- Scraper gasket
- Rubber gloves
- Safety glasses
Step 1 Remove any electrical connectors or hoses.. Start by removing any electrical connectors or hoses that are attached to the EGR valve.
Step 2: Remove the bolts securing the EGR valve to the engine.. Usually there are from two to four, depending on the car.
Step 3: Scrape off the gasket material from the mating surface. Keep debris out of the EGR port of the engine.
Step 4: Install a new EGR valve and valve gasket.. Install a new EGR valve gasket and EGR valve to the engine to factory specifications.
Step 5: Reconnect Hoses or Electrical Connections.
Step 6: Recheck your system. Check operation according to factory service manual and check for vacuum or exhaust leaks.
EGR valves are simple in how they work, but often not easy when it comes to replacement. If you are not comfortable replacing the EGR valve yourself, have a qualified mechanic like AvtoTachki replace the EGR valve for you.