
How to connect a solar panel to an LED lamp (steps, extension switch and testing tips)
Content
Follow these simple steps to install a solar panel and use the generated energy to light up your garden or driveway.
Powering your LED downlight from a solar panel is a good long term energy saving solution as it can cut down on your energy bills. By using our guide, you can save on installation costs and set up your solar panel system without the help of an electrician.
First, I will show you how to connect a solar panel to an LED lamp. You can easily expand the system to get additional benefits when you are sure.
In a simple setup, all you need other than a solar panel and an LED bulb is two wires and a resistor. We will connect the LED lamp directly to the solar panel. Then I'll show you how to expand this system by adding a switch, rechargeable batteries, an LED or charge controller, a capacitor, a transistor, and diodes. I will also show you how to check the current if you need it.
Things You'll Need
To connect a solar panel to an LED light, you will need the following nine items:
- A solar panel
- LED light
- LED controller
- Wires
- Connectors
- Wire Stripping Tool
- Crimping tool
- Screwdriver
- Soldering iron
An LED usually requires very little power, so if you're only using a solar panel for LED lighting, it doesn't have to be big or powerful. When you buy a solar panel you should have a copy of the wiring diagram, but if you don't have one it's a simple process as explained below.
Connecting a solar panel to an LED lamp
Simple method
The simple method of connecting a solar panel to LED lights requires a small amount of material and preparation.
It is suitable for those cases when you want to get the job done quickly and effortlessly. With additional options, which I will discuss later, you can expand the capabilities of this system later.
Apart from the solar panel and LED, all you need is an LED controller (optional), two wires and a resistor.
So, let's begin.
If you look at the back of the solar panel, you will find two terminals with the polarity marked on them. One should be marked positive or "+" and the other negative or "-". Even if only one is marked, you will know that the other has the opposite polarity.
We will connect two identical polarities with wires and insert a resistor into the positive wire. Here is the connection diagram:
To connect a solar panel to an LED lamp, it is quite simple:
- Strip the ends of the wires (about half an inch).
- Connect the wires with a crimping tool
- Connect each pin to the connector for each wire as shown in the wiring diagram.
- Using these connectors, connect the solar panel to the charge controller.
- Connect to the charging regulator with a screwdriver.
- Connect the LED controller to the LED.
Now you can use the solar panel to power your LED lighting.
Connecting a separate LED in the circuit as an indicator can give a visual indication of whether the solar panel is on or off (see picture below).
Other Components You Can Include
The simple setting above will be limited.
To better control the operation of the LED, you can connect the LED to the LED controller and then to the solar panel. But there are other components that you can also connect to the solar panel and LED circuit you made.
In particular, you can add the following:
- A switch control the circuit, i.e. turn it on or off.
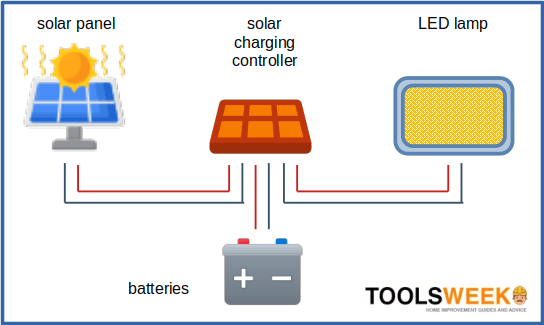
- Accumulator battery if you want to use the LED light connected to the solar panel at any time of the day other than sunlight.
- A charge controller to prevent batteries from overcharging (if you are using a battery and have more than 5 watts of solar power for every 100 Ah of battery capacity).
- Capacitor if you want to reduce interruptions during the operation of the solar panel, i.e. when something interferes by blocking the light source. This will smooth out the power supply from the panel.
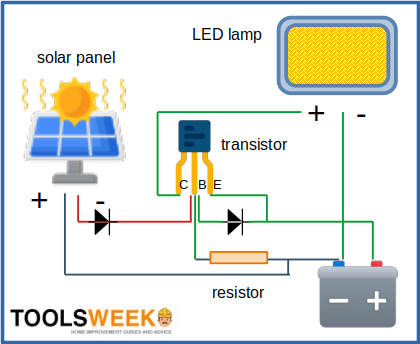
- PNP transistor can be used to determine the level of dimming.
- A diode will ensure that current flows in only one direction, i.e. from the solar panel to the LED lamp and batteries, and not vice versa.
If you decide to add rechargeable batteries, I would recommend that you also include a diode in the circuit that only allows current to flow in one direction. In this case, it will allow it to flow from the solar panel to the battery, but not vice versa.
If you are using a capacitor, the base LED light may require a 5.5 volt capacitor, or you can use two capacitors of 2.75 volts each.
If you turn on the transistor, it will be controlled by the voltage of the solar panel, so when the sunlight is too bright, the transistor should turn off, and when there is no sunlight, the current should flow to the LED.
Here is one of the possible connection schemes, which includes a battery, a transistor and two diodes.
Current test
You may need to test the current for brightness or another power issue with the LED bulb.
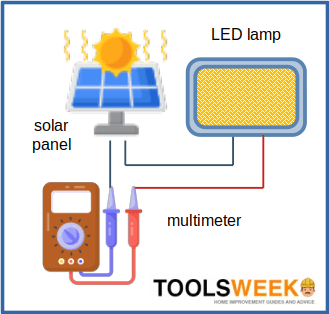
I'll show you how it's done with a low power LED in electronic circuits. Specifically, I tested this method using a solar panel rated at 3 volts and 100 mA. I also used a multimeter, a gooseneck lamp and a ruler. Also, you will need a battery for this test.
Here are the steps:
Step 1: Prepare your multimeter
Set the multimeter to measure DC current, in this case in the 200 mA range.
Step 2 Connect the test lead
Connect the red lead of the solar panel to the long lead of the LED using one alligator clip test lead. Then connect the multimeter's red test lead to the LED's short wire, and its black test lead to the solar panel's black wire. This should form a series circuit as shown below.
Step 3: Check the LED
Position the LED under test about 12 feet (XNUMX inches) above the panel and turn it on. The LED should light up. If it doesn't, recheck your multimeter wiring and setup.
Step 4: Check the current
Get the current reading on the multimeter. This will show you exactly how much current is going through the LED. You can check the characteristics of the LED to make sure that there is enough current.
Video link


