How to bleed car brakes
An automotive braking system is a hydraulic system that uses an incompressible fluid to transfer braking force from your foot to working components attached to your vehicle's wheels. When these systems are serviced, air can enter through an open line. Air can also enter the system through a leaky fluid line. Compressed air entering the system or fluid leaking can seriously impair braking performance, so the system must be bled after repair. This can be done by bleeding or bleeding the brake lines and this guide will help you with that.
The process of bleeding the brake system is similar to flushing brake fluid. When the brakes are bled, the goal is to remove any trapped air from the system. Flushing the brake fluid serves to completely remove the old fluid and contaminants.
Part 1 of 2: Problems with the brake system
Typical symptoms that occur when a fluid leaks typically include:
- The brake pedal falls to the floor and often does not return.
- The brake pedal may become soft or spongy.
Air can enter the hydraulic brake system through a leak, which must be repaired before attempting to bleed the system. Weak wheel cylinder seals in drum brakes can start to leak over time.
If you live in an area where salt is regularly used to de-ice roads due to cold weather, rust can develop on exposed brake lines and rust through them. It would be better to replace all the brake lines on this car, but some kits allow parts to be replaced.
Many modern vehicles with an anti-lock braking system (ABS) require the system module to be bled using a special procedure that often requires the use of a scan tool. If this is your case, hire a qualified technician as air bubbles can get into these blocks and be very difficult to remove.
- Attention: Read your vehicle's service manual and look under the hood for the master cylinder or ABS module, which may have an air outlet. Start with the wheels and go back to the master cylinder for best results if you can't find a specific procedure.
Other problems with the hydraulic brake system:
- Stuck brake caliper (caliper may be stuck in the clamped or released state)
- Clogged flexible brake hose
- Bad master cylinder
- Loose drum brake adjustment
- Leak in fluid line or valve
- Bad/leaky wheel cylinder
These failures may result in component replacement and/or require the brake fluid system to be bled and flushed. If you notice a soft, low or spongy pedal along with increased braking force, it is important to contact the service department immediately.
Part 2 of 2: Bleeding the brakes
This method of purging the brake fluid will allow you to complete the process without a partner. Be sure to use the correct fluid to avoid contamination of the brake fluid and damage to the brake system.
Necessary materials
Offset head designs work best and should include sizes at least ¼, ⅜, 8mm, and 10mm. Use a wrench that fits your car's bleeder fittings.
- Clear tubing (12" long section sized to fit snugly over vehicle air vent screws)
- Brake fluid
- Can of brake cleaner
- Disposable Waste Fluid Bottle
- Jack
- Jack's stand
- Rag or towel
- Nut socket (1/2″)
- Torque wrench (1/2″)
- Vehicle Service Manual
- Wheel chocks
Set of wrenches
FunctionsA: 1 pint of brake fluid is usually enough to bleed, and 3+ would be required when replacing a major component.
Step 1: Set the parking brake. Set the parking brake and place wheel chocks under each wheel.
Step 2: Loosen the wheels. Loosen the lug nuts on all wheels about half a turn and prepare the lifting equipment.
Functions: Maintenance can be performed on one wheel or the entire vehicle can be raised and jacked up while the vehicle is on level ground. Use common sense and create a safe work environment.
A warning: Some vehicles have a bleed valve on the ABS module and master cylinder. For more information, see the vehicle's service manual.
Step 3: Open the hood and check the current brake fluid level.. You can use the Max and Min markings for reference. You don't want the brake fluid level to ever drop below the minimum level mark.
- Functions: On some brake fluid reservoir designs, you can use a turkey syringe or a squirt to speed up the flushing process a bit.
Step 4: Fill the reservoir with brake fluid up to the Max.. You can add more, but be careful not to spill brake fluid. Brake fluid can corrode rust-preventing coatings and create big problems.
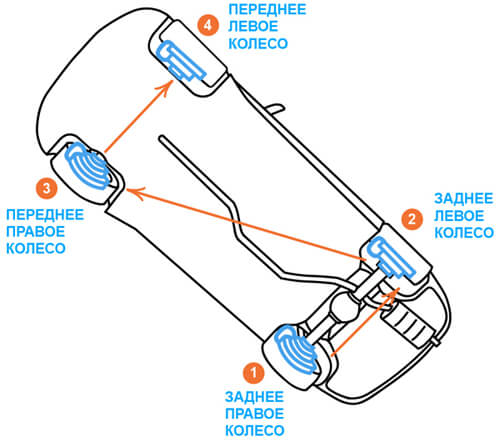
Step 5: Check the bleed sequence for your vehicle in your service manual.. Start where the service manual recommends, or you can usually start at the bleed screw furthest from the master cylinder. This is the right rear wheel for many cars and you continue with the left rear, right front, then bleed the left front brake assembly.
Step 6: Raise the corner of the car you'll start with. Once the corner is up, place a jack under the car to support the weight. Do not crawl under a vehicle that is not supported by proper equipment.
Step 7: Remove the first wheel in sequence. Locate the bleed screw at the rear of the caliper or drum brake cylinder**. Remove the rubber cap from the bleed screw and do not lose it. These caps protect against dust and moisture that can cause rust on the closed outlet.
Step 8: Place the ring wrench on the bleeder screw.. An angle wrench works best because it leaves more room for movement.
Step 9: Slide one end of the clear plastic hose onto the bleed screw nipple.. The hose section must fit snugly against the nipple on the bleed screw to prevent air leakage.
- A warning: The hose must remain on the bleeder to prevent air from being sucked into the brake lines.
Step 10: Put the other end of the hose into a disposable bottle.. Place the outlet end of the transparent hose into a disposable bottle. Insert a section long enough so that the hose does not fall out and become tangled.
- Functions: Route the hose so that the hose rises over the vent screw before bending back to the container, or position the container above the vent screw. Thus, gravity will allow the liquid to settle while the air rises from the liquid.
Step 11: Using a wrench, loosen the bleed screw about ¼ turn.. Loosen the bleed screw while the hose is still connected. This will open the brake line and allow fluid to flow.
- Functions: Because the brake fluid reservoir is located above the bleeders, gravity may cause a small amount of fluid to enter the hose when the bleeders are opened. This is a good sign that there are no blockages in the fluid line.
Step 12: Slowly depress the brake pedal twice.. Return to the brake assembly and inspect your tools. Make sure fluid enters the clear tube and does not leak out of the tube. There should be no leakage when the liquid enters the container.
Step 13: Fully and slowly depress the brake pedal 3-5 times.. This will force fluid out of the reservoir through the brake lines and out of the open air outlet.
Step 14: Make sure the hose has not slipped off the bleeder.. Make sure the hose is still on the air outlet and all fluid is in the clear hose. If there are leaks, air will enter the brake system and additional bleeding will be required. Check fluid in transparent hose for air bubbles.
Step 15 Check the brake fluid level in the reservoir.. You will notice that the level has dropped slightly. Add more brake fluid to refill the reservoir. Do not allow the brake fluid reservoir to dry out.
- Attention: If there are air bubbles in the old fluid, repeat steps 13-15 until the fluid is clean and clear.
Step 16: Close the bleed screw. Before removing the transparent hose, close the air outlet to prevent air from entering. It doesn't take much force to close the air outlet. A short pull should help. Brake fluid will spill out of the hose, so have a rag ready. Spray some brake cleaner to remove brake fluid from the area and reinstall the rubber dust cap.
- Functions: Close the bleed valve and at this time get back in the car and depress the brake pedal again. Pay attention to the feeling. If the pedal used to be soft, you will feel the pedal become stiffer as each component is blown.
Step 17: Make sure the bleeder screw is tight.. Change the wheel and tighten the lug nuts as a sign that you have completed the service at this corner. if you serve one corner at a time. Otherwise, move on to the next wheel in the bleeding sequence.
Step 18: Next wheel, repeat steps 7-17.. Once you have access to the next corner in the sequence, repeat the leveling process. Be sure to check the brake fluid level. The reservoir must remain full.
Step 19: Clean Up Residual Fluid. When all four corners have been removed, spray the bleed screw and any other parts soaked with spilled or dripping brake fluid with brake cleaner and wipe dry with a clean rag. Leaving the area clean and dry will make it easier to spot leaks. Avoid spraying brake cleaner on any rubber or plastic parts, as the cleaner can make these parts brittle over time.
Step 20 Check the brake pedal for hardness.. Bleeding or flushing brake fluid generally improves pedal feel as compressed air is removed from the system.
Step 21 Inspect the bleed screws and other fittings for signs of leakage.. Fix as needed. If the bleed screw was left too loose, you must start the whole process over.
Step 22: Torque all wheels to factory specifications. Support the weight of the corner you are tightening with a jack. The car can be lifted, but the tire must touch the ground, otherwise it will just spin. Use a ½” torque wrench and socket nut to secure the wheel properly. Tighten each clamp nut before removing the jack stand and lowering the corner. Continue to the next wheel until all are secured.
- A warning: Dispose of used fluid properly as used engine oil. Used brake fluid should NEVER be poured back into the brake fluid reservoir.
This one-man method is very effective and provides a significant reduction in moisture and air trapped in the hydraulic brake system, as well as providing a very stiff brake pedal. Test run time. Before starting the car, press the brake pedal firmly to make sure it is soft and firm. At this point, you should feel almost like stepping on a stone.
You may feel the pedal go down or up as the vehicle starts to move and the brake booster starts to work. This is normal because the brake assist system amplifies the force applied by the foot and directs all of that force through the hydraulic system. Take a ride on the car and slow it down by pressing the brake pedal to check your work. The brakes should have a very fast and sharp response to the pedal. If you feel that the pedal is still too soft or the braking performance is not enough, consider hiring one of our mobile experts here at AvtoTachki to help.