How to check the fan sensor
Content
Question how to check the fan sensor, car owners may be interested in when the internal combustion engine radiator cooling fan does not turn on or, conversely, it works constantly. And all because often this element is the cause of such a problem. in order to check the sensor for turning on the cooling fan, you need to know the principle of its operation, and you should also use a multimeter to take some measurements.
Before proceeding to the description of the procedure for checking the radiator fan switch-on sensor, it is worth understanding how it works and its basic types of malfunctions.
How the fan sensor works
The fan switch itself is a temperature relay. Its design is based on a bimetallic plate connected to a movable rod. When the sensitive element of the sensor is heated, the bimetallic plate bends, and the rod attached to it closes the electric circuit of the cooling fan drive.
The sensitive element comes into contact with antifreeze, usually in the radiator (in its lower part, on the side, depends on the car model), but there are ICE models where the fan sensor is placed in the cylinder block, such as in the popular VAZ-2110 car (on injector ICEs). ). And sometimes the design of some internal combustion engines provides for as many as two sensors for turning on the fan, namely, on the inlet and outlet pipes of the radiator. This allows you to both turn on and turn off the fan forcibly when the antifreeze temperature drops.
It is also worth knowing that there are two types of fan temperature sensor - two-pin and three-pin. Two pins are designed for fan operation at one speed, and three pins are designed for two fan speeds. The first speed is switched on at a lower temperature (for example, at +92°С…+95°С), and the second - at a higher temperature (for example, at +102°С…105С°).
failure of the fan switch sensor
The cooling fan switch-on sensor is a fairly simple device, so it has few causes of breakdowns. It may not work in such cases:
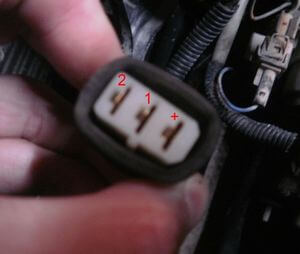
Connectors on a three-pin DVV chip
- Contact sticking. In this case, the fan will run constantly, regardless of the temperature of the antifreeze.
- Contact oxidation. In this case, the fan will not turn on at all.
- Breakage of the relay (rod).
- Wear of the bimetallic plate.
- No fuse power.
Please note that the fan switch sensor is non-separable and cannot be repaired, therefore, if a failure is detected, it is changed. In a modern car, the check engine light will signal a problem, since one or more of the following errors will be recorded in the memory of the electronic control unit (ECU) - p0526, p0527, p0528, p0529. These error codes will report an open circuit, both signal and power, but this happened due to sensor failure or wiring or connection problems - you can only find out after checking.
How to check the fan sensor
in order to check the operability of the fan switch-on sensor, it must be dismantled from its seat. As mentioned above, it is usually located either on the radiator or in the cylinder block. However, before dismantling and testing the sensor, you need to make sure that power is supplied to it.
Power check
DVV Power Check
On the multimeter, we turn on the DC voltage measurement mode within the range of about 20 Volts (depending on the specific model of the multimeter). In the disconnected sensor chip, you need to check for voltage. If the sensor is two-pin, then you will immediately see if there is 12 volts there. In a three-contact sensor, you should check the voltage between the pins in the chip in pairs in order to find where there is one “plus” and where there are two “minuses”. Between the "plus" and each "minus" there must also be a voltage of 12V.
If there is no power on the chip, first of all you need to check whether the fuse is intact (it can be both in the block under the hood and in the passenger compartment of the car). Its location is often indicated on the fuse box cover. If the fuse is intact, you need to “ring” the wiring and check the chip. Then it is worth starting to check the fan sensor itself.
However, before draining the antifreeze and unscrewing the radiator cooling fan sensor, it is also worth doing one small test that will make sure that the fan is working properly.
Checking the operation of the fan
With the help of any jumper (a piece of thin wire), close the “plus” in pairs and first one, and then the second “minus”. If the wiring is intact, and the fan is working, then at the moment of the circuit, first one and then the second fan speed will turn on. On a two-contact sensor, the speed will be one.
it is also worth checking if the fan turns off when the sensor is turned off, if the contacts are stuck in it. If, when the sensor is turned off, the fan continues to work, then this means that something is wrong with the sensor, and it needs to be checked. To do this, the sensor must be removed from the vehicle.
Checking the sensor for switching on the fan
You can check the DVV in two ways - by heating it in warm water, or you can even heat it with a soldering iron. Both of them imply continuity checks. Only in the latter case, you will need a multimeter with a thermocouple, and in the first case, a thermometer capable of measuring temperatures above 100 degrees Celsius. If a three-contact fan switch-on sensor is checked, with two switching speeds (installed on many foreign cars), then it is advisable to use two multimeters at once. One is to check one circuit, and the second is to simultaneously check the second circuit. The essence of the test is to find out if the relay is activated when heated to the temperature indicated on the sensor.
They check the sensor for turning on the radiator cooling fan according to the following algorithm (using the example of a three-pin sensor and one multimeter, as well as a multimeter with a thermocouple):
Checking DVV in warm water with a multimeter
- Set the electronic multimeter to the "dialing" mode.
- Connect the red probe of the multimeter to the positive contact of the sensor, and the black one to the minus, which is responsible for the lower fan speed.
- Connect the probe that measures the temperature to the surface of the sensitive element of the sensor.
- Turn on the soldering iron and attach its tip to the sensitive element of the sensor.
- When the temperature of the bimetallic plate reaches a critical value (indicated on the sensor), a working sensor will close the circuit, and the multimeter will signal this (in the dialing mode, the multimeter beeps).
- Move the black probe to "minus", which is responsible for the second fan speed.
- As the heating continues, after a few seconds, the working sensor should close and the second circuit, when the threshold temperature is reached, the multimeter will beep again.
- Accordingly, if the sensor does not close its circuit during warm-up, it is faulty.
Checking a two-contact sensor is carried out similarly, only the resistance needs to be measured between only one pair of contacts.
If the sensor is heated not with a soldering iron, but in a container with water, then make sure that not the entire sensor is covered, but only its sensitive element! As it heats up (control is carried out by a thermometer), the same operation will occur as described above.
Hack and predictor Aviator
The cooling fan switch sensor is a reliable device, but if there is a suspicion that it has failed, then to check it, you need a multimeter, a thermometer and a heat source that will heat the sensitive element.