How to check the pressure on the radiator cap
Radiator caps are pressure tested using a cooling system pressure gauge. This indicates whether the pressure in the cooling system is at a normal level.
As the temperature of the coolant in your cooling system rises, the pressure in the system also increases. The normal operating temperature of a cooling system is about 220 degrees Fahrenheit, and the boiling point of water is 212 degrees Fahrenheit.
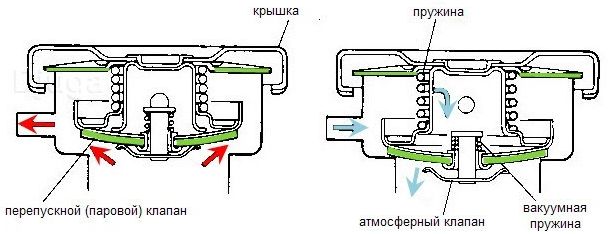
By pressurizing the cooling system, the boiling point of the coolant rises to 245 degrees Fahrenheit at 8 psi. The pressure in the cooling system is controlled by the radiator cap. Radiator caps withstand 6 to 16 psi pressure for most automotive systems.
Most cooling system pressure test kits come with everything you need to test pressure on most vehicles. This also includes checking the radiator caps. For pressure testing of cooling systems of various makes and models of vehicles, adapters for each manufacturer are required.
Part 1 of 1: Crimping the Radiator Cap
Required material
- Cooling system pressure tester
Step 1: Make sure the cooling system is not hot.. Gently touch the radiator hose to make sure it is hot.
- A warning: Extreme pressure and heat play a role. Do not attempt to remove the radiator cap while the engine is hot.
Step 2: Remove the radiator cap. Once the engine is cool enough to touch the radiator hose without burning you, you can remove the radiator cap.
A warning: There may still be pressurized hot coolant in the system, so be sure to pay attention and be careful.
Functions: Place a drip tray under the radiator to catch any coolant that may leak out when the radiator cap is removed.
Step 3: Attach the radiator cap to the pressure gauge adapter.. The cap is put on the pressure gauge adapter in the same way as it is screwed onto the radiator neck.
Step 4: Install the adapter with the cover installed on the pressure tester..
Step 5: Inflate the gauge knob until the pressure reaches the pressure indicated on the radiator cap.. The pressure should not be lost quickly, but it is normal to lose a little.
- Functions: The radiator cap must withstand most of the maximum pressure for five minutes. However, you don't have to wait five minutes. Slow loss is normal, but rapid loss is a problem. This requires a bit of judgment on your part.
Step 6: Install the old cap. Do it if it's still good.
Step 7: Buy a new radiator cap from an auto parts store.. Make sure you know the year, make, model, and size of your engine before heading to the parts store.
It is often helpful to bring an old radiator cap with you.
- FunctionsA: It is recommended to bring old parts with you to buy new ones. By bringing in old parts, you can be sure you're leaving with the right parts. Many parts also require a core, otherwise an extra charge will be added to the price of the part.
Radiator caps are an integral part of the cooling system that many underestimate in keeping the cooling system balanced. If you'd like one of AvtoTachki's professional technicians to check your radiator cap under pressure, make an appointment today and have one of our mobile mechanics check it for you at your home or office.