How to check the injector nozzle
Content
Question how to check injectors, can periodically occur both among owners of injection cars and cars with diesel ICE. To diagnose injectors, specialists use various methods and tools. In most cases, the simplest injector check is do-it-yourself.
injection nozzles
How to check the operation of injectorswhat you need to produce for this, and what tools you will need next, you will find out.
Signs of nozzle breakage
The task of the nozzle is to supply fuel to the combustion chamber. Therefore, the basic breakdown that can occur with it is clogging or its complete failure. Symptoms of injector malfunction include:
- unstable operation of the internal combustion engine at idle;
- a significant increase in fuel consumption;
- problems with starting the internal combustion engine, especially “cold”;
- in some cases, a significant amount of black smoke may appear from the exhaust pipe (if a lot of fuel enters the combustion chamber through a leaking nozzle), and sometimes it is also accompanied by periodic loud pops from the muffler;
- loss of the dynamic qualities of the car, expressed in the fact that the car accelerates poorly, it lacks power, jerks are felt while driving even on a flat surface, including when releasing gas and when changing the load value on the internal combustion engine.
These signs, of course, may indicate other problems of the car's power unit, however, if they occur, we advise you to check the nozzles and, if necessary, repair or replace them.
Causes of failure of injector nozzles
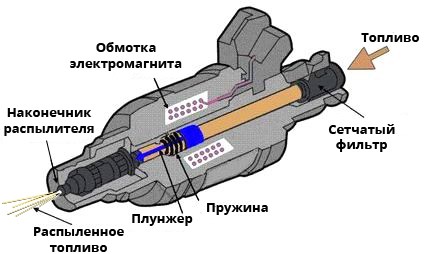
Nozzle device
Modern fuel injectors in gasoline internal combustion engines are of two types - electromagnetic and mechanical. The first is a solenoid valve that is controlled by the vehicle's ECU system. When the appropriate signals are given, the valve opens to a certain angle, regulating the amount of fuel supplied to the cylinder. The second only supplies fuel to the channel. In its design there is a needle with a step. When there is enough pressure, the fuel overcomes the resistance of the spring and the needle rises. Accordingly, the atomizer opens and fuel is supplied to the chamber. At present, electromagnetic nozzles have gained wide popularity, as they are more technologically advanced. Therefore, we will continue to consider checking and cleaning using their example.
There can be only a few malfunctions of an electromagnetic injector:
- lack of a signal from the ECU;
- breakage or complete failure of the winding;
- clogged nozzle outlet.
As practice shows, it is the latter option that is the most common cause of complete or partial failure of the injector.
How to check fuel injectors on an injection engine
There are several methods of how to check the operation of the injector. Let's list them in order with a detailed indication of the algorithm of actions.
Checking by measuring resistance
You can check the injectors without removing them using a multimeter. To get started, check which injectors are installed on your car - high or low impedance (electrical resistance). This data will be needed to perform an accurate diagnosis. In order to check the injectors with a tester without removing them from the internal combustion engine, you need to adhere to the following plan:
Measuring the resistance of the injector winding
- remove high-voltage wires from injectors;
- set the multimeter to the mode of measuring insulation resistance (ohmmeter) in the range from 0 to 200 ohms (depending on the technical parameters of the device, the upper limit may differ, most importantly, so that the ohmmeter can show a resistance value of several tens of ohms);
- turn off the ignition and remove the negative terminal from the battery;
- disconnect the electrical connector on the injector being diagnosed (usually, for this, the mounting clip located on the block body is snapped off);
- connect the test leads of the tester to the injector leads and measure.
High impedance injectors have insulation resistance within 11…17 Ohm, and low impedance — 2…5 Ohm.
If the value of the measured insulation resistance differs significantly from the specified value, this indicates that the injector is faulty. Accordingly, the nozzle must be dismantled and a detailed diagnosis should be made.
It is important to know that the voltage to the injectors from the ECU is supplied in a pulsed form, not a constant one. Therefore, it is recommended not only to measure the resistance with an ohmmeter, but also to take an oscillogram of the impulse voltage transfer using an oscilloscope, so you can see what peak voltage it takes. The tester will show you only the average values.
How to check the power supply to the injectors

Checking the power supply to the fuel rail VAZ 2110-2112
We will consider checking the availability of power to the ramp using the example of VAZ 2110, 2111, 2112 cars, as one of the most popular. But first, recall that in the block with contacts, four of them supply power to the injectors, and one (pink wire with a black stripe) is the common "mass". You need to act according to the following algorithm:
- disconnect the power chip;
- set the upper limit of the measured resistance in the region of 200 Ohm on the multimeter (this value depends on the specific model of the tester);
- measure in pairs any of the four contacts from the injectors with a common connector.
Resistance value should be within 11,5 ... 15,5 ohms. Remember that this will only measure the resistance of each injector on the ramp.
You can check the nozzle just for vibration. With the engine running a good nozzle should vibrate a little... If there is no tremor, then it is out of order.
Checking the power supply from the car's electrical circuit is quite simple, you just need to:
- in turn, from each nozzle, you need to disconnect the block of the supply wires;
- after that, connect the injector directly to the battery with two pieces of wires;
- turn on the ignition.
If the nozzle begins to spray fuel, then the problem must be sought in the wiring.
How to check the starting nozzle
First, let's say a few words about the monoinjector. Today, there are fewer and fewer such units, since the system is outdated. Its essence lies in the installation of only one nozzle - in front of the throttle. They can be found on old models of foreign cars VW, Audi, Skoda, Seat and others.
Let's describe the algorithm for checking the resistance of an injector on a mono-injector:
- check the contacts from the injectors in pairs and compare them with the data from the manual (usually, these values \u1,2b\u1,6bshould be in the range of XNUMX ... XNUMX ohms);
- when checking contacts 1 and 4, you need to make sure that the DTVV (intake air temperature sensor) is working correctly, for this, also use the resistance data from the manual;
- if the resistance value is out of range, you need to diagnose the injector in more detail.
Starting nozzle
Often, in the old mono-injector ICEs, in addition to the valve injector, the so-called starting nozzle is also used, the task of which is to give an additional amount of fuel when starting the ICE, especially in cold weather and high ICE speeds, in order to to make it easier to launch. Its operating time is determined automatically by the ECU (namely, a thermal relay), but usually it is only a few seconds, after which it turns off, since the internal combustion engine starts up and there is no need for its further use.
Its operation is completely similar to the operation of the nozzles in the injector. During operation, it can also partially or completely fail. A clear sign of such problems is the fact that a cold ICE starts and immediately stalls. The starting injector is checked according to the following algorithm:
- pick up some small measuring container (like a glass);
- remove the nozzle from the internal combustion engine and install it in the mentioned container;
- one contact of the nozzle is connected directly to the car battery, and the other to its “mass”;
- the fuel pump relay is also connected to the “plus” of the battery, thereby putting it into operation.
During operation and testing of the pump, the nozzles must be turned to the fuel spray angle, as well as the amount of gasoline pumped. Reference data can be found in the reference information for the injector that is installed in your car. As an indicative example, data on the K-Jetronic system can be given. In this case, the spray angle is 80°, and the volume is from 70 to 100 cubic centimeters of fuel per minute. Naturally, in other systems, these indicators will be different.
After you check the operation of the mono nozzle, disconnect it and wipe it dry. In normal working condition, its body is sealed. And this means that fuel should not leak from it. Wait a while and make sure of this (1 ... 2 minutes is enough for this).
Checking the injector by ear
Experienced car owners are able to check the condition and performance of the injectors without removing them from the internal combustion engine, namely, aurally. To do this, use the usual rectangular plank Or better yet, a stethoscope.
Attach one end tightly to the injector to be checked, and the other end to the ear. If the nozzle is in normal working condition, then you will not hear any extraneous sounds or vibrations from it, only uniform clicks. But if it does not click or the sounds are not uniform, and there are other vibrations and knocks, this means that the nozzle under study is clogged. And the stronger the knocks and noises, the greater the degree of blockage.
In general, you can listen to the nozzles without the mentioned board. However, this requires relevant experience. The fact is that with a faulty node, a muffled high-frequency sound, similar to a squeak or whistle, will be heard from the cylinder block. If you heard it while the internal combustion engine is running, we recommend that you check the operation of the nozzle in more detail on a stand or ramp.
Checking the nozzles on the ramps
Fuel rail
there is also one method for checking injectors - with the fuel rail removed (it is removed along with the injectors, so this method can be attributed to one that involves removing the injectors). To do this, the ramp is removed along with the nozzles, and cups or other containers are installed under them, where fuel will fall. In this case, it is desirable to remove the “negative” terminal from the battery, and disconnect the power wire harnesses. Before switching on, the circuit must be restored.
After that, connect the two fuel pipes, and clamp the fittings holding them with a key. then you need to turn the starter for 10 ... 15 seconds (but not longer, since this is harmful to it). At the same time, it is important to notice the shape of the “torch”, under which fuel is supplied, as well as the amount of gasoline in the glasses. With serviceable injectors, the amount of gasoline in them should be the same. If this is not the case, then for further detailed diagnostics it must be removed and checked at the stand.
it will also be useful to notice if gasoline is leaking from the nozzle when the engine is turned off. If this is the case, then it is worth checking the integrity of the nozzle body, as well as the degree of its closure.
Checking the balance of injectors
Checking the balance of injectors
Consider injector balance check on the example of VAZ cars. Actions are performed in the following sequence:
- turn off the fuel pump and start the car in order to remove excess fuel pressure in the system (the car should work for a few seconds and stall);
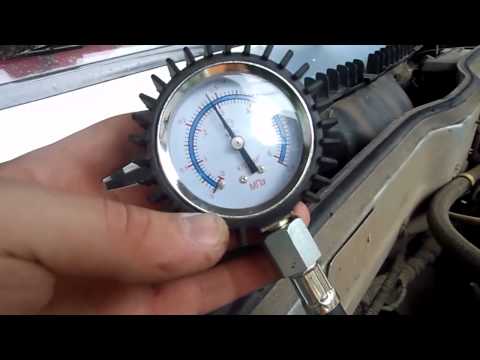
- connect a pressure gauge to the fuel system;
- reconnect the fuel pump to the system;
- connect a computer with the appropriate software and a cable for taking and diagnosing readings to the car's computer.
Further actions are carried out in the software, with the help of which the fuel pump is turned on and off, as well as the injectors. The algorithm of action for each of them is as follows:
- turn on the ignition;
- we check the readings on the pressure gauge (should be about 2,8 ... 3 atm);
- using the software, disable the fuel pump relay;
- on the pressure gauge, the pressure dropped slightly (approximately 2,8 atm);
- turn on the first injector using the software;
- check the pressure on the pressure gauge (ideally, the pressure should not drop significantly);
- turn on the fuel pump relay again with the help of the program in order to restore the pressure to the original 2,8 ... 3 atm;
- then repeat the procedure with all injectors, after which do not forget to restore pressure in the system using the fuel pump.
Ideally, all injectors should show the same pressure relief. If in any of them the reset occurs with a very different value, this means that something is wrong with the injector, and additional diagnostics are needed.
After performing the described procedures, do not forget to completely relieve the pressure in the system. you need to connect the fuel pump and start the car, after which you can disconnect the pressure gauge.
Checking injectors on the bench
Stand for testing injectors
Mechanical characteristics affect the performance of injectors. And their verification is possible only at a special stand. You can read how to make it with your own hands in a separate material. Namely, at the stand they check:
- the amount of fuel passing through the nozzle;
- fuel pressure;
- the shape of the “torch” of the nozzle.
Checking the removed injector on the stand is the most accurate diagnostic method. With it, you can determine the degree of damage to the nozzle and the feasibility of repair.
How to clean nozzles
The most common problem in the operation of nozzles is their banal contamination. Therefore, in order to restore their performance and return the nominal performance of the nozzle, it is enough to clean it. This can be done in two ways - without removing it from the internal combustion engine (by adding a special cleaner to the fuel) and in the removed state (by passing the cleaner through a separate nozzle or ultrasound). The following methods are used for cleaning:
- mechanical;
- ultrasonic;
- with the help of chemicals.
In this article, we will only talk about a few, since often additional professional equipment is needed to clean nozzles. You will find detailed information on self-cleaning in another material. Here we will briefly touch on these methods.

Cleaning the nozzle at home
A single nozzle can be cleaned using special chemicals. For example, the same additives that are added to the fuel to clean the system or the so-called “Carburetor Cleaner”. In this case, you need to act according to the following algorithm:
- prepare in advance “Carburetor Cleaner” (or its equivalent in the form of a spray can), a contact button without fixing the closed position, a syringe with a volume of 5 ml or more, a tube for extending the neck of the syringe with a seal, an empty container, preferably a large volume (5-10 liters ), charger from a mobile phone with a cut plug, contact wires with terminals;
- then you need to insert the test nozzle into the back of the syringe (as tightly as possible, with or without an elastic band);
- after that, connect the terminals through the button to the charger and plug it into the outlet;
- insert the tube into the sprayer of the cleaning agent, and deploy the back of the nozzle into the prepared empty container;
- after that, press the sprayer so that a certain amount also gets into the nozzle;
- press the contact button to activate the nozzle.
If the nozzle is in good order, detergent should come out under pressure from its reverse side. The purge procedure must be repeated several times to achieve the desired degree of purity.
In addition to the above methods of verification, one can also mention checking the toxicity of gases and opacity - a low level of CO during gassing is a sign of poor injector performance. this method is practiced in some service stations, as a control of the operation of the internal combustion engine. Since both certain knowledge and equipment are needed, we will not consider it as one of the options for self-diagnosis.
you also cannot ignore and pay attention to checking the injectors for correcting fuel supply and lambda, but here the situation is the same as with toxicity, you will need not only diagnostic equipment, but also be able to understand all the numbers that diagnostics will show you.
Cleaning the nozzle without removing it
Injector cleaner
In this case, cleaning can be carried out in several ways:
- With the use of special cleaning additives that are added to the fuel. They contain special cleaning agents that gently clean the nozzle holes.
- Pressure cleaning. To do this, you need to accelerate the car to a speed of 110 ... 130 km / h, and drive 10 ... 15 km (about 5 ... 6 minutes) at high engine speeds. Due to the high load in the nozzles, natural cleaning will occur.
- Idling. This method is similar to the previous one. it is necessary to start the internal combustion engine while the car is stationary and maintain the speed at the level of 4 ... 5 thousand for 3 ... 4 minutes. This will also clean the nozzles. However, the previous cleaning method is better because the load under its conditions is higher.
Conclusions
Problems in the operation of the injectors are not a critical breakdown, however, if they occur, we recommend that you do not postpone checking and repairing the breakdown. In most cases, repairs can be carried out independently using the methods described above. Timely check and diagnostics of injectors will allow you to avoid problems with the operation of the car. Prevention will cost you less than repair work on injectors or other internal combustion engine components. We recommend that you clean the nozzles after every 30 ... 35 thousand kilometers your car, regardless of its condition.