How to check and add fluid to a car with an automatic transmission
Checking and filling the transmission with sufficient fluid will help you enjoy driving.
Automatic transmissions can operate reliably for tens of thousands of miles without the need for any major maintenance. The gearbox itself is filled with fluid, thanks to which everything runs smoothly. The transmission sends all the power coming from the engine to the wheels, so if the parts inside experience too much friction, something will eventually fail. To avoid this, you can use the dipstick to check the transmission fluid level to monitor the fluid level inside the automatic transmission and, if necessary, add fluid to the transmission.
Some newer vehicles do not have an accessible dipstick or may have a fluid level sensor and should be checked by a professional if a low level is suspected.
- Attention: Some manufacturers do not recommend changing the transmission fluid throughout the life of the transmission and do not have a normal fill or level checkpoint in the engine compartment.
Part 1 of 2: Automatic Transmission Fluid Check
Necessary materials:
- Gloves
- Paper towels or rags
Step 1: Park on a level surface. The car needs to be parked to check the fluid level, so find a level surface to park on.
If the transmission has a manual shifter (usually 1, 2, and 3 under the “Drive” label on the shifter), it is recommended that you change each gear before shifting to Park and let the engine idle.
- Attention: The engine must be running so that the fluid level can be determined. Note that some vehicles will indicate the transmission is in Park and the engine is running, while others may indicate the transmission is in neutral with the engine running to check the fluid level.
Step 2: open the hood. To open the hood, there is usually a switch inside the car that raises the hood slightly, and there is a lever on the front of the hood, usually accessible through a grille, that must be pulled to raise the hood. .
- FunctionsTip: If the hood won't stay on by itself, find a metal bar that hooks onto the bottom of the hood to hold it in place.
Step 3 Locate the transmission fluid pipe.. Under the hood is a pipe for automatic transmission fluid. It's usually pretty far away, so expect it to take you a while before finding it.
The car's owner's manual will show you exactly where it is, but if it's not there, here are some tips for finding the automatic transmission fluid dipstick:
The dipstick will have some kind of handle that you can pull to take it out of the pipe, so locate that first. It may or may not be labelled.
If the car is front wheel drive, the dipstick will be in front of the engine. If the car is rear wheel drive, the dipstick will probably point towards the rear of the engine.
It may be difficult to pull up at first, but don't force it.
Step 4: pull out the dipstick. Have a rag or paper towel ready before pulling the dipstick all the way out.
While pulling it out, grab the dipstick with a rag with your free hand and clean it of liquid. To accurately check the level, fully insert the dipstick again and pull it out.
The dipstick also has two lines or marks; "Hot" and "Cold" or "Full" and "Add".
The fluid must be at least between these two lines. If it is below the bottom line, then more fluid needs to be added. There will be about a pint of fluid between the add line and the full line on the transmission dipstick on most small to medium sized vehicles.
Before adding any liquid, take the time to check how the actual liquid looks. It is usually a pure amber color, but some species are more brown and some more red. Watch for liquid that looks dark or not very clear. If it is too dark, it may burn, and if the liquid is milky, then it is contaminated. Also watch out for air bubbles.
Step 5: Solve problems. It's time to solve all the problems found during the fluid check process.
If the fluid is burnt, the radiator fluid must be flushed out as it will not properly protect the parts inside the transmission. If the fluid is burnt, the transmission may need to be repaired and you should seek the services of a professional mechanic.
The milky automatic transmission fluid is contaminated and may be a sign of other problems. Turn off the car and call a mechanic to avoid serious damage. If the fluid is milky, the transmission may need repair and you should seek the services of a professional mechanic.
Air bubbles indicate that the type of fluid may not be suitable for the transmission, or that there is too much fluid in the transmission.
- A warning: If the wrong fluid is poured into the gearbox, it may cause internal damage to the system.
Part 2 of 2: Adding Transmission Fluid
Necessary materials
- Automatic transmission fluid
- trumpet
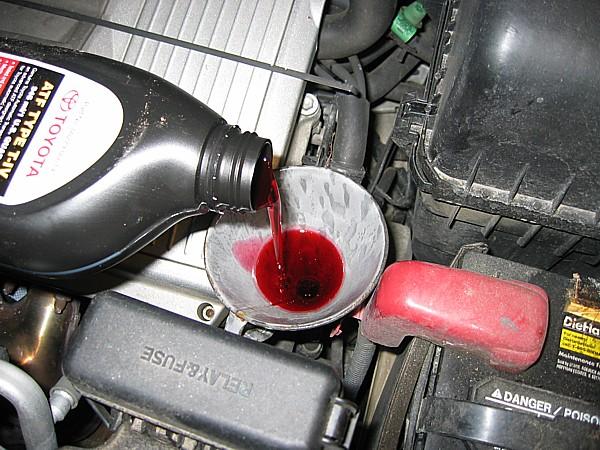
Step 1: Get the Right Fluid Type. Once you've determined that more fluid needs to be added to the transmission, you'll need to purchase both the proper type of transmission fluid for your vehicle (listed in your vehicle's owner's manual) and a long, thin funnel to make adding it easier. existing fluid.
- A warning: Do not add liquid if it is the wrong type. Some dipsticks will list the correct fluid if you don't have an owner's manual.
Step 2: Add liquid through the funnel. You can add more by inserting a funnel into the tube from which the dipstick was removed and pouring a small amount of automatic transmission fluid into the tube.
Check the level each time you add a little until the level is right between the two lines.
- Attention: Add fluid with the engine running in the appropriate gear to check the fluid level.
If the transmission has been drained, you will need 4-12 liters of fluid to fill it back up. Follow your vehicle service manual for the recommended type and amount of fluid to use.
If the fluid level is very low when checking, add more fluid and carefully inspect the system for leaks. A low fluid level may be a sign that fluid is leaking. Expect to add about a pint before checking the level again.
Step 3: Go through all the transfer settings. If there are no leaks and the fluid level is normal, get back behind the wheel (but keep the hood open) and, while depressing the brake pedal, run the transmission through all of the transmission settings. This will stir up the fresh fluid and allow it to coat all of the transmission parts.
Step 4: Check the dipstick. Make sure the fluid level is correct even after shifting the transmission through all settings. Add more if the level drops too much.
Proper transmission maintenance will keep your vehicle running smoothly and will stay that way for many more miles than a car with a running transmission. The only thing that keeps all the very precise parts inside the transmission lubricated is automatic transmission fluid, and checking the level regularly and adding fluid if necessary is good practice.
If you prefer a professional mechanic like from AvtoTachki, add transmission fluid for you at home or office.