
How to check the purge valve with a multimeter
Content
The purge valve is a device that has its own characteristics.
Unlike other components in your engine, it takes more time for mechanics to point it out when problems arise.
Oddly enough, this is one of the easiest components to run tests.
There are several methods that can be used, however many people don't know what to do.
This article covers everything you need to know about a purge valve, including how it works and various methods for diagnosing it with a multimeter.
Let's get started.
What is a purge valve?
The purge valve is an essential component of modern Evaporative Emissions Control (EVAP) systems that help improve fuel efficiency and reduce emissions.
During combustion, the EVAP purge valve prevents fuel vapors from escaping into the atmosphere by keeping them inside the charcoal canister.
Once the powertrain control module (PCM) sends a signal to the purge valve, these fuel vapors are expelled into the engine for combustion, acting as a secondary fuel source.
In doing so, the PCM ensures that the purge valve opens and closes at the right time to release the right amount of fuel vapor into the engine.
Purge valve problems
The purge valve may have several faults.
- Purge valve stuck closed
When the purge valve gets stuck in the closed position, misfiring and difficulty starting the engine occur.
However, the PCM easily notices this problem and engine lights come on on the car's dashboard.
- Purge valve stuck open
When the purge valve gets stuck in the open position, it is impossible to control the amount of fuel vapor being thrown into the engine.
It also causes engine misfiring and difficulty starting, and is harder to notice because the car continues to run.
- Power terminal problem
There may be problems with the power terminals that connect it to the PCM.
This means that in the event of a malfunction, the purge valve does not receive the correct information from the PCM to perform its duties.
A multimeter helps to conduct appropriate tests on this as well as tests on other vehicle components.
How to Test a Purge Valve with a Multimeter (3 Methods)
To test the purge valve, set the multimeter dial to ohms, place test leads on the purge valve power terminals, and check the resistance between the terminals. A reading below 14 ohms or above 30 ohms means the purge valve is faulty and needs to be replaced..
That's not all, as well as other methods of checking if the purge valve is in good condition or not, and we will move on to them now.
Method 1: Continuity Check
Most purge valves are solenoid, and a continuity test helps ensure that the metal or copper coil running from the positive to negative terminal is good.
If this coil is faulty, the purge valve will not work. To run this test, follow these steps.
- Disconnect the purge valve from the vehicle
In order to have proper access to the purge valve and check for continuity, you must disconnect it from the vehicle.
Before doing this, make sure the car has been turned off for at least 30 minutes.
Disconnect the purge valve by unscrewing the clamps of the inlet and outlet hoses, as well as disconnecting it at the power terminal.
The inlet hose comes from the fuel tank and the outlet hose goes to the engine.
- Set the multimeter to continuous mode
Set the dial of the multimeter to continuous mode, which is usually represented by the "sound wave" icon.
To check if this mode is set correctly, place two multimeter probes on top of each other and you will hear a beep.
- Place the multimeter probes on the terminals
Once your multimeter is set up correctly, you simply place the probes on the purge valve's power terminals.
- Rate results
Now, if the multimeter does not beep when you bring the probes to the power terminals, then the coil inside the purge valve is damaged and the entire valve needs to be replaced.
If the multimeter beeps, move on to other tests.
Method 2: Resistance Test
The purge valve may not work properly because the resistance between the positive and negative terminals is too low or too high.
The multimeter will also help you diagnose by following these steps.
- Disconnect the purge valve from the vehicle
Just like the continuity test, you completely disconnect the purge valve from the vehicle.
You unscrew the clamps and also separate the valve on the power terminal.
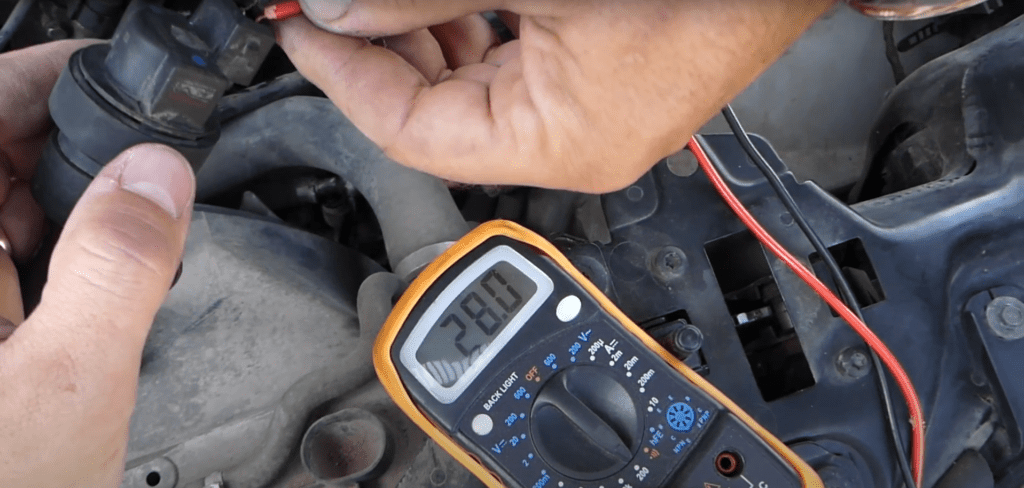
- Set your multimeter to ohms
To measure the resistance in your purge valve, you set the multimeter dial to ohms.
This is usually indicated by the omega symbol (Ω) on the multimeter.
To confirm that it is set correctly, the multimeter should display "OL" which means open loop or "1" which means infinite reading.
- The position of the multimeter probes
Simply place the multimeter leads on the purge valve power terminals.
- Rate results
This is what you pay attention to. A good purge valve is expected to have a resistance of 14 ohms to 30 ohms, depending on the model.
If the multimeter shows a value that is above or below the appropriate range, then your purge valve is faulty and needs to be replaced.
If the value falls within this range, then proceed to other steps.
A multimeter is not required for these other steps, but is useful for diagnosing stuck-open or closed-position problems.
Method 3: mechanical testing
Mechanical click tests include the purge valve click test and the purge valve vacuum test.
Purge Valve Click Test
Checking for purge valve clicks helps identify a stuck closed problem.
Normally, when the engine is running, a signal is sent to the purge valve on the intermediate links to open and allow fuel vapor to enter.
There is a clicking sound every time the valve opens and this is what you want to check.
To run a simple test, follow these steps.
Once the purge valve is disconnected from your vehicle, connect it to power by simply connecting it to the car battery. It's a simple setup and all you need are alligator clips, a 12 volt battery and your ears.
Place two alligator clips on each power terminal of your purge valve and place the other end of both clips on each of the battery posts. This means that one alligator clip goes to the positive battery terminal and the other to the negative.
A good purge valve makes a clicking sound when the clamps are properly connected. As stated earlier, the clicking sound comes from the opening of the purge valve.
This procedure is simple, and if it seems confusing, this short video shows exactly how to perform the purge valve click test.
Purge Valve Vacuum Test
A purge valve vacuum test helps identify a stick-open problem.
If the purge valve is leaking, it will not do its job of delivering the correct amount of fuel vapor to the engine.
Another additional tool you will need is a hand held vacuum pump.
The first step is to connect a vacuum pump to the outlet port through which fuel vapors exit into the engine.
You need the vacuum pump hose to be between 5 and 8 inches for it to fit well.
Once the hose is connected correctly, turn on the vacuum pump and check that the pressure is between 20 and 30 Hg. 30 rt. Art. represents an ideal vacuum and is the maximum achievable vacuum pressure (rounded up from 29.92 Hg).
Wait 2-3 minutes and carefully monitor the vacuum pressure on the pump.
If the vacuum pressure drops, the purge valve is leaking and needs to be replaced. If not, then there is no leak in the purge valve.
In case the pressure does not decrease, you can take one more step - connect the purge valve to a power source, such as a car battery, so that it opens.
As soon as you hear the click signaling the opening of the valve, you expect the vacuum pressure to drop to zero.
If this happens, the purge valve is good.
Do you need to replace the purge valve?
Checking the purge valve is very easy. You either use a multimeter to test for continuity or resistance between terminals, or do mechanical tests for clicking sounds or proper vacuum.
If any of this fails, then the unit must be replaced.
Replacement costs range from $100 to $180, which also includes labor costs. However, you can also replace the purge valve yourself if you know how to walk properly.

F.A.Q.
How do I know if my purge valve is stuck open?
If the purge valve is stuck open, the engine is idling, misfiring, rough, or difficult to start the vehicle. This is due to the fact that an excess amount of fuel vapor is supplied to the engine.
What happens if the purge valve gets stuck in the closed position?
When the purge valve sticks closed, the engine will idle, the engine will have difficulty starting, or the engine light will come on. This is quicker to notice than when the purge valve is stuck in the open position.
What is the resistance of the purge valve?
The resistance of a good purge valve is between 14 ohms and 30 ohms. This varies by model and any value below or above this range indicates a purge valve failure.
Should the purge valve click?
Yes, a working purge valve clicks when connected to a power source. This means that it opens up to release fuel vapors from the charcoal canister and supply them to the engine.
Can the purge valve be cleaned?
You can clean the purge valve without opening it by spraying carburetor cleaner or MAF into the intake and exhaust ports. Close both ends, give the valve a good shake and let the debris drain out.
