How to check the front assembly
Content
If you have worn components on the front, this can cause a number of issues with your vehicle. Depending on the vehicle, the front may include tie rod ends, intermediate arms, bipods, rack, etc.
If you have worn components on the front, this can cause a number of issues with your vehicle. Depending on the vehicle, the front end may include tie rod ends, intermediate arms, bipods, rack and pinion, ball joints, and dampers or struts. There are also a number of other parts that can fail.
You may start to feel a difference in driving, or you may notice some tire wear issues or noises that weren't there before. Any of these can be unnerving and can make you think a little about how much it will cost to fix your car.
Knowing what parts to look for and what signs to look for can help you repair your car yourself, or at least keep you from being scammed at the shop.
Part 1 of 3: Which components make up the front assembly
The front of your car is made up of two main parts: the steering and the suspension. Steering is used to do just that - to steer the vehicle - while suspension allows the car to absorb the bumps in the road and make the vehicle comfortable.
Control mechanism. Steering usually consists of a steering gear. It can be a steering gearbox or a rack and pinion assembly. It is mechanically connected to the steering wheel via a steering shaft, which usually does not need to be replaced. Then the steering mechanism is connected to the steering knuckles with tie rod ends.
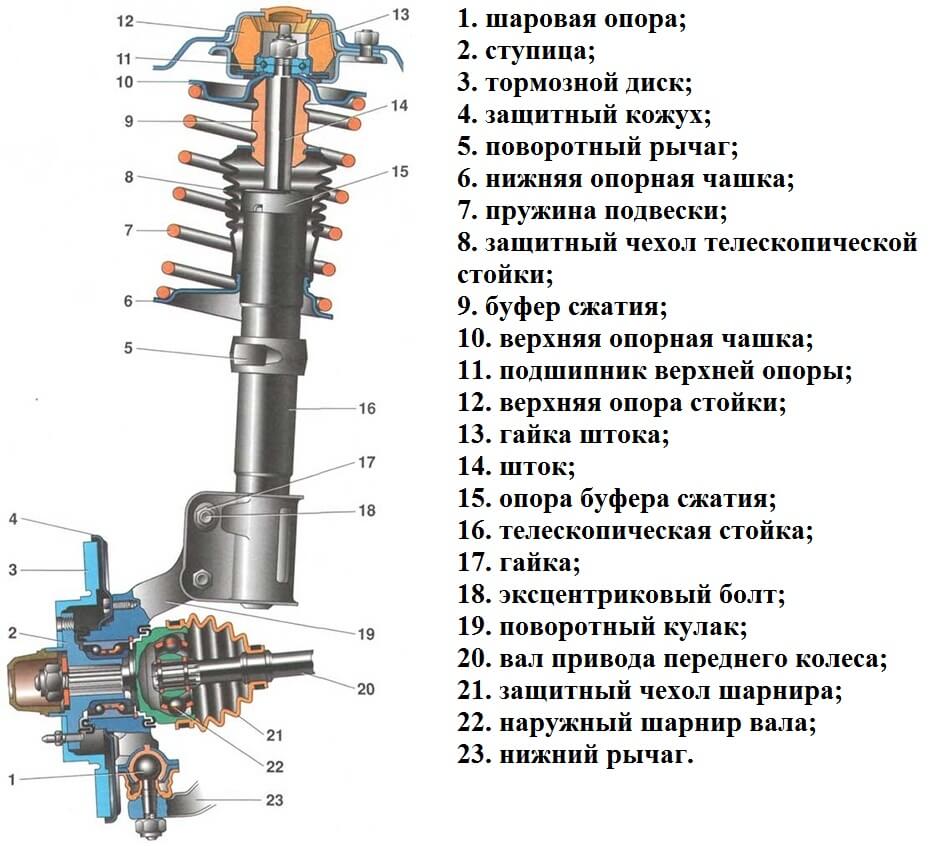
Suspension. While suspension systems will vary, most will consist of wear parts such as bushings, ball joints, control arms or tie rods, and dampers or struts.
Part 2 of 3: Checking and Repairing the Steering System
Before checking the steering, the front of the vehicle must be off the ground.
Necessary materials
- Hydraulic floor jack
- Jack stands
- Wheel chocks
Step 1 Park your vehicle on a firm and level surface.. Apply the parking brake.
Step 2: Install wheel chocks around the rear wheels..
Step 3: Raise the front of the car.. Raise the vehicle from its intended lifting point using a hydraulic jack.
Step 4 Jack up the car.. Install jacks under the welded seams of the body and lower the car on them.
Once the front wheels are off the ground, you can begin to inspect the steering.
Step 5: Inspect the tires: Tire wear is the first check that can be done to identify problems with the front end.
If the front tires show uneven shoulder wear, this may indicate a worn front component or toe problem.
Step 6: Check for looseness: After inspecting the tires, check if there is free play in the front.
Grasp the front wheel at the three o'clock and nine o'clock positions. Try rocking the tire from side to side. If no movement is detected, then there should be no problem with the tie rod ends.
Step 7: Check the tie rod ends: The tie rod ends are assembled with a ball in the swivel joint. Over time, the ball wears down on the joint, which causes excessive movement.
Grab the tie rod assembly and pull it up and down. A good tie rod won't move. If there is play in it, then it must be replaced.
Step 8: Inspect the rack and pinion: Check the rack and pinion for leaks and worn bushings.
If it flows from the anthers at the ends of the rack and pinion, then it must be replaced.
Mounting sleeves should be checked for cracks or missing parts. If any damaged components are found, the mounting sleeves will need to be replaced.
When you have finished inspecting the steering components, you can move on to inspecting the suspension parts while the vehicle is still in the air.
Part 3 of 3: Suspension Check and Repair
When the car is still in the air, you will be able to inspect most of the front suspension parts.
Step 1: Inspect the tires: When inspecting front tires for suspension wear, the first thing you should look for is bulging tire wear.
Cupped tire wear looks like the ridges and valleys on the tire. This indicates that the tire bounces up and down when driving on the road. In most cases, this indicates a worn shock or strut, but it can also indicate a worn ball joint.
Step 2: Check for play: Place your hands on the wheel at the twelve o'clock and six o'clock positions. Grabbing the tire, push and pull it and feel the free play.
If the tire is tight and doesn't move, the suspension may be fine. If there is movement, then you need to inspect each individual part of the suspension.
Step 3: Check Struts/Shocks: Before jacking up the car, you can do a car bounce test. This is done by pushing up and down on the front or back of the car until it starts to bounce.
Stop pushing the car and count how many more times it bounces before it stops. If it stops within two bounces, then the shocks or struts are fine. If they keep jumping, they need to be replaced.
Once the vehicle is in the air, they can be checked visually. If they show any signs of leakage, they must be replaced.
Step 4: Check the ball joints: Ball joints are knuckle pivot points that allow the suspension to turn with the steering. It is a ball built into the joint that wears out over time.
To inspect it, you will need to place a bar between the bottom of the tire and the ground. Have an assistant pull the bar up and down while you watch the ball joint. If there is play in the joint, or if the ball seems to pop in and out of the joint, it must be replaced.
Step 5: Check bushings: The bushings located on the control arms and tie rods are usually made of rubber. Over time, these rubber bushings fail as they begin to crack and wear out.
These bushings should be visually inspected for cracks, stretch marks, missing parts, and oil saturation. If any of these occur, the bushings need to be replaced.
In some cases it is possible to replace the bushings, while in others it is better to replace the entire arm with bushings.
After you have thoroughly inspected the steering and suspension parts on your vehicle, you will need a wheel alignment. Correct wheel alignment must be done on a computerized wheel alignment machine to ensure all corners are within specification. It is also important that this check is carried out regularly or at least once a year. If this seems like a daunting task, you can get help from a certified mechanic, such as AvtoTachki, who can come to your home or office to inspect your front end.