How to check the electrolyte level in the battery
Content
Part of what makes modern batteries so efficient is the "wet cell" design they use. In a wet electrolyte battery, there is a mixture of sulfuric acid and distilled water (called electrolyte) that binds all the cells in the battery...
Part of what makes modern batteries so efficient is the "wet cell" design they use. A wet battery has a mixture of sulfuric acid and distilled water (called electrolyte) that connects all of the battery's electrodes located inside each cell. This fluid may leak, evaporate, or otherwise be lost over time.
You can check and even top up these cells at home using a few simple tools. This may be done as part of ongoing maintenance or in response to degraded performance of the battery itself.
Part 1 of 2: Inspect the Battery
Necessary materials
- Wrench (only if you are going to remove the clamps from the battery terminals)
- Safety goggles or visor
- Protective gloves
- rags
- Baking soda
- Distilled water
- Spatula or flathead screwdriver
- Cleaning brush or toothbrush
- small flashlight
Step 1: Put on your protective gear. Wear proper protective equipment before starting any work on the vehicle.
Safety glasses and gloves are simple items that can save you a lot of trouble later on.
Step 2: Locate the battery. The battery has a rectangular shape and a plastic outer surface.
The battery is usually located in the engine compartment. There are exceptions, for example, some manufacturers place the battery in the trunk or under the rear seats.
- FunctionsA: If you can't find the battery in your car, please refer to your car owner's manual.
Part 2 of 3: Open the Battery
Step 1: Remove the battery from the car (Optional). As long as the top of the battery is accessible, you can follow each step to check and top up the electrolyte while the battery is still in your vehicle.
If the battery is difficult to access in its current position, it may need to be removed. If this applies to your vehicle, here is how you can easily remove the battery:
Step 2: Loosen the negative cable clamp. Use an adjustable wrench, socket wrench, or wrench (of the correct size) and loosen the bolt on the side of the negative clamp holding the cable to the battery terminal.
Step 3: Disconnect the other cable. Remove the clamp from the terminal and then repeat the process to disconnect the positive cable from the opposite terminal.
Step 4: Open the protective bracket. There is usually a bracket or case that holds the battery in place. Some need to be unscrewed, others are secured with wing nuts that can be loosened by hand.
Step 5: Remove the battery. Lift the battery up and out of the vehicle. Keep in mind, batteries are quite heavy, so be prepared for the bulk of the battery.
Step 6: Clean the battery. The electrolyte inside the battery should never be contaminated as this will drastically shorten the life of the battery. To prevent this, it is necessary to clean the outside of the battery from dirt and corrosion. Here is an easy way to clean your battery:
Make a simple mixture of baking soda and water. Take about a quarter cup of baking soda and add water until the mixture has the consistency of a thick milkshake.
Dip a rag into the mixture and lightly wipe the outside of the battery. This will neutralize corrosion and any battery acid that may be on the battery.
Use an old toothbrush or scouring brush to apply the mixture to the terminals, scrubbing until the terminals are free of corrosion.
Take a damp cloth and wipe off any baking soda residue from the battery.
- Functions: If there is corrosion on the battery terminals, then the clamps that secure the battery cables to the terminals most likely also have some corrosion. Clean the battery clamps with the same mixture if the corrosion level is low or replace the clamps if the corrosion is severe.
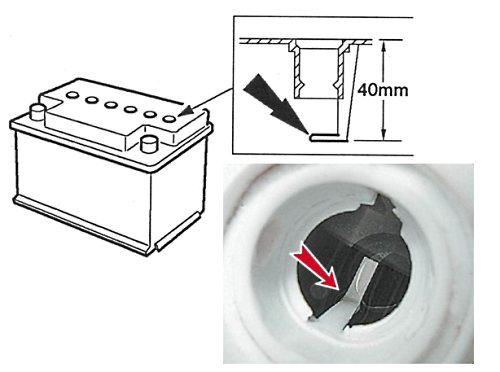
Step 7: Open the battery port covers. The average car battery has six cell ports, each containing an electrode and some electrolyte. Each of these ports is protected by plastic covers.
These covers are located on top of the battery and are either two rectangular covers or six individual round covers.
Rectangular covers can be removed by prying them out with a putty knife or flathead screwdriver. Round caps unscrew like a cap, just turn counterclockwise.
Use a damp cloth to wipe off any dirt or grime located under the covers. This step is just as important as cleaning the entire battery.
Step 8: Check the electrolyte level. Once the cells are open, one can look directly into the battery where the electrodes are located.
The liquid must completely cover all electrodes, and the level must be the same in all cells.
- Functions: If the camera is difficult to see, use a small flashlight to illuminate it.
If the electrolyte levels are not equal, or if the electrodes are exposed, you need to top up the battery.
Part 3 of 3: Pour the electrolyte into the battery
Step 1: Check the required amount of distilled water. First you need to know how much liquid to add to each cell.
How much distilled water to add to the cells depends on the condition of the battery:
With a new, fully charged battery, the water level can be filled to the bottom of the filler neck.
An old or dying battery should have enough water to cover the electrodes.
Step 2: Fill cells with distilled water. Based on the assessment made in the previous step, fill each cell with the appropriate amount of distilled water.
Try to fill each cell up to one level. Using a bottle that can be filled with a small amount of water at a time helps a lot, precision is important here.
Step 3 Replace the battery cover.. If your battery has square port covers, line them up with the ports and snap the covers into place.
If the ports are round, turn the covers clockwise to secure them to the battery.
Step 4: Start the car. Now that the whole process is complete, start the engine to see how the battery works. If performance is still below par, the battery should be checked and replaced if necessary. The performance of the charging system should also be checked for any problems.
If your car battery is not holding a charge or you do not want to check the electrolyte level in the battery yourself, call a qualified mechanic, for example, from AvtoTachki, to check and service the battery.