How to vacuum a car
Content
Keeping your vehicle clean, both inside and out, is part of regular vehicle maintenance. While keeping the outside of your car clean is mostly about appearance and corrosion resistance, cleaning the inside of your car has several benefits:
- A clean interior keeps your clothes clean while driving
- It eliminates odors
- This increases the attractiveness and value of your car when you sell it.
- Prevents abnormal wear of carpet and plastic.
- Removes allergens that can cause disease
Vacuuming the interior of your car is one of the most basic yet important vehicle maintenance and detailing procedures, but it is often incomplete or incorrect. It is important to use the correct tools and attachments to avoid damaging the interior of your vehicle when vacuuming.
Part 1 of 4: Choose the Right Vacuum Cleaner
It's easy to get into the habit of looking for the cheapest option for car maintenance and supplies. When it comes to a vacuum cleaner, it is important to choose a high quality vacuum cleaner with all the necessary tools. This will save you time and money in the long run.
Step 1: Look for a Quality Brand Name Vacuum Cleaner. If you're shopping at a big box store, avoid the inexpensive options that come with branded vacuum cleaners.
They will be less efficient, lower quality, and have less vacuum power, meaning they will typically need to be replaced more often and cleaning will take much longer.
An inexpensive vacuum cleaner may never be able to remove some of the deep-seated soil that a high-quality vacuum cleaner can suck up.
Well-known brands such as Shop-Vac, Hoover, Ridgid and Milwaukee will offer vacuum cleaners that can withstand the rigors of garage use.
Step 2. Decide if you need a cordless vacuum cleaner. If there is no electricity near the place where you will vacuum, choose a cordless vacuum cleaner.
Choose a model with a replaceable and rechargeable battery for the longest use. If the vacuum cleaner battery runs out and the vacuum cleaner itself needs to be plugged in for several hours to recharge, you will lose time waiting.
- AttentionA: DeWalt makes durable cordless vacuum cleaners that are great for use in cars.
Step 3: Choose a Wet/Dry Vacuum Cleaner. Floor mats and carpets can be wet with snow or water and can damage vacuum cleaners not designed for wet surfaces.
- Functions: Always keep the Wet/Dry Vacuum Cleaner Assembly for wet cleaning in the garage or when cleaning the car in case of moisture or water.
Step 4: Choose a Vacuum Cleaner with a Tool Kit.
At a minimum, you'll need a thin upholstery tool, a four to six-inch flat brushless brush head, and a soft-bristled round brush head.
Part 2 of 4: Vacuum the Carpets
Carpeting in your car is where most of the dirt ends up. It gets on your shoes, your pants, and since it's the lowest point in your car, all the dust from other places gets there.
Step 1 Remove the floor mats from the car.. You will clean them separately and return them back.
Step 2: Remove all loose items from the vehicle.. Throw out all the garbage that has accumulated inside your car and put all unnecessary items in it.
Set aside any items that need to be returned to the car after it has been cleaned.
Step 3: Vacuum the floor mats on a clean, dry surface..
Shake off any loose materials from the floor mat and place it on a clean floor.
Attach the flat wide universal nozzle without brush to the vacuum hose and turn on the vacuum cleaner. Suck up dirt, sand, dust and gravel from the floor mat.
Slowly make long passes across the mat at about an inch per second. Block the passages of the vacuum cleaner to collect as much dirt as possible.
- Functions: If there is noticeable dirt in the floor mat, use the fine nozzle on the vacuum hose to loosen the debris and collect it.
Step 4: Vacuum the Carpets.
Using the wide all-purpose nozzle, pick up dirt and dust from the carpet. Cover each pass with a nozzle to pick up as much dirt as possible.
Complete each section of the floor before moving on to the next.
- Functions: Start on the driver's side as this is likely to be the worst area.
Step 5: Vacuum hard-to-reach carpeted areas.. Vacuum crevices and hard-to-reach areas using the fine, hard-to-reach upholstery nozzle.
Vacuum the edges where the carpets meet the plastic trim and the areas between the seats and the console. Get as deep as possible under the seats to collect dust and dirt that has got there.
- Attention: Be careful not to scratch the plastic edging with the nozzle as there is no brush on the end of the nozzle.
Step 6: Vacuum the trunk. Often the barrel is forgotten when detailing. Be sure to vacuum the trunk in the same way as described in step 4.
Part 3 of 4: Vacuum the Seats
The seats in your car are made of either fabric or a smooth surface such as natural or synthetic leather. They should also be vacuumed to remove any buildup in fabric or crevices.
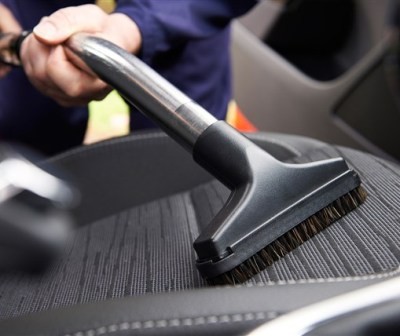
Step 1: Vacuum the seat surfaces. Use overlapping passes at the same speed as when vacuuming carpets.
If you have fabric seats, vacuum the entire seat area with a brushless all-purpose nozzle.
Suck out as much dust and dirt as possible from the pillow and fabric.
If you have leather seats, vacuum the surface with a brush attachment. A wide multi-purpose head will do the trick if it has a brush. The bristles of the brush will prevent streaks or scratches on the skin.
Step 2: Vacuum the cracks.
The seams as well as the hinge area between the bottom of the seat and the backrest can collect dust, food particles and dirt.
Use the fine crevice nozzle to vacuum any debris from each of the seams and seams.
Part 4 of 4: Vacuum the interior trim
Dust most often accumulates on the plastic trim of the car. Vacuum it to get rid of unsightly dust that can dry out the plastic and cause it to crack.
Step 1: Attach the round soft bristle nozzle to the vacuum hose..
- Attention: Do not use the brushless attachment as you will scratch or scrape your car's upholstery.
Step 2: Lightly run the bristle tool over each surface of the finish to pick up dust and dirt..
Get into hard-to-reach places such as the dashboard and crevices around the shifter where dust and dirt accumulate. The bristles will lift the dirt out of the cracks, and the vacuum cleaner will suck it out.
Step 3: Vacuum all exposed areas.
Use the bristle attachment to clean all visible areas of vehicle interiors such as the dashboard, console, shifter area and rear seat trim.
After you've thoroughly vacuumed your car, you can put the floor mats back in place and put everything that's left in your car in a safe and tidy place, like the trunk. Vacuum your car once a month or whenever you notice dirt buildup in your car.