How to drain water from a motorcycle fork?
Content
Draining the motorcycle from the fork it is necessary to carry out every 20-000 km. Over time and miles, the oil eventually degrades. This directly affects the performance of the fork that becomes inflated. And then you can feel it when riding a motorcycle. Fork oil wear often results in poor handling and bottoming problems when braking. Are you under the impression that your machine lacks performance? To ride in complete safety and extra comfort, do not forget to empty the motorcycle fork.
How to drain the motorcycle plug yourself? Which oil to use? What tools are needed to drain water from a motorcycle fork?
Here's our little guide that will explain step by step how to drain the water from your fork.
Drain the motorcycle fork: what do you need?
To drain the water from a motorcycle fork, you need certain tools.
Required Tools
To drain the water from the motorcycle fork, you need the following tools:
- Rule
- Jack
- Measuring container
- Big syringe
- Rubber washer
- Wrenches suitable for disassembly (large wrench, open-end wrench, torque wrench, etc.)
What oil to replace the fork?
This question is worth asking because you will not be able to use engine oil on your fork. At the risk of damaging it, you must use fork oilspecially designed for the latter.
Again, you should be aware that not every fork oil you find on the market is suitable for this purpose. In fact, the viscosity of the oil must match the part itself. To make the right choice, adhere to the appropriate manufacturer's recommendations.
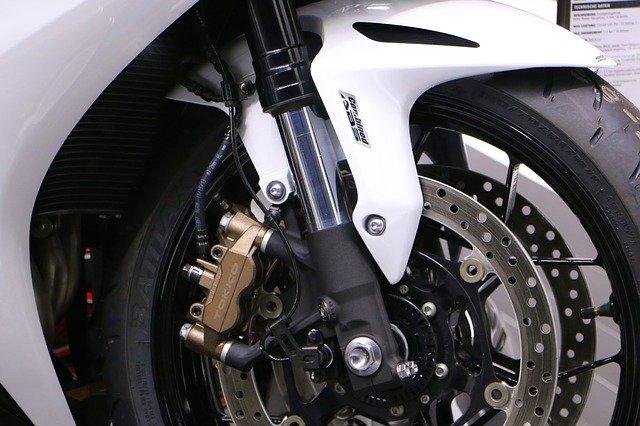
How to drain water from a motorcycle fork
Emptying the fork of a motorcycle is a fairly simple operation, especially if it is regular plug... You don't need to be a mechanical professional to be successful. Just take it step by step.
Step 1: Measure and mark the height of the tubes.
The first thing you need to do is to mark the triple tree. This is important if you want to put the plug in the right place after changing the oil. To do this, take a ruler and measure the height of the fork tubes and adjusting screws and mark the protrusion under the triple tree.
Step 2: proceed with disassembly
So that you can disassemble lift your motorcycle, a motorcycle lift or a special stand with the front raised. After that, first unlock the axles and screws and remove the front wheel, brake calipers and fender. To disassemble the fork tubes, first loosen the top triple clamping screw without removing the plugs.
Then do the same for the top plugs. Then we unscrew the tees and remove the plug. Then proceed with disassembly by completely removing the plugs.
Step 3: empty the tubes
Take a container into which you will pour the contents of the test tubes. do not be shy pump well to make sure there is no oil left in it. Typically, this operation takes a good twenty minutes.
When emptying, be careful not to lose any removable parts. In order not to lose sight of them or not to lose them at all, place them in a container within sight.
Step 4: fill the tubes
When the tubes are completely empty, clean them of dirt and impurities and reassemble the parts one by one. If you notice that they are dirty, do not be afraid to clean them. If you notice any scratches, smooth them out with steel wool.
Then fill in new oil and pump it several times so that oil can enter the valves. To find out the amount required, refer to the manufacturer's instructions and use a measuring spout to avoid overdosing... To adjust properly, you can remove the excess with a large syringe.
Step 5: put it all together!
You are almost done. Once the tubes are full, you can start assembling in the same disassembly order, but of course in the reverse order.
Begin by reinstalling the shims and springs and tightening the plug. Then replace the tubes in the tees, making sure they are tight and making sure they are in exactly the same place using the marks you marked earlier.
If necessary, measure again with a ruler to make sure the protrusion is the same height. Then screw the caps back on. Then complete the assembly of the wheel, brake calipers and mudguard.