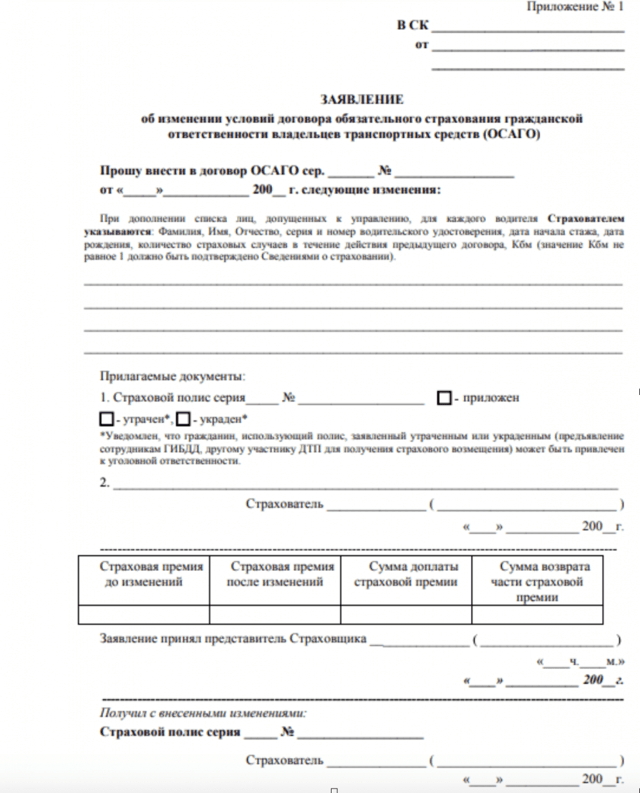
How to remove window tint
Content
There are several reasons to have tinted windows in cars, including added UV protection, a degree of privacy, and cosmetic appeal. However, over time, the elements and general wear and tear can affect the shade. Window tint damage can show up as blistering, scratching, or peeling around the edges, which is not only unappealing, but reduces its effectiveness as a UV and privacy protector. Extreme temperatures - both hot and cold - can cause the tint film to peel off the window pane. As soon as the stratification, noticeable by bubbles or peeling, begins, it quickly worsens.
While you might be tempted to simply remove the damaged tint from your car's windows, the sticky residue can take hours to clear. Removing tint from car windows is a much less time-consuming job than tinting. There are several effective ways to remove tint from windows with your own hands. Try one of these five proven methods that use readily available materials and limited know-how.
Method 1: soap and scratch
Necessary materials
- Dishwashing liquid
- Wiper
- Paper towels
- Razor blade or shaving knife
- Sprayer
- water
To remove tint film from small areas of glass, a simple scraping method with soap and water is effective. Most people have the necessary materials and tools at hand, and no special skill is required to achieve the effect. However, this is time-consuming and physically tiring, so other methods are better suited for large windows such as the windshield or rear window.
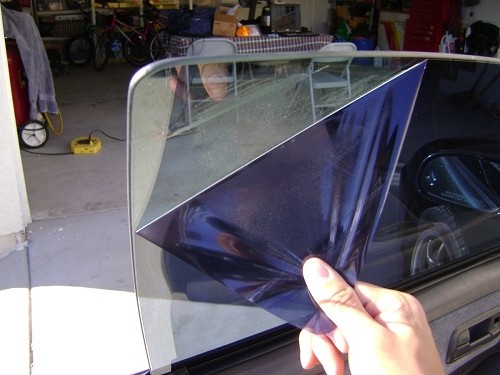
Step 1: Use a Knife to Raise the Corner. Using a razor blade or knife, make a cut in the corner of the film. This will create a tab that you can lift out of the window.
Step 2: Pick up and clean. Firmly grasp the free corner of the film and remove it from the window. In case it does not peel off in one piece, repeat the lifting and peeling process of the remaining film until most or all of the paint has come off.
Step 3: Prepare your soap mixture. Prepare a soapy water mixture in a spray bottle using a mild detergent such as dish soap and warm water. There is no particular proportion that is needed; soap mixture is equivalent to the amount you would use to wash dishes.
Step 4: Spray the mixture. Spray generously with the soapy mixture on the remaining adhesive remaining where you removed the tinted film.
Step 5: Scrape off the glue. Carefully scrape the adhesive off the glass with a knife blade, being careful not to cut yourself. Spray more as the soapy water dries to keep the work area moist.
Step 6: Clean the window. Clean the window with glass cleaner and paper towels after removing all adhesive.
Method 2: soap and newspaper
Necessary materials
- Bucket or bowl
- Dishwashing liquid
- Wiper
- Newspaper
- Paper towels
- Razor blade or knife
- Sponge
- water
This method is very similar to the soap and scrape method, but requires much less effort. It's also a good way to recycle old newspapers that you might have on hand, and it doesn't require any special skills.
Step 1: Prepare your soap mixture. Prepare a mixture of dishwashing detergent and warm water in a bucket or bowl. You will need a little more soap than dishwashing, but there are no exact proportions to achieve.
Step 2: Apply the mixture to the window and cover with newspaper. Moisten the window with damaged tinting liberally with soapy water and cover it with newspaper. Leave it like this for about one hour, dampening the outside of the newspaper with plenty of soapy water whenever it starts to dry (about every 20 minutes).
Step 3: Remove paint and newspaper. Using a razor blade or knife, peel off the newspaper and top coat of paint in long strips, as in step 1 of method 1.
Step 4: Wipe off any excess paint. Wipe off the remaining layer of paint with a blade or knife in the same way as a strip. It should come off easily. However, if the shade is persistent, simply repeat the process from the beginning.
Method 3: ammonia and the sun
Necessary materials
- Black plastic garbage bags
- Dishwashing liquid
- Paper towels
- Razor blade or knife
- Scissors
- Sprayer
- Ammonia sprayer
- steel wool
If the sun is shining, consider using ammonia as a means to remove damaged window tint. Ammonia caught on the film and placed in a sun-warmed environment will soften the adhesive and be easy to remove.
Step 1: Prepare the soap mixture. Prepare a mixture of dishwashing detergent and warm water in a spray bottle, as in the previous method. Next, cut a couple of pieces of a plastic trash bag large enough to cover both the inside and outside of the affected window.
Step 2: Apply the mixture and cover with plastic. Spray the soap mixture on the outside of the window and then glue a piece of plastic on top. The soap mixture helps hold it in place.
Step 3: Spray ammonia on the inside of the window and cover with plastic. Spray ammonia generously on the inside of a window with the car doors open to vent the toxic fumes of the cleaning agent. You may want to have the inside of your vehicle covered and protected by a tarp. Then apply another piece of black plastic over the ammonia just like you did with the soap mixture on the outside of the window.
Step 4: Let the plastic stand. Let the plastic parts lie in the sun for at least an hour. The black plastic retains heat to loosen the adhesive that holds the tint in place. Remove plastic parts.
Step 5: Remove the paint. Pry off a corner of the paint with your fingernail, razor blade or knife and simply peel off the tinted film.
Step 6: Clean off any adhesive residue and dry. Remove excess adhesive with ammonia and fine steel wool, then wipe off excess debris with paper towels.
Method 4: Dryer
Necessary materials
- the cloth
- Wiper
- Hairdryer
- Paper towels
- Razor blade or knife
Heating a damaged window tint for easy removal is another method that costs next to nothing and uses the materials you probably have on hand. However, it can get a little dirty, so keep towels and a trash can nearby. You can complete this task with a heat gun, but more people prefer a hair dryer.
Step 1: Use a hair dryer to heat up the window tint. With the hair dryer on, hold it about two inches from one corner of the window tint you want to remove until you pry it off with your fingernail or razor/knife blade, usually about 30 seconds.
Step 2: Slowly remove the paint with a blow dryer. Holding the hair dryer at the same distance from the glass, direct the air jet to where the paint is in contact with the glass. Slowly continue to remove the film.
Step 3: Wipe off any remaining adhesive. Thoroughly wipe off any excess adhesive with a clean towel. If there are difficulties with removal, you can heat the glue again with a hair dryer, then it will be easier to rub off and stick to the towel.
Step 4: Clean the window. Clean the window with glass cleaner and paper towels as in the previous methods.
Method 5: Removing the steamer
Necessary materials
- Adhesive Remover
- Fabric steamer
- Paper towels
- water
The easiest way to do-it-yourself window tint removal is to use a fabric steamer, though it costs a bit more if you need to rent the equipment. However, the time you can save often makes this price small.
Step 1: Fill the Steamer. Fill the fabric steamer with water and turn on the machine.
Step 2: steam corner. Hold the steam nozzle about one inch from the corner of the tint you want to remove. Keep it there long enough that you can separate it from the glass with your fingernail (about a minute).
Step 3: Remove paint. Continue to hold the steamer at the same distance from the glass, directing the steam to where the tint film and glass are in contact. Slowly remove the tint from the window.
Step 4: Wipe with a towel. Spray the adhesive remover on the glass and wipe it with paper towels as in the previous methods.
Although you can remove window tint yourself using any of these methods, you can enlist the help of a professional. The cost of professional tint removal varies greatly depending on the size of the glass, and it can save you a lot of time and hassle.