How to tint taillights
Content
The car you drive is a reflection of who you are. If something about your car doesn't quite fit the pattern, you can tweak it to fit you better.
Car modification is big business. Companies manufacture and sell billions of dollars worth of automotive accessories each year, including:
- Aftermarket wheels
- Tinted rear lights
- Lowering springs
- Footrests
- Tonneau cases
- Window tinting
Car accessories come in many different qualities and styles, and it's easy to spend thousands of dollars customizing your car with new parts to make it look unique. If you're on a budget but still want to create some personality in your car, you can do so by tinting your taillights yourself.
- A warningA: Shade laws vary from state to state. You can check your state's tinting laws at Solargard.com to determine if taillight tinting is legal in your area.
Method 1 of 3: Use tint spray to tint taillights
Tinting taillights with tint spray requires a steady hand and your undivided attention. You will also need a clean, dust-free medium to apply the shade, otherwise your finish will be permanently ruined by dust and lint deposited on the drying shade.
Necessary materials
- 2,000 grit sandpaper for wet sanding
- Can of transparent cover
- tint spray bottle
- Car polishing
- car wax
- Lint-free napkins
- Masking tape
- Bucket with 1 gallon of water and 5 drops of dish soap
- Sharp utility knife
Step 1: Remove the taillights from your vehicle. The tail light removal procedure is generally the same for all vehicles, but some models may vary slightly.
Open the trunk and pull the hard mat away from the rear of the trunk where the taillights are.
Step 2: Remove fasteners. Some may be screws or nuts while others are plastic wing nuts that can be removed by hand.
Step 3: Disconnect the tail light harness.. Nearly all of them are connected via a quick connect, which can be undone by pressing on the tab on the connector and pulling on the two sides.
Step 4: Remove the tail light.Push the tail light back using your hands or a flathead screwdriver to secure the light in the open position. The rear light should now be off from the vehicle.
Step 5: Repeat this process for both sides. After you remove the first tail light, repeat steps 1-4 for the other rear light.
Step 6: Prepare the rear light surface.. Wash the rear light with soap and water, then dry completely.
Soak 2,000 grit sandpaper in soapy water while cleaning the rear lights.
Step 7: Mask the reverse lights. Cover the transparent part of the reversing lights with masking tape.
Completely cover the reversing light area, then cut it exactly to size with a utility knife. Use light pressure as you don't want to cut too deep into the light.
Step 8: Sand the Taillights. After cleaning the taillights, dampen the taillights and lightly sand the surface of the taillights with wet sandpaper.
Wipe the surface regularly to make sure your progress is even. Re-wet the light before continuing sanding.
Repeat for the second tail light, making sure the sanding is visible before moving on to the next step.
Step 9: Spray paint on the tail lights.. Check the can before spraying light. Familiarize yourself with the spray pattern and the amount of spray coming out of the nozzle.
- A warning: Always handle aerosol paints and sprays in a well ventilated area. Use a mask to avoid inhaling the spray.
Spray the light in long strokes, starting spraying in front of the light and stopping after you have gone through all the light.
Apply a thin but full film to the entire tail light. Make both taillights at the same time so they are the same.
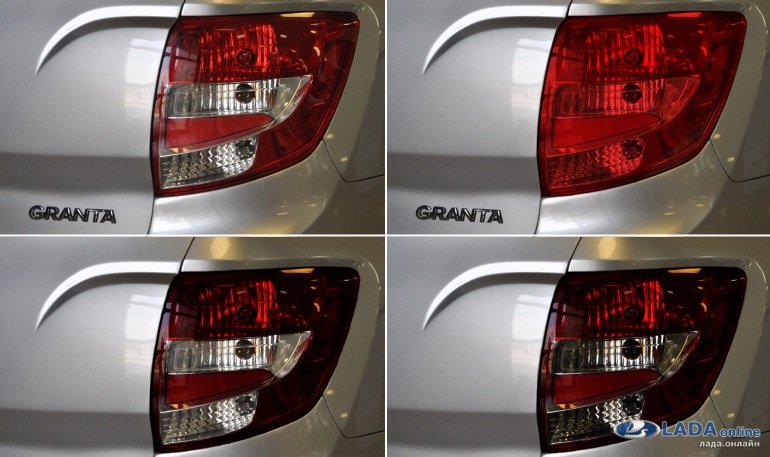
Tip: Let the tail lights dry for an hour before refinishing them. For a dark smoky effect, apply two coats. To get a darkened look, use three tint spray treatments.
Functions: At this point, your taillights will look pretty good, but a better result can be achieved by applying a clear coat and buffing before reinstalling the tinted taillights.
Step 10: Sand the spray painted with sandpaper.. Use 2,000 grit sandpaper to scratch the surface of the shade very lightly.
The purpose of this is to adhere the clear coat to the surface so minimal light sanding is required.
Remove the masking tape from the reversing light section and lightly sand the area. You can apply an even clear coat over the entire lens.
Rinse the entire rear light with water, then let it dry completely.
Step 11: Apply a clear coat. In the same way as the tint spray, apply a clear coat to the rear light. Apply light, continuous coats to tail lights with each pass.
Let dry 30 minutes between coats.
- Functions: Apply at least 5 coats of clear lacquer to tail lights. 7-10 coats is optimal for a uniform protective coating.
When done, let the paint on the taillights dry overnight.
Step 12: Polish the Surface. With 2,000 grit sandpaper, very lightly rub off the clear layer until it becomes a uniform haze over the entire lens.
Apply a small, quarter-sized drop of polish to a clean cloth. Apply the polish to the entire rear light lens in small circles until you get a shiny finish.
Wipe the polished finish with a new cloth. Apply the wax over the polished surface in the same way as the polish.
The wax will protect the rear light clear coat from fading and discoloration.
Step 13: Install the tinted taillights back on the car.. Reinstalling the tail lights is the reverse process of removing them in step 1.
Connect the tail light back to the wiring harness and firmly attach the tail light back to the vehicle.
Method 2 of 3: Tinted taillights with film
Window tint is inexpensive and fairly easy to apply, although the end product isn't always as good as spray paint.
Necessary materials
- Heat gun or hair dryer
- Microfiber cloth or lint-free cloth
- Sharp utility knife
- Small vinyl scraper (Choose a small hand scraper)
- Water sprayer
- Film for window tinting of the desired degree of darkening (for example, you can use tint film 5%, 30% or 50%).
Step 1: Cut the tint film to fit the rear lights.. Using a sharp utility knife, cut the tint film to the shape of the rear lights.
Leave excess on the edges that will need to be trimmed. Apply the film to the rear light to make sure the size is correct.
Step 2: Moisten the tail light with water from a spray bottle.. Use a spray bottle to wet the surface of the rear light. This will allow the tint film to stick.
Step 3: Remove the protective layer from the tint film. Remove the protective layer from the adhesive side of the tint film.
- A warning: Now you will need to work quickly and carefully; any dust or lint can stick to the film and remain between the tail light and the film.
Step 4: Place the tint film on the damp surface of the rear light.. The water will create a slippery surface so you can move the tint film and adjust its position.
Step 5: Remove water and air bubbles from under the tint with a vinyl squeegee.. Start from the center and move towards the edges. Squeeze out all the bubbles so that the shade looks flat.
Step 6: Make the tint film pliable.. Use a heat gun around the edges to heat up the tint film and make it pliable. The edges will have wrinkles if they are not slightly heated and smoothed out.
- A warning: Excessive heat will wrinkle and warp the paint. Be careful to only slightly warm the shade.
Step 7: Trim Excess Window Tint. Using a sharp utility knife, cut off the excess tint film so that the film covers only the rear lights.
Use a mop, finger, or credit card to smooth the edges and tuck them around the tailgate to complete the process.
Method 3 of 3: Install Tinted Aftermarket Headlights
The most expensive option is to replace the taillights with aftermarket darkened taillights. Although this option is more expensive, it takes much less time, and the shade is guaranteed to be uniform.
- Functions: You can find aftermarket tinted taillights at CariD.com. This website allows you to search for parts by make, model and year of your vehicle.
Step 1: Remove your current taillights. Follow the instructions to remove the taillights as in method 1.
Step 2: Install the aftermarket taillights.. Your aftermarket tinted taillights must match exactly the model and year of your vehicle.
Connect the new tail light to the wiring harness and install the tail light firmly back on the vehicle and make sure it clicks into place.
Taillight tinting can add style to your vehicle and give it a whole new look. With the three methods above, you can tint your car's taillights today.
Sometimes you may encounter problems in the operation of the rear light. Whether you need help installing new taillights, changing bulbs, or fixing electrical problems in your headlights, an AvtoTachki Certified Technician can come to your home or office to fix these issues.