How to Remove Paint Lumps from Your Car
Content
Nothing good will happen if you drive too close behind a dump truck or other vehicle carrying an unprotected load. Perhaps, if you're lucky, you can get away with dirt strewn across the hood. If you're not so lucky, your car could get hit by a rock while it's speeding down the highway. As soon as you get out of the car, it doesn't take long for you to realize that the rock has left you a gift: peeling paint. Don't worry, you say. Get some paint and you'll be ok.
That is, of course, until you realize that applying retouching paint is not as easy as it sounds. Most often, car owners use the brush that comes with the paint, and end up with ugly drops.
Here are four suggestions for removing dried paint:
Method 1 of 4: Try low-tech materials
Required material
- Preparatory solvent
- Toothpicks
Try low tech materials first because they are often the most suitable tool, can work just as well as what you buy from an auto parts store, and can save you money. Follow the steps below to remove low-tech touch-up paint.
Step 1: Using the nail. By far the easiest and least expensive method of removing paint is to use your fingernail to see if you can peel off the excess paint.
Scrape off the dried paint to see if you can remove some or even most of it. Try not to scratch too hard to avoid damaging the paint underneath.
Step 2: Using a toothpick. If the paint was recently applied, you can remove the bead with a toothpick.
Spray the drop of paint with prep thinner to loosen it.
Carefully pick up any paint balls with a toothpick by lifting up the end of the paint ball. Continue to work the toothpick underneath the balloon, spraying a bit of thinner underneath the balloon if you need to loosen it further.
Step 3: Recolor the area. If you managed to chip off a drop of paint, you may need to repaint the area.
This time use a toothpick instead of a brush to apply a new coat of paint.
It may take more than one coat of paint to make the chipped area look like the rest of the car. Be patient and let it dry completely before applying the next layer.
Method 2 of 4: Paint thinner
Necessary materials
- Microfiber towels
- Mild soap or detergent
- Paint thinner
- Q-tips
If your fingernail or toothpick strategies haven't worked, try paint thinner. Paint thinner can damage the paint on your car, so use cotton swabs or cotton buds to limit its contact with the surrounding paint.
Step 1: Clean the area of dirt and debris. Thoroughly wash the area around the bead of paint using mild soap mixed with water.
Rinse thoroughly and dry the area with a microfiber towel.
Step 2: Apply paint thinner. Apply a very small amount of solvent with a cotton swab.
Gently wipe a drop of paint with a cotton swab (only).
A drop of paint should come off easily.
Step 3: Touch up. If you need to touch up a little, use a toothpick to apply a new coat of paint.
Let the patched area dry completely before applying another coat.
Method 3 of 4: lacquer thinner
Necessary materials
- Varnish thinner
- Microfiber towels
- Mild soap or detergent
- Q-tips
If you don't have paint thinner, or if paint thinner didn't work, try lacquer thinner. Varnish thinner, unlike single-solvent paint thinner or mineral spirits, is a combination of thinners designed to give it specific characteristics.
Step 1: Clear the area. Thoroughly wash the area around the bead of paint with water mixed with a mild detergent.
Rinse the area and dry it with a microfiber towel.
Step 2: Apply nail polish thinner. Using a Q-tip, carefully apply a small amount of nail polish thinner to the drop of paint.
The base coat of the car's paint should not be affected.
- A warning: Keep lacquer thinner away from plastic trim.
Step 3: Touch up the area. If you need to touch up a little, use a toothpick to apply a new coat of paint.
Let the touch-up paint dry before applying another coat.
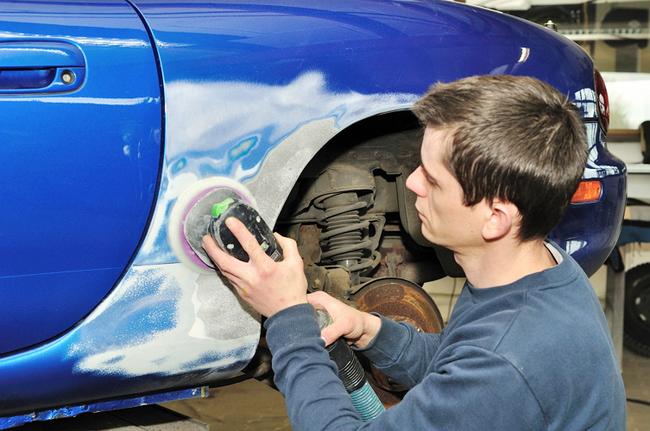
Method 4 of 4: Sand the Ball
Necessary materials
- Masking tape
- Microfiber towel
- Mild soap or detergent
- Sanding block
- Sandpaper (grit 300 and 1200)
If you're doing household chores and feel comfortable with a sander, try sanding down a blob of paint until it's smooth. With a little care, making sure to tape the area, you can quickly remove that pesky paint ball.
Step 1: Clear the area. Using a mild soap mixed with water, wash the area of the paint blob to remove any dirt or other debris.
When finished cleaning, rinse and dry with a clean microfiber towel.
Step 2: Tape the area. Mask off the areas immediately surrounding the area where you will be sanding.
Step 3: Sand the High Points. Sand the raised dots of the paint ball using wet and dry 300 grit sandpaper.
For best results, use a sanding block. Dura-Block is a popular brand.
Step 4: Finish Sanding. When the surface is dry, sand the surface with wet and dry 1200 grit sandpaper.
A warning: Take your time with the sander, being careful not to remove the base paint. Also pay attention to the overall paint level of the car.
Functions: If you find you've taken off too much paint, don't worry. Take a toothpick and fill in the gap. Again, it may take several coats to fill a hole, so be patient and let each coat dry completely before applying another.
With patience and a little know-how, you can remove unsightly paint. If you don't feel confident doing the job yourself, seek the help of a professional bodybuilder. You can also go to a mechanic to see what options you have and the best way to fix a paint problem.