How to install a car window deflector
Ventshade visors on your car windows keep out the sun and rain while letting fresh air in. Window bars also prevent wind.
Windshield deflectors or vent visors are designed to protect the driver from the harmful rays of the sun. Also, the visors are a good deflector from rain and hail. The visor deflects the wind, making it easier to move the car at high speeds. The visors are usually black, however they can be any color you want to match your vehicle.
Whether mounted on a door frame or inside a window opening, the visor helps maintain cabin comfort for the driver and passengers. When driving on the road, you can lower the window so that the visor still covers the window and allow air to pass through the car's cabin. Plus, when it's raining outside, you can still roll the window down a bit to let fresh air into the cab without getting wet.
When installing ventilation hoods, do not install them with the protective tape fully open. This creates installation problems and can make it difficult to move the visor if it is installed in the wrong position. It can also damage the door insert trim or paint on the outside of the door as the visors move after being glued into place.
Part 1 of 2: Installing the vent shield vent shield
Necessary materials
- Alcohol wipes or swabs
- Car chalk (white or yellow)
- Safety knife with razor blade
- scuff pad
Step 1 Park your vehicle on a level, firm surface away from dust.. Make sure the transmission is in park (for automatic transmission) or 1st gear (for manual transmission).
Step 2: Place wheel chocks around the tires left on the ground.. Engage the parking brake to keep the rear wheels from moving.
Installing the ventilation hood on the outside of the door:
Step 3: Take the car to a car wash or wash the car yourself. Use a towel to dry up all the water.
- Attention: Do not wax the car if you put the vent visors on the door frame. The wax will prevent the adhesive double-sided tape from sticking to the door and it will fall off.
Step 4: Place the ventilation hood on the door. Use car chalk to mark the location of the visor when you're happy with where you want to place it.
- Attention: If you are working with a white vehicle, use yellow chalk, and if you are working with a yellow vehicle, use white chalk. All other vehicles use white chalk.
Step 5: Lightly walk over the place where the visor will be installed with a patch. This will scratch the paint a bit to provide a rough area and a good seal.
Step 6: Swab the area with an alcohol pad.. Make sure you only use an alcohol wipe and not some other cleaner.
Step 7: Remove the ventilation hood from the package.. Peel off approximately one inch of the end covers of the double-sided adhesive tape.
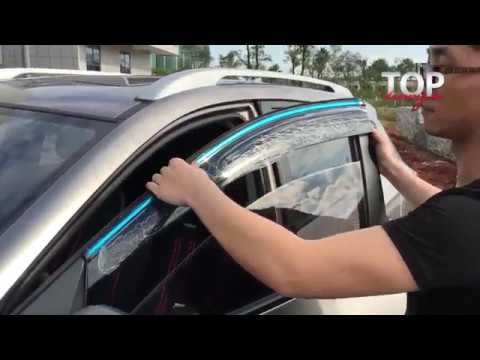
Step 8: Place the canopy on the door. Make sure you place the visor exactly where you want it.
Step 9: Take the back of the peeled off coating and peel it off.. The peel is only about 3 inches long.
Step 10: Take the front of the peeled off coating and peel it off.. Make sure you pull the peel down and out of the way.
This prevents the tape from sticking to the peeling material.
- Attention: Don't let the flaking come off, so take your time. If the peel comes off, you will need to use a safety knife to remove the peel.
Step 11: Remove the outer visor cover. This is a transparent plastic that protects the visor during transport.
Step 12: Wait 24 hours. Leave the ventilation hood for 24 hours before opening the window and opening and closing the door.
Installing the ventilation visor on the window channel inside the door:
Step 13: Take the car to a car wash or wash the car yourself. Use a towel to dry up all the water.
- Attention: Don't wax your car if you put vent visors on the door frame. The wax will prevent the adhesive double-sided tape from sticking to the door and it will fall off.
Step 14: Lightly run the pad over where the visor will be placed.. This will remove any debris from the plastic door liner.
If your door doesn't have a plastic liner, the pad will help peel off the paint, leaving a rough surface and providing a good seal.
Step 15: Remove the outer visor cover. This is a transparent plastic that protects the visor during transport.
Step 16: Take an alcohol pad or swab and wipe the area. Make sure you only use an alcohol wipe and not some other cleaner.
This will remove any extra debris on the window channel and create a clean surface for the tape to stick to.
Step 17: Remove the ventilation hood from the package.. Remove the end covers of the double-sided adhesive tape by about one inch.
Step 18: Place the canopy on the door. Make sure you place the visor exactly where you want it.
Step 19: Grab the peeled-off coating from the back and peel it off.. The peel is only about 3 inches long.
Step 20: Take the peeled coating from the front and peel it off.. Make sure you pull the peel down and out of the way.
This prevents the tape from sticking to the peeling material.
- Attention: Don't let the flaking come off, so take your time. If the peel comes off, you will need to use a safety knife to remove the peel.
Step 21: Minimize the Window. After you have installed the vent visor, you need to roll up the window.
Make sure the window is opposite the visor. If the window has a gap between the visor and the glass, use a lint-free cloth to fill the gap. This is usually done on older cars with loose windows.
Step 22: Wait 24 hours. Leave the ventilation hood for 24 hours before opening the window and opening and closing the door.
- Attention: If you have installed the vent visor and make a mistake and want to remove the visor, you will need to remove it as soon as possible. Use your safety razor blade and slowly scrape off the double-sided tape. To install another one, scrape off the remaining tape and proceed to prepare for installing a second visor or additional tape. The tape is used only once.
Part 2 of 2: Test drive the car
Step 1: Rotate the window up and down at least 5 times.. This ensures that the vent stays in place when the window is moved.
Step 2: Open and close the door with the window down at least 5 times.. This ensures that the visor stays on during the impact of the closing door.
Step 3: Insert the key into the ignition.. Start the engine and drive the car around the block.
Step 4: Check the vent hood for vibration or movement.. Make sure you can raise and lower the window without problems.
If, after installing the vent shield, you notice that the power window switch does not work or there are other problems with your windows, invite one of AvtoTachki certified specialists to your home or work and inspect.