How to Install a Catalytic Converter
Content
The catalytic converter is one of the most important emission components of a modern gasoline engine. It is part of the car's exhaust system and is responsible for keeping hydrocarbon emissions below…
The catalytic converter is one of the most important emission components of a modern gasoline engine. It is part of the vehicle's exhaust system and is responsible for keeping vehicles' hydrocarbon emissions below acceptable levels. Its failure will usually activate the Check Engine light and cause the vehicle to fail the emissions test.
Catalytic converters fail over time due to the destruction of the catalytic substance inside as a result of regular cycling or due to damage caused by poor engine operating conditions such as prolonged driving with an excessively lean or rich mixture. Since catalytic converters are usually sealed metal blocks, they must be replaced if they fail.
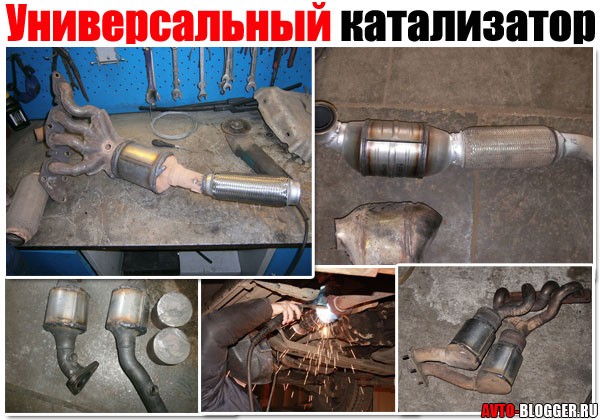
Typically, catalytic converters are attached in two ways: either bolted to the flanges or welded directly to the exhaust pipes. The exact procedures for replacing catalytic converters vary from car to car, however the more common bolt-on type design is a job that can usually be done with the right set of hand tools and knowledge. In this article, we'll walk you through how to replace the more common bolt-on catalytic converter designs.
Method 1 of 2: Installing a bolt-on type catalytic converter located in the exhaust system
There are many ways to bolt on a catalytic converter, the specifics vary from car to car. In this particular case, we will look at the more common bolt-on design, in which the catalytic converter is located on the bottom of the car.
Necessary materials
- Assortment of keys
- socket
- Jack stands
- penetrating oil
- Assortment of ratchets and sockets
- Extensions and ratchet connections
- Safety glasses
Step 1: Raise the car and secure it on jack stands.. Be sure to raise the vehicle so that there is room for maneuvering underneath.
Engage the parking brake and use chocks or blocks of wood under the wheels to prevent the vehicle from rolling.
Step 2: Find your catalytic converter. Locate the catalytic converter on the bottom of the car.
It is usually located closer to the front half of the car, usually behind the exhaust manifold.
Some vehicles may even have multiple catalytic converters, in such cases it is important to note which catalytic converter needs to be replaced.
Step 3 Remove all oxygen sensors.. If necessary, remove the oxygen sensors, which may be installed directly in or near the catalytic converter.
If the oxygen sensor is not installed in the catalytic converter or it needs to be removed, go to step 4.
Step 4: Spray Penetrating Oil. Spray the penetrating oil on the outlet flange fasteners and flanges and let them soak in for a few minutes.
Due to their location at the bottom of the vehicle and the environment, exhaust system nuts and bolts are particularly prone to rust and seizing, so spraying them with penetrating oil makes them easier to unfasten and helps avoid problems with stripped nuts or bolts.
Step 5: Prepare your tools. Determine what size sockets or wrenches are required to remove the catalytic converter flange nuts or bolts.
Sometimes removal requires various extensions or flexible connections, or a ratchet and socket on one side, and a wrench on the other side.
Make sure the tools are properly installed before attempting to loosen fasteners. As noted earlier, exhaust fittings are particularly prone to rust, so extra care must be taken not to round or peel off any fittings.
Remove the hardware and the catalytic converter should come free.
Step 6: Replace the catalytic converter. Replace the catalytic converter with a new one and replace all exhaust flange gaskets to prevent exhaust leaks.
Also take care to double check if the replacement catalytic converter meets the correct specifications for the vehicle's emission standards.
Emission standards vary from state to state, and a vehicle can be damaged by an improperly installed catalytic converter.
Step 7: Install the catalytic converter. Install the catalytic converter in reverse order of removal, steps 1-5.
Method 2 of 2: Installing an Exhaust Manifold Integral Catalytic Converter
Some vehicles use a catalytic converter design that is built into the exhaust manifold and bolts directly to the head(s) and leads down into the exhaust system. These types of catalytic converters are also very common and in many cases can be replaced with a basic set of hand tools.
Step 1: Locate the catalytic converter.. For vehicles that use catalytic converters built into the exhaust manifolds, they can be found under the hood, bolted directly to the cylinder head or engine heads if it is a V6 or V8 engine.
Step 2: Remove Obstacles. Remove any covers, cables, wiring, or intake pipes that may obstruct access to the exhaust manifold.
Also take care to remove any oxygen sensors that may be installed in the manifold.
Step 3: Spray Penetrating Oil. Spray penetrating oil on any exhaust manifold nuts or bolts and let them soak in for a few minutes.
Remember to spray not only the hardware in the head but also the hardware on the bottom flange leading down to the rest of the exhaust.
Step 4: Raise the car. Depending on the design of the vehicle, sometimes the lower bolts can only be accessed from underneath the vehicle.
In these cases, the vehicle will need to be jacked up and jacked up to gain access to these nuts or bolts.
Step 5: Determine the necessary tools. Once the vehicle is raised and secured, determine what size tools are required and loosen the exhaust manifold fasteners on both the head and flange. Again, take care that the tools are properly installed before attempting to loosen nuts or bolts to avoid stripping or rounding off any hardware.
After all equipment has been removed, the manifold should be disconnected.
Step 6: Replace the catalytic converter. Replace the catalytic converter with a new one.
Replace all manifold and exhaust pipe gaskets to prevent exhaust leaks or engine performance problems.
Step 7: Install a new catalytic converter. Install the new catalytic converter in the reverse order of removal.
All things considered, bolt-on catalytic converters are generally easy to make, however features can vary greatly from vehicle to vehicle. If you are uncomfortable trying to replace it yourself, contact a certified specialist, for example, from AvtoTachki, who will replace the catalytic converter for you.