How to troubleshoot a car that makes a clanging noise on bumps
Content
- Part 1 of 7: Diagnosing worn or damaged struts
- Part 2 of 7: Diagnosing worn or damaged leaf spring brackets
- Part 3 of 7: Diagnosing Worn or Damaged Suspension Arms
- Part 4 of 7: Diagnosing Damaged or Broken Ball Joints
- Part 5 of 7: Diagnosing Damaged or Broken Shock Absorbers
- Part 6 of 7: Diagnosing Loose or Damaged Body Mounts
Vehicles that clang when going over bumps may have worn leaf spring struts or calipers, damaged control arms or shock absorbers.
If you drive over bumps and hear a clunk, there's a good chance something is wrong with your car. Often the suspension system is at fault when you hear the clang.
The knock that occurs when the car moves over bumps can be caused by the following reasons:
- Worn or damaged racks
- Worn or damaged leaf spring calipers
- Worn or damaged control levers
- Damaged or broken ball joints
- Damaged or broken shock absorbers
- Loose or damaged body mounts
When it comes to diagnosing clanking noise when driving over bumps, a road test is required to determine the sound. Before taking the car for a road test, you need to walk around the car to make sure that nothing falls from it. Look under the bottom to see if any parts of the car are broken. If something safety related is broken in the vehicle, you need to fix the problem first before doing a road test. Also be sure to check your tire pressure. This will prevent the car's tires from overheating and allow for a proper test.
Part 1 of 7: Diagnosing worn or damaged struts
Step 1: Press the front and back of the car. This will check if the strut dampers are working properly. As the strut body becomes depressed, the strut damper will move in and out of the strut tube.
Step 2: Start the engine. Turn the wheels from lock to lock from right to left. This will test to see if the base plates will make clicking or popping sounds when the vehicle is stationary.
Step 3: Drive the car around the block. Make turns so that you can fully turn the steering wheel in the desired direction. Listen for clicks or pops.
The struts are designed to turn with the wheels as the struts have a mounting surface for the wheel hub. While checking the struts for sounds, feel the steering wheel for any movement, as if the wheel hub mounting bolts could be loosened causing the wheels to shift and misalign.
Step 4: Drive your car over bumps or potholes. This checks the condition of the strut shaft for broken internals or a dented shell.
- AttentionA: If you see oil on the rack body, you should consider replacing the rack with a new or refurbished rack.
Preparing the car for check racks
Necessary materials
- flashlight
- Jack (2 tons or more)
- Jack stands
- Long mount
- Wheel chocks
Step 1: Park your vehicle on a level, firm surface.. Make sure the transmission is in park (for automatic transmission) or 1st gear (for manual transmission).
Step 2: Install wheel chocks around the rear wheels, which will remain on the ground. Apply the parking brake to block the rear wheels from moving.
Step 3: Raise the car. Using a jack recommended for the weight of the vehicle, raise it under the vehicle at the indicated jack points until the wheels are completely off the ground.
Step 4: Install the jack stands. The jack stands should be located under the jacking points. Then lower the car onto the jacks. For most modern cars, the jack stand attachment points are on a weld right under the doors along the bottom of the car.
Checking the Status of the Racks
Step 1: Take a flashlight and look at the racks. Look for dents in the strut housing or oil leaks. Look at the base plate to see if there is separation. Check the hub bolts and make sure they are tight with a wrench.
Step 2: Take a long pry bar. Raise the tires and check their movement. Be sure to look where the movement is coming from. The wheels may move if the ball joint is worn, the hub bolts are loose, or the hub bearing is worn or loose.
Step 3: Open the engine compartment hood. Locate the mounting studs and nuts on the base plate. Check if the bolts are tight with a wrench.
Lowering the car after diagnosis
Step 1: Gather all the tools and creepers and get them out of the way.
Step 2: Raise the car. Using a jack recommended for the weight of the vehicle, raise it under the vehicle at the indicated jack points until the wheels are completely off the ground.
Step 3: Remove the jack stands and keep them away from the vehicle.
Step 4: Lower the car so that all four wheels are on the ground. Pull out the jack and set it aside.
Step 5: Remove the wheel chocks from the rear wheels and set them aside.
If a car problem needs attention now, you need to repair worn or damaged struts.
Part 2 of 7: Diagnosing worn or damaged leaf spring brackets
Leaf spring calipers tend to wear out over time on vehicles under normal driving conditions. Most vehicles drive not only on roads, but also in other areas. Leaf springs are found on trucks, vans, trailers and all types of off-road vehicles. Due to off-road effort, leaf spring vehicles tend to break or buckle, causing clanging. Typically, the shackle at one end of the leaf spring bends or breaks, creating a binding sound, which is a loud clang.
Vehicles with massive suspension lifters are at risk of failing leaf spring clamps. There are many vehicle-related suspension parts that lift and require more attention than a standard suspension system.
Necessary materials
- flashlight
Step 1: Take a flashlight and visually check the car's suspension. Look for damaged or leaf springs.
- AttentionA: If you find any broken suspension parts, you need to have them repaired before you test drive the car. As a result, a security issue arises that needs to be addressed.
Step 2: Drive the car around the block. Listen for any clanging sounds.
Step 3: Drive your car over bumps or potholes. This checks the condition of the suspension as the tires and suspension are moved.
Step 4: Apply the brakes hard and accelerate quickly from a standstill. This will check for any horizontal movement in the suspension system. A clevis bushing with a loose leaf spring may not make noise during normal operation, but may move during sudden stops and rapid takeoffs.
- Attention: If your vehicle has been in an accident before, the leaf spring mounting brackets can be reinstalled on the frame to fix the alignment problem. Leaning back can lead to suspension slack issues or bushing wear faster than normal.
Preparing the Vehicle for Checking the Leaf Spring Clamps
Necessary materials
- flashlight
- Jack (2 tons or more)
- Jack stands
- Long mount
- Wheel chocks
Step 1: Park your vehicle on a level, firm surface.. Make sure the transmission is in park (for automatic transmission) or 1st gear (for manual transmission).
Step 2: Install wheel chocks around the rear wheels, which will remain on the ground. Apply the parking brake to block the rear wheels from moving.
Step 3: Raise the car. Using a jack recommended for the weight of the vehicle, raise it under the vehicle at the indicated jack points until the wheels are completely off the ground.
Step 4: Install the jack stands. The jack stands should be located under the jacking points. Then lower the car onto the jacks. For most modern cars, the jack stand attachment points are on a weld right under the doors along the bottom of the car.
Checking the condition of the leaf spring brackets
Step 1: Take a flashlight and look at the suspension system. Check if parts are damaged, bent, or loose. Check the mounting bolts to the steering knuckle and make sure they are tight with a wrench.
Step 2: Take a long pry bar. Raise the tires and check their movement. Be sure to look where the movement is coming from. The wheels may move if the ball joint is worn, if the knuckle mounting bolts are loose, or if the hub bearing is worn or loose.
Step 3: Locate the Leaf Spring Brackets Check the mounting bolts to the leaf spring brackets. Check if the bolts are tight with a wrench. Look for bent or broken leaf spring clamps.
Lowering the car after diagnosis
Step 1: Gather all the tools and vines and get them out of the way.
Step 2: Raise the car. Using a jack recommended for the weight of the vehicle, raise it under the vehicle at the indicated jack points until the wheels are completely off the ground.
Step 3: Remove the jack stands and keep them away from the vehicle.
Step 4: Lower the car so that all four wheels are on the ground. Pull out the jack and set it aside.
Part 3 of 7: Diagnosing Worn or Damaged Suspension Arms
Control levers in vehicles wear out over time under normal driving conditions. Most vehicles drive not only on roads, but also in other areas. Most drivers tend to think that cars are like trucks and can go off-road without any problems. This leads to more frequent wear of suspension parts.
Necessary materials
- flashlight
Step 1: Take a flashlight and visually inspect the vehicle controls. Look for any damaged or broken control arms or related suspension parts.
- AttentionA: If you find any broken suspension parts, you need to have them repaired before you test drive the car. As a result, a security issue arises that needs to be addressed.
Step 2: Drive the car around the block. Listen for any clanging sounds.
Step 3: Drive your car over bumps or potholes. This checks the condition of the suspension as the tires and suspension are moved.
Step 4: Apply the brakes hard and accelerate quickly from a standstill. This will check for any horizontal movement in the suspension system. A loose control arm bushing may not make noise during normal operation, but may move during heavy braking and rapid takeoff.
- Attention: If your vehicle has been in an accident before, the control arms can be reattached to the frame to fix the toe problem. Leaning back can lead to control lever loosening problems or bushing wear faster than normal.
Preparing the car for checking the suspension arms
Necessary materials
- flashlight
- Jack (2 tons or more)
- Jack stands
- Long mount
- Wheel chocks
Step 1: Park your vehicle on a level, firm surface.. Make sure the transmission is in park (for automatic transmission) or 1st gear (for manual transmission).
Step 2: Install wheel chocks around the rear wheels, which will remain on the ground. Apply the parking brake to block the rear wheels from moving.
Step 3: Raise the car. Using a jack recommended for the weight of the vehicle, raise it under the vehicle at the indicated jack points until the wheels are completely off the ground.
Step 4: Install the jack stands. The jack stands should be located under the jacking points. Then lower the car onto the jacks. For most modern cars, the jack stand attachment points are on a weld right under the doors along the bottom of the car.
Checking the condition of suspension arms
Step 1: Take a flashlight and look at the controls. Check if parts are damaged, bent, or loose. Check the mounting bolts to the steering knuckle and make sure they are tight with a wrench.
Step 2: Take a long pry bar. Raise the tires and check their movement. Be sure to look where the movement is coming from. The wheels may move if the ball joint is worn, if the knuckle mounting bolts are loose, or if the hub bearing is worn or loose.
Step 3: Open the engine compartment hood. Locate the mounting bolts to the suspension arms. Check if the bolts are tight with a wrench. Look for bushings of levers. Check the bushing for cracks, breakage or missing.
Lowering the car after diagnosis
Step 1: Gather all the tools and vines and get them out of the way.
Step 2: Raise the car. Using a jack recommended for the weight of the vehicle, raise it under the vehicle at the indicated jack points until the wheels are completely off the ground.
Step 3: Remove the jack stands and keep them away from the vehicle.
Step 4: Lower the car so that all four wheels are on the ground. Pull out the jack and set it aside.
If necessary, have a mechanic replace worn or damaged control arms.
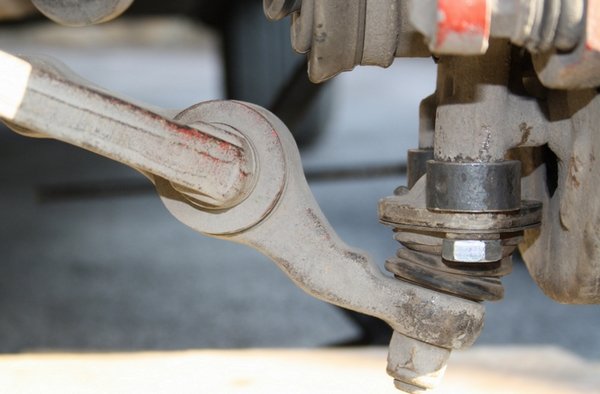
Part 4 of 7: Diagnosing Damaged or Broken Ball Joints
Car ball joints wear out over time under normal road conditions. Most vehicles drive not only on roads where there is a lot of dust, but also in other directions. Most drivers tend to think that cars are like trucks and can go off-road without any problems. This leads to more frequent wear of suspension parts.
Necessary materials
- flashlight
Step 1: Take a flashlight and visually inspect the ball joints and suspension of the car. Look for damaged or broken ball joints.
- AttentionA: If you find any broken suspension parts, you need to have them repaired before you test drive the car. As a result, a security issue arises that needs to be addressed.
Step 2: Drive the car around the block. Listen for any clanging sounds that come from under the car.
Step 3: Drive your car over bumps or potholes. This checks the condition of the suspension as the tires and suspension are moved.
Step 4: Apply the brakes hard and accelerate quickly from a standstill. This will check for any horizontal movement in the suspension system. A loose suspension bushing may not make noise during normal operation, but may move during heavy braking and rapid takeoff.
- Attention: If your vehicle has been in an accident before, the suspension can be reattached to the frame to fix the toe problem. Leaning back can lead to suspension slack issues or bushing wear faster than normal.
Preparing the car for a suspension test
Necessary materials
- flashlight
- Jack (2 tons or more)
- Jack stands
- Long mount
- Extra large pair of channel blocking pliers
- Wheel chocks
Step 1: Park your vehicle on a level, firm surface.. Make sure the transmission is in park (for automatic transmission) or in first gear (for manual transmission).
Step 2: Install wheel chocks around the rear wheels, which will remain on the ground. Apply the parking brake to block the rear wheels from moving.
Step 3: Raise the car. Using a jack recommended for the weight of the vehicle, raise it under the vehicle at the indicated jack points until the wheels are completely off the ground.
Step 4: Install the jack stands. The jack stands should be located under the jacking points. Then lower the car onto the jacks. For most modern cars, the jack stand attachment points are on a weld right under the doors along the bottom of the car.
Checking the condition of the ball joints
Step 1: Take a flashlight and look at the ball joints. Check if parts are damaged, bent, or loose. Check the mounting bolts to the steering knuckle and make sure they are tight with a wrench.
Step 2: Take a long pry bar. Raise the tires and check their movement. Be sure to look where the movement is coming from. The wheels may move if the ball joint is worn, if the knuckle mounting bolts are loose, or if the hub bearing is worn or loose.
Step 3: Locate the ball joints. Check for castle nut and cotter pin on ball joints. Take a very large pair of pliers and squeeze the ball joint. This checks for any movement within the ball joints.
Lowering the car after diagnosis
Step 1: Gather all the tools and vines and get them out of the way.
Step 2: Raise the car. Using a jack recommended for the weight of the vehicle, raise it under the vehicle at the indicated jack points until the wheels are completely off the ground.
Step 3: Remove the jack stands and keep them away from the vehicle.
Step 4: Lower the car so that all four wheels are on the ground. Pull out the jack and set it aside.
If a car problem requires attention, see a mechanic to replace damaged or broken ball joints.
Part 5 of 7: Diagnosing Damaged or Broken Shock Absorbers
Necessary materials
- flashlight
Step 1: Take a flashlight and visually inspect the dampers. Look for any abnormal shock absorber damage.
Step 2: Drive the car around the block. Listen for any clanging sounds. The tires are designed to be in constant contact with the road as the shock absorbers press the tires to the ground.
Step 4: Drive your car over bumps or potholes. This checks the condition of the rebound reaction in the tires and bumps of the car. shock absorbers are designed to stop or slow down the vibrations of the helix when the helix spring is shaken.
Preparing your car for a tire check
Necessary materials
- flashlight
- Jack (2 tons or more)
- Jack stands
- Wheel chocks
Step 1: Park your vehicle on a level, firm surface.. Make sure the transmission is in park (for automatic transmission) or 1st gear (for manual transmission).
Step 2: Install wheel chocks around the rear wheels, which will remain on the ground. Apply the parking brake to block the rear wheels from moving.
Step 3: Raise the car. Using a jack recommended for the weight of the vehicle, raise it under the vehicle at the indicated jack points until the wheels are completely off the ground.
Step 4: Install the jack stands. The jack stands should be located under the jacking points. Then lower the car onto the jacks. For most modern cars, the jack stand attachment points are on a weld right under the doors along the bottom of the car.
Checking the condition of shock absorbers
Step 1: Take a flashlight and visually inspect the dampers. Inspect the shock absorber housing for damage or dents. Also, inspect the shock mount brackets for missing bolts or broken lugs.
Step 2: Look at tire inspection for dents. This will mean that the shock absorbers are not working properly.
- Attention: If the tires lean on the tread, then the shock absorbers are worn out and do not keep the tires from bouncing when the coil vibrates. Tires must be replaced when servicing shock absorbers.
Lowering the car after diagnosis
Step 1: Gather all the tools and vines and get them out of the way.
Step 2: Raise the car. Using a jack recommended for the weight of the vehicle, raise it under the vehicle at the indicated jack points until the wheels are completely off the ground.
Step 3: Remove the jack stands and keep them away from the vehicle.
Step 4: Lower the car so that all four wheels are on the ground. Pull out the jack and set it aside.
Step 5: Remove the wheel chocks from the rear wheels and set them aside.
Damaged or broken shock absorbers should be replaced by a professional mechanic.
Part 6 of 7: Diagnosing Loose or Damaged Body Mounts
Body mounts are designed to fasten the body to the car body and prevent the transmission of vibrations to the cab interior. Most vehicles have up to eight body mounts from the front to the rear of the vehicle. The body mounts may become loose over time or the bushing may deteriorate and break off. Cracking sounds that occur when the body mounts are missing or when the body is damaged as a result of hitting the frame. Usually, a vibration or shock is felt in the cab along with the sound.
Necessary materials
- flashlight
Step 1: Take a flashlight and visually inspect the car body mounts. Look for any damaged or body attachments.
- AttentionA: If you find any broken suspension parts, you need to have them repaired before you test drive the car. As a result, a security issue arises that needs to be addressed.
Step 2: Drive the car around the block. Listen for any clanging sounds.
Step 3: Drive your car over bumps or potholes. This checks the condition of the body mounts as the body moves over the frame.
- Attention: If you have a one-piece car, then the sound will come from the subframes that support the engine and rear suspension.
Preparing the Vehicle for Checking the Leaf Spring Clamps
Materials needed to complete the job
- flashlight
- Jack (2 tons or more)
- Jack stands
- Wheel chocks
Step 1: Park your vehicle on a level, firm surface.. Make sure the transmission is in park (for automatic transmission) or in first gear (for manual transmission).
Step 2: Install wheel chocks around the rear wheels, which will remain on the ground. Apply the parking brake to block the rear wheels from moving.
Step 3: Raise the car. Using a jack recommended for the weight of the vehicle, raise it under the vehicle at the indicated jack points until the wheels are completely off the ground.
Step 4: Install the jack stands. The jack stands should be located under the jacking points. Then lower the car onto the jacks. For most modern cars, the jack stand attachment points are on a weld right under the doors along the bottom of the car.
Checking the condition of the body mounts
Step 1: Take a flashlight and look at the body mounts. Check if parts are damaged, bent, or loose. Check the mounting bolts to the body mounts and make sure they are tight with a wrench. Inspect the body mount bushings for cracks or tears in the rubber.
Lowering the car after diagnosis
Step 1: Gather all the tools and vines and get them out of the way.
Step 2: Raise the car. Using a jack recommended for the weight of the vehicle, raise it under the vehicle at the indicated jack points until the wheels are completely off the ground.
Step 3: Remove the jack stands and keep them away from the vehicle.
Step 4: Lower the car so that all four wheels are on the ground. Pull out the jack and set it aside.
Eliminating clunking noise when driving over bumps can help improve vehicle handling.