How to choose and install subwoofers
While a factory sound system will do the job, if you want to really "feel" the music, you should install an aftermarket system, and subwoofers are an important part of a high quality aftermarket car stereo.
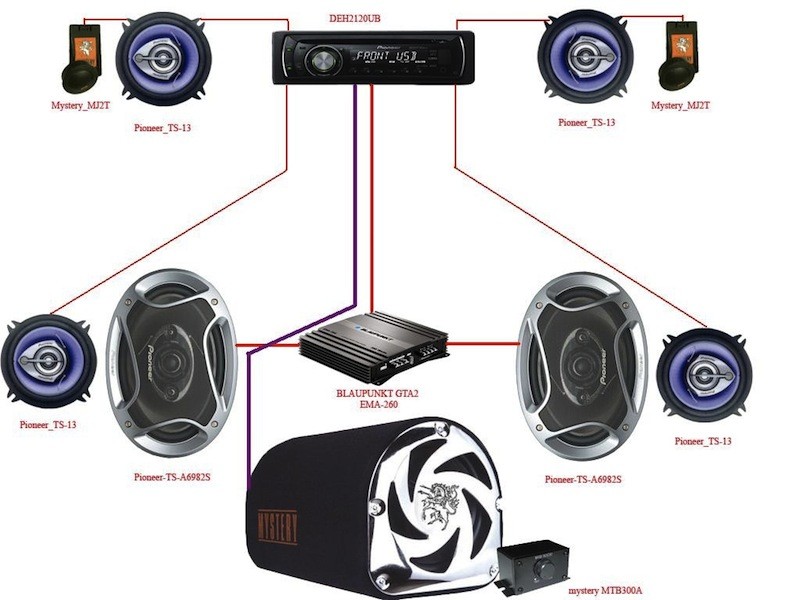
Subwoofers are one of the best upgrades you can make to any stereo system. Whether you want to flatten mid-range sound with smaller-diameter speakers, or alarm your neighbor's car with a trunk full of 15-inch subwoofers, the setup is essentially the same.
The only function of a subwoofer is to reproduce low frequencies, more commonly referred to as bass. No matter what kind of music you like to listen to, a quality subwoofer will enhance the sound of your car stereo. Factory-installed stereo systems usually include a subwoofer, but these are often too small to reproduce very low frequency sounds. A quality subwoofer can solve this problem.
Subwoofers are available in various sizes and types. There are many factors to consider when choosing a subwoofer, including your musical tastes, the amount of space in your car, and your budget.
Let's take a look at the different types of subwoofers available and how to choose the right one for your car.
Part 1 of 2: Choose a subwoofer for your car
Step 1: Choose the right type of subwoofer. Decide which type of subwoofer system is best for your needs. There are several different systems. Here is a brief overview of the different options:
Step 2: Compare speaker specifications. There are many specifications to consider when choosing a subwoofer.
Here are some of the most relevant features:
Step 3: Consider Other System Components. If you are not buying a complete system, you will need to make a decision about the other components of your system:
- Amplifier
- A set of dynamite
- Fencing
- Polyester fiber
Wiring (amplifier and speaker)
Attention: The Dynamat kit helps prevent rattling while the polyester fiber is the padding that goes into the body.
Step 4: Do your research. Once you've decided on the type of system you want to install in your car, it's time to do some research.
Ask friends and family for recommendations, read reviews, and determine the best components for your vehicle and budget.
Step 5: Determine where the subwoofer will be installed.You must also determine where you plan to mount the subwoofer in the vehicle and take measurements to ensure that the components you select will fit correctly in the vehicle.
Step 6: Purchase the system. It's time to get out your credit card or checkbook and start buying your system components.
Subwoofers and other necessary components can be purchased from various retail outlets.
When you find the best price, buy a new car stereo.
Part 2 of 2: Subwoofer Installation
Necessary materials
- hex keys
- Set of drills and drills
- Tools for removing the head unit (depending on the vehicle)
- crosshead screwdriver
- Screws, nuts and bolts
- Nippers
- Wire strippers
Required details
- Amplifier
- fuse
- Subwoofer(s) and subwoofer box
- Metal L-shaped brackets for attaching the speaker cabinet
- Power wire
- RCA cables
- remote wire
- Rubber bushings
- Speaker wire
Step 1: Determine where the subwoofer cabinet and amplifier will be located. Generally, the chest is the most common choice for placing these items, so we'll be basing the following instructions on that.
Step 2: Attach the amplifier and speaker cabinet to something strong.. This is a must because you don't want these items to slide around the car when driving over bumps and corners.
Most stereo installers mount the speaker cabinet directly to the floor using long bolts and nuts. To do this, you need to drill four holes in both the subwoofer cabinet and the floor of the car.
- A warningA: Before drilling anything in this project, you should double, triple, and quadruple check where you expect holes to be drilled. The underside of a car is filled with important items such as brake lines, fuel lines, exhaust systems, suspension parts, and sometimes differentials. You really don't want to suddenly drill a hole in something important just to drop the bass. If you are not comfortable drilling the floor, consider having one of the experienced technicians from AvtoTachki take over the project for you.
Step 3: Install the speaker cabinet with the L-brackets.. Now that you've looked under the car and found safe places to drill holes in the floor, screw the L-brackets onto the speaker cabinet.
Then align the opposite holes in the bracket with a part of the floor that can be safely drilled.
Lower the bolts through the L-bracket through the floor pan. Use a flat washer and secure the bolt with a nut to the bottom of the car.
Use the four L-shaped brackets to ensure that the speaker enclosure is securely attached to the vehicle.
Step 4: Install the Amplifier. Most installers mount the amplifier into the speaker cabinet for ease of installation.
Place the amplifier on the speaker box and screw it to the box so that it is securely fastened.
Step 5: Remove the stereo head unit from the dashboard.. Prepare RCA cables and "remote" wire (may also be labeled "power antenna" wire) for installation.
RCA wires carry music from the stereo system to the amplifier. The "remote" wire tells the amplifier to turn on.
Run the RCA and remote wires from the stereo head unit through the dash and down to the floor. Make sure both wires are connected to the head unit and then reinstall the head unit back into the dash.
Step 6: Connect the cables and wires to the speaker cabinet and amplifier.. Run the RCA and remote wires under the car carpet, all the way to the speaker box and amplifier.
This process will vary depending on the vehicle, but it will usually be necessary to remove the dash panel and some interior trim to allow the wires to get under the carpet.
Connect the wires to the appropriate terminals on the amplifier - they will be marked accordingly. This is usually done with a Phillips screwdriver or a hex wrench, although this varies by brand of amplifier.
Step 7: Run the power cord through, but don't plug it in yet.. Route the wire directly from the battery through the firewall into the vehicle interior.
Be sure to use grommets wherever the wire goes through the piece of metal. You don't want the power cord to rub against sharp edges.
Once inside the vehicle, route the power wire on the opposite side of the vehicle from the RCA and remote wires. Placing them next to each other often causes feedback or unpleasant sound from the speakers.
Connect the power lead to the amplifier and connect it to the large positive terminal.
Step 8: Install a Tire Guard. The power supply wire needs a protective mechanism and this fuse is called a "bus fuse".
The amperage of this fuse must be determined according to the instructions supplied with the amplifier.
This fuse must be installed within 12 inches of the battery; the closer to the battery the better. In the unfortunate event of a short circuit, this fuse blows and cuts off power to the power wire.
Having this fuse is the most important part of this whole setup. After installing the fuse, the power supply cable can be connected to the battery.
Step 9: Connect the speaker cabinet to the amplifier with the speaker wire.. This will again require the use of a Phillips screwdriver or a hex wrench.
Step 10: Drop the bass. It is best to set the amplifier and head unit settings to minimum before turning up the volume. From there, settings can be slowly increased to your desired listening settings.
Your car stereo should now hum and you can enjoy high quality sound with the satisfaction that comes from upgrading yourself. If you are having difficulty with any part of the above process, you can always seek help from a professional mechanic or stereo installer.
Installing a subwoofer is an option for drivers who want the best musical experience on the road. If you install a sound system, your car will sound great so you can hit the road and play your favorite tunes. If you are disturbed by loud sounds coming from your car that prevent you from using all the features of your new stereo system, entrust the check to AvtoTachki certified specialists.