How to replace a Pitman car lever
The bipod link connects the steering wheel and steering gear to your vehicle's tires. A bad bipod arm can lead to poor steering or even steering failure.
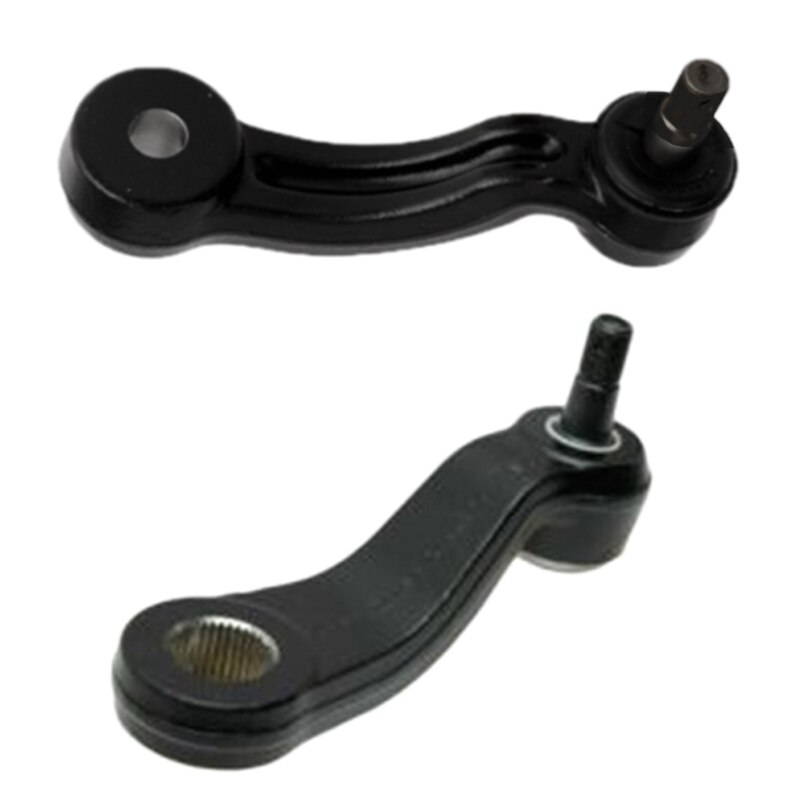
The tie rod arms are an important link between the steering wheel and tires. More specifically, the bipod link connects the steering gear to the brake or center link. This helps turn the angular motion of your handlebar and gearbox into a linear motion used to turn the wheels back and forth.
A faulty bipod arm can result in "sloppy" steering (i.e., excessive steering wheel play) and the vehicle feeling like it wanders or does not respond to normal driving methods. A broken or missing bipod arm can lead to total steering failure. Replacing the arm requires a few special tools and less than a day, depending on your level of experience.
Part 1 of 2: Removing the old bipod
Necessary materials
- Socket 1-5/16 (or similar size)
- Break bar (optional)
- socket
- Jack stands
- lubricant for mechanics
- needle nose pliers
- User's Guide
- Cucumber fork (optional)
- Pitman arm puller
- Replacing the pan
- Rubber hammer
- Socket set and ratchet
Wrench
Attention: New connecting rods should come with castle nut, cotter pin and grease fitting. If you haven't, you will also need to collect these items.
FunctionsA: Any special tools you don't own can be borrowed from your local auto parts store. Before spending extra money on tools that you will potentially only use once, consider renting or borrowing them first, as many stores have these options.
Step 1: Raise the vehicle and remove the corresponding tire.. Park your car on a level surface. Locate the bar next to the opener you are replacing and loosen the lug nuts on that bar.
- Functions: This must be done before you raise the vehicle. Attempting to loosen the lug nuts while the vehicle is in the air allows the tire to rotate and does not create resistance to break the torque applied to the lug nuts.
Using your vehicle's owner's manual, find the lifting point where you want to place the jack. Keep a jack nearby. Raise the vehicle. With the vehicle raised slightly above the desired height, place jack stands under the frame. Slowly release the jack and lower the vehicle onto the stands.
Remove lug nuts and bar next to coulter.
- Functions: It is safe to place another object (such as a removed tire) under the vehicle in case the outriggers fail and the vehicle falls. Then, if someone is under the car when this happens, there will be less chance of injury.
Step 2: Find the bipod arm. Looking under the car, find the tie rod and focus on the tie rod arm. Observe the placement of the bolts on the bipod handle and plan the best position for removing them.
Step 3: Remove the locking bolt. First, you can remove the large bolt connecting the bipod to the steering mechanism. These bolts are typically 1-5/16" in size, but may vary in size. It will curl up and most likely need to be removed with a crowbar.
Step 4: Remove the bipod arm from the steering gear.. Insert the bipod puller into the gap between the steering gear and the stop bolt. Using a ratchet, turn the center screw of the puller until the bipod lever is free.
- Functions: If necessary, you can use your hammer to assist in removing this end of the bipod arm. Gently tap the lever or puller with a hammer to release it.
Step 5: Remove the castle nut and cotter pin.. On the other end of the bipod you will see a castle nut and cotter pin. The cotter pin holds the castle nut in place.
Remove the cotter pin with a set of needle nose pliers. Remove the castle nut with socket and ratchet. You may need to cut the cotter pin to remove it, depending on its condition.
Step 6: Remove the Bipod Arm. Use a brine fork to separate the bipod arm from the center link. Insert the tines (i.e. the tips of the fork tines) between the connecting rod and the center link. Drive the teeth deeper into the gap with a hammer until the bipod lever pops out.
Part 2 of 2: Fitting the New Bipod
Step 1: Get ready to install the new bipod arm.. Apply grease around the bolt that attaches the link to the steering gear and down around the steering gear.
This will help protect against dirt, grime, and water that could prevent the tie rod from working properly. Apply liberally to area, but wipe off excess.
Step 2: Attach the link to the steering gear.. Install the new bipod arm to the steering gear by tightening the retaining bolt removed in step 3 of part 1.
Align the notches on the handle with the notches on the steering gear as you move them together. Find and align flat marks on both devices.
Make sure all washers are in good condition or new before installation. Make sure they stay in the same order they were removed. Hand tighten the bolt and tighten with a torque wrench to your vehicle's specifications.
Step 3: Attach the tie rod to the center link.. Attach the other end of the bipod to the center, or drag the link and hand-tighten the castle nut into place. Tighten it with a ratchet or torque wrench if desired (tighten to 40 ft.lb).
Take the new cotter pin and cut it to the size of the cotter pin you removed earlier with the old tie rod (or about 1/4-1/2 inch longer than the castle nut). Thread the new cotter pin through the castle nut and twist the ends outward to lock it in place.
Step 4: Replace the tire. Reinstall the tire you removed in step 1 of part 1. Hand tighten the lug nuts.
Step 5: Lower the car. Remove all tools and objects from under the vehicle. Use the jack at the appropriate lifting points to lift the vehicle off the stands. Remove the stands from under the car. Lower the car to the ground.
Step 6: Tighten the bar nuts.. Use a torque wrench to finish tightening the nuts on the wheel hub. See user manual for torque specifications.
Step 7: Try out the new manipulator. Turn the car key to accessory mode to unlock the steering wheel. Turn the steering wheel clockwise (all the way to the left, then all the way to the right) to check if the steering works.
Once you are sure the steering is working, drive the car to see how well it steers while driving. It is recommended to test both at lower and higher speeds.
- A warning: Turning the steering wheel with the tires stationary puts additional stress on ALL steering components. Rotate the tires only while driving, whenever possible, and reserve extra load for rare trials (such as those described above) and extreme driving conditions.
Pitchman levers convert the rotation of your steering wheel and steering wheel box into a linear motion used to push tires left and right and should be replaced every 100,000 miles. While this part is vital to the functioning of the car, it can be replaced in less than a day using the steps above. However, if you prefer to have this repair done by a professional, you can always have one of AvtoTachki certified technicians come and replace your handle at your home or office.