How to replace the oil pressure sensor on most cars
Oil pressure sensors fail if the sensor light blinks or stays on when the pressure is acceptable or when the gauge is at zero.
The operation of an internal combustion engine depends on oil. Pressurized engine oil is used to create a layer between moving parts. This layer of protection prevents moving parts from coming into contact with each other. Without this layer, there is excess friction and heat between moving parts.
Simply put, oil is designed to provide protection both as a lubricant and as a coolant. To provide this pressurized oil, the engine has an oil pump that takes the oil stored in the oil pan, pressurizes and delivers the pressurized oil to several locations inside the engine through oil passages built into the engine components.
The ability of the oil to perform these functions is reduced for several reasons. The motor heats up during operation and cools down when it is turned off. This thermal cycle causes the oil to lose its ability to lubricate and cool the engine over time. As the oil begins to break down, small particles are formed that can clog oil passages. This is why the oil filter is tasked with pulling these particles out of the oil, and why there are oil change intervals.
To a small extent, the oil pressure gauge and indicator/indicator can be used to inform the driver about the condition of the lubrication system. As the oil begins to break down, the oil pressure may drop. This pressure drop is detected by an oil pressure sensor and transmitted to a pressure gauge or warning light in the instrument cluster. The old mechanics rule of thumb for oil pressure was 10 psi of oil pressure for every 1000 rpm.
This article will show you how to replace the oil pressure sensor for most vehicles. There are slight differences between different car makes and models, but this article is written in such a way that it can be adapted to get the job done.
Part 1 of 1: Replacing the Oil Pressure Sensor
Necessary materials
- Oil pressure sensor socket - optional
- Screwdriver Set
- Towel/cloth shop
- Thread sealant - if necessary
- Set of wrenches
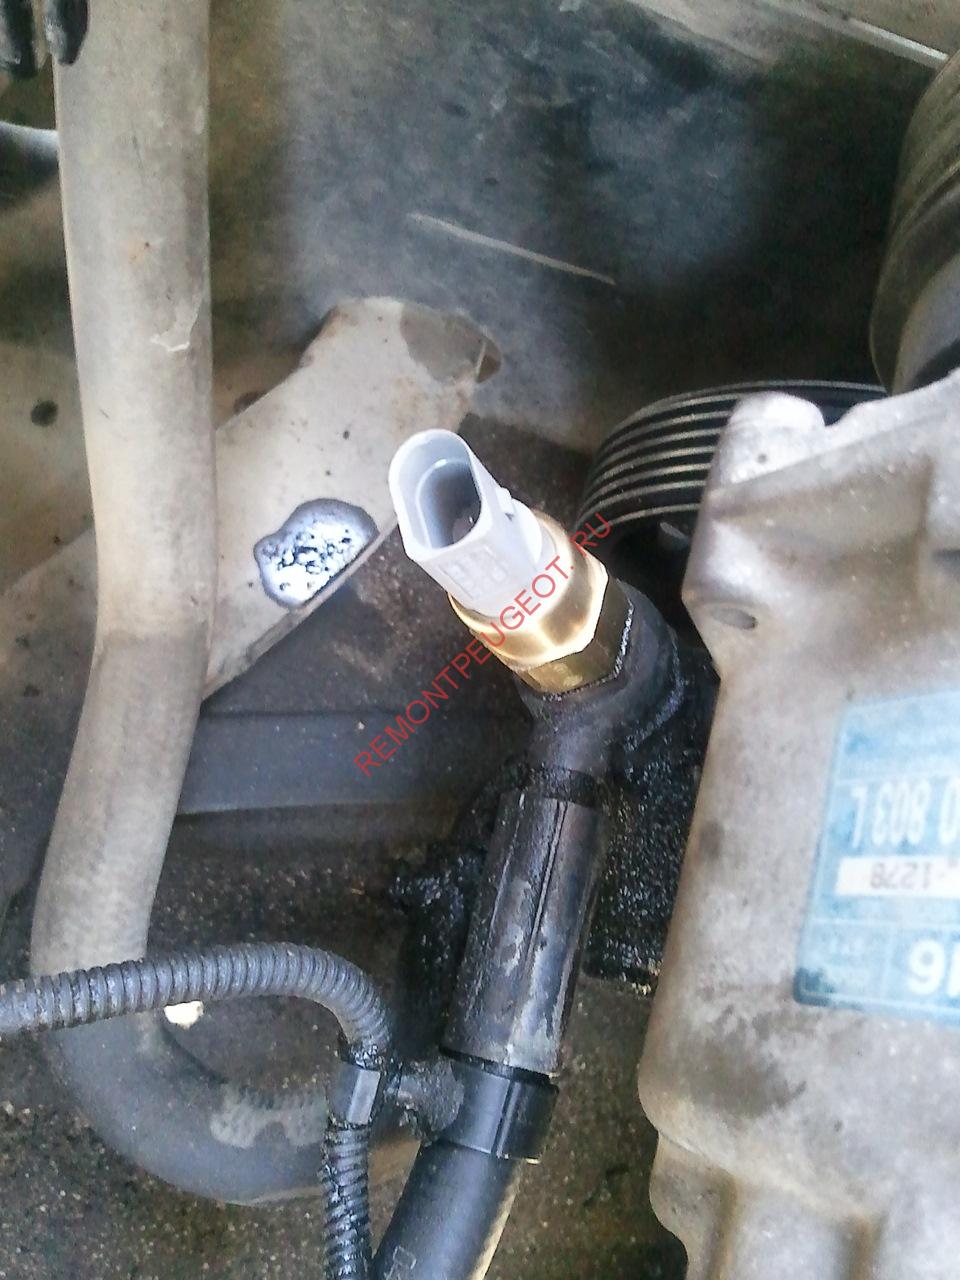
Step 1. Locate the oil pressure sensor.. The oil pressure sensor is most often mounted in the cylinder block or cylinder heads.
There is no real industry standard for this position, so the sensor can be installed in any number of locations. If you can't find the oil pressure sensor, you may need to consult a repair manual or a professional repair technician.
Step 2: Disconnect the oil pressure sensor electrical connector.. Release the retaining tab on the electrical connector and carefully pull the connector out of the sensor.
Because the oil pressure sensor is exposed to the elements under the hood, debris can build up around the plug over time. It may be necessary to push and pull the plug a couple of times to release it when the retainer is released.
- Attention: In some cases, a small amount of spray lubricant may help to disconnect the electrical connector. You can also use a small screwdriver to carefully release the connector. Be careful not to damage the electrical connector when removing it.
Step 3: Remove the Oil Pressure Sensor. Use a suitable wrench or socket to loosen the oil pressure switch.
After loosening, it can be unscrewed to the end by hand.
Step 4: Compare the replaced oil pressure sensor with the removed one. This is all determined by the internal design, but the physical dimensions must be the same.
Also, make sure that the thread part has the same diameter and thread pitch.
- A warning: Since the oil pressure switch is installed in a place where the oil is under pressure, it is usually necessary to use some kind of thread sealant. There are several different types of sealants, as well as a range of liquids, pastes, and tapes that can be used. Just make sure you use one that is compatible with petroleum based products.
Step 5: Install the replacement oil pressure sensor. Screw in the replacement by hand until you can no longer turn it by hand.
Finish tightening with an appropriate wrench or socket.
Step 6 Replace the electrical connector.. Make sure the connector is fully seated and the locking tab is locked.
Step 7: Check for correct operation. Start the engine and check if there is oil pressure on the gauge or if the oil pressure warning light goes out.
- A warning: It may take 5-10 seconds for the oil pressure to recover. This is because removing the oil pressure sensor will introduce a small amount of air into the system that needs to be purged. If during this time the oil pressure is not observed or the indicator does not go out, immediately turn off the engine. Also, if strange noises are heard during this time, turn off the engine and contact a specialist.
Without proper oil pressure, the engine will fail. It's not about if, it's about when, so make sure these repairs are done immediately and efficiently. If at any point you feel that you cannot do without replacing the oil pressure sensor in your vehicle, contact one of AvtoTachki's certified professional technicians to perform the repair for you.