How to replace the transmission oil pressure sensor
Content
- Part 1 of 7: Understanding how a transmission oil pressure sensor works
- Part 2 of 7. Check the condition of the transmission oil pressure sensors.
- Part 3 of 7: Preparing to replace the transmission position sensor
- Part 4 of 7. Remove the gearbox oil pressure sensor.
- Part 5 of 7: Install a new transmission oil pressure sensor
- Part 6 of 7: Lower the car and connect the battery
- Part 7 of 7: Test drive the car
The transmission oil pressure switch reports pump readings. If the filter is clogged, this switch puts the transmission in emergency mode.
A transmission oil pressure switch, also known as a linear pressure switch, is used in transmissions with pressurized hydraulic fluid. Cars with automatic transmission, whether front-wheel drive or four-wheel drive, have an oil pressure sensor.
The transmission oil pressure sensor is designed to communicate with the car's computer with measured pressure values generated by the pump. If the filter in the oil pan becomes clogged, the pump will develop less flow, putting less pressure on the switch. The switch will tell the computer to default to the lowest pressure gear without any damage. This state is known as sluggish mode. The transmission will usually get stuck in second or third gear, depending on how many gears the transmission has.
The switch also informs the computer of the loss of pressure. When pressure drops, the computer shuts down the motor to prevent damage to the pump. The transmission pumps are the heart of the transmission and can do more damage to the transmission if it is run at engine power without lubrication.
Part 1 of 7: Understanding how a transmission oil pressure sensor works
The gearbox oil pressure sensor has contacts inside the housing. There is a spring inside that holds the pin jumper away from the positive and ground pins. On the other side of the spring is the diaphragm. The area between the intake port and the diaphragm is filled with hydraulic fluid, usually automatic transmission fluid, and the fluid is pressurized when the transmission is running.
Transmission oil pressure sensors are of the following types:
- Clutch pressure switch
- Pump pressure switch
- Servo pressure switch
The clutch pressure switch is located on the housing near the clutch pack installation site. The clutch switch communicates with the computer and provides data such as pressure to hold the clutch pack, duration of pressure hold, and time to release pressure.
The pump pressure switch is located on the gearbox housing next to the pump. The switch tells the computer how much pressure comes from the pump when the engine is running.
The servo pressure switch is located on the housing next to the belt or servo in the transmission. The servo switch controls when the belt is actuated by hydraulically moving the pressurized servo, how long the pressure is held on the servo, and when pressure is released from the servo.
- Attention: There may be more than one oil pressure switch for clutch and servo packages. During the diagnostic procedure, you may have to check the resistance on all switches to determine which one is bad if the engine indicator code does not provide any details.
Signs of failure of the oil pressure switch in the gearbox:
The transmission may not shift if the oil pressure sensor is faulty. The no-shift symptom prevents the fluid from overheating.
If the pump switch has failed completely, the motor may not start to prevent the pump from running dry. This helps prevent premature failure of the oil pump.
Engine light codes associated with a malfunction of the oil pressure switch in the gearbox:
- P0840
- P0841
- P0842
- P0843
- P0844
- P0845
- P0846
- P0847
- P0848
- P0849
Part 2 of 7. Check the condition of the transmission oil pressure sensors.
Step 1: Try to start the engine. If the engine starts, turn it on and see if the transmission makes it go slow or fast.
Step 2: If you can drive a car, drive it around the block.. See if the transmission will shift or not.
- AttentionNote: If you have a constant speed transmission, you will need to use a pressure adapter hose to check fluid pressure. During the test drive, you will not feel the gear change. The transmission uses electronic belts immersed in hydraulic shift fluid so you won't be able to feel any shifting.
Step 3: Check the wiring harness under the vehicle.. After a test drive, look under the vehicle to make sure the transmission oil pressure sensor harness is not broken or disconnected.
Part 3 of 7: Preparing to replace the transmission position sensor
Necessary materials
- Hex key set
- socket wrenches
- Jack stands
- Flash
- Flat head screwdriver
- Jack
- Protective gloves
- Protective clothing
- Ratchet with metric and standard sockets
- Safety glasses
- Torque bit set
- Wheel chocks
Step 1: Park your vehicle on a level, firm surface.. Make sure the transmission is in park (automatic) or 1st gear (manual).
Step 2: Fix the wheels. Install wheel chocks around tires that will remain on the ground. In this case, place wheel chocks around the front wheels as the rear of the vehicle will rise.
Apply the parking brake to block the rear wheels from moving.
Step 3: Install a nine volt battery in the cigarette lighter.. This will keep your computer running and save the current settings in the car. If you don't have a XNUMX-volt power-saving device, you can skip this step.
Step 4: Disconnect the battery. Open the car hood and disconnect the car battery. Remove the ground cable from the negative battery terminal to cut off power to the transmission oil pressure sensor.
Disabling the engine start source prevents pressurized fluid from escaping.
- AttentionA: It is important to protect your hands. Be sure to wear protective gloves before removing any battery terminals.
Step 5: Raise the car. Using a jack recommended for the weight of the vehicle, raise the vehicle at the indicated jack points until the wheels are completely off the ground.
- AttentionA: It is always best to follow the recommendations given in your vehicle owner's manual and use the jack at the appropriate points for your vehicle.
Step 6: Install Jacks. The jack stands should be located under the jacking points. Then lower the car onto the jacks.
- Functions: For most modern vehicles, the jacking points are located on the weld right under the doors along the bottom of the vehicle.
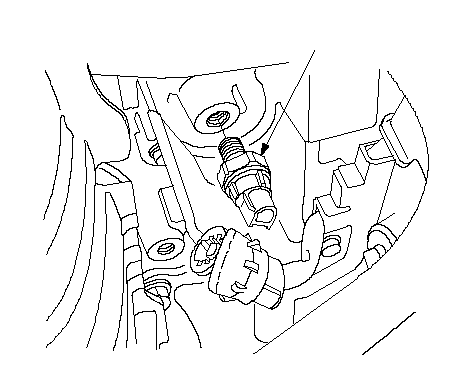
Part 4 of 7. Remove the gearbox oil pressure sensor.
Step 1: Take precautions. Wear protective clothing, oil-resistant gloves and goggles.
Step 2. Take a vine, a flashlight and tools for work.. Slide under the car and locate the oil pressure sensor in the transmission.
Step 3: Remove the harness from the switch. If the harness has cleats securing it to the transmission, you may need to remove the cleats to remove the harness from the derailleur mount.
Step 4: Remove the mounting bolts that secure the derailleur to the gearbox.. Use a large flathead screwdriver and slightly pry the gear selector.
Part 5 of 7: Install a new transmission oil pressure sensor
Step 1: Get a new switch. Install a new switch to the transmission.
Step 2 Install the mounting bolts to the switch.. Tighten them by hand. Tighten the bolts to 8 ft-lbs.
- Attention: Do not overtighten the bolts or you will crack the new switch housing.
Step 3: Connect the wiring harness to the switch. If you had to remove any brackets holding the wiring harness to the transmission, make sure you reinstall the brackets.
Part 6 of 7: Lower the car and connect the battery
Step 1: Clean up your tools. Gather all the tools and vines and get them out of the way.
Step 2: Raise the car. Using a jack recommended for the weight of the vehicle, raise it under the vehicle at the indicated jack points until the wheels are completely off the ground.
Step 3: Remove Jack Stands. Remove the jack stands and keep them away from the vehicle.
Step 4: Lower the car. Lower the vehicle so that all four wheels are on the ground. Pull out the jack and set it aside.
Step 5 Connect the battery. Open the car hood. Reconnect the ground cable to the negative battery post.
Remove the nine volt fuse from the cigarette lighter.
Tighten the battery clamp to ensure a good connection.
- AttentionA: If you have not used a nine volt battery saver, you will need to reset all settings in your vehicle such as the radio, power seats, and power mirrors.
Step 6: Remove the wheel chocks. Remove the wheel chocks from the rear wheels and set them aside.
Part 7 of 7: Test drive the car
Required material
- flashlight
Step 1: Drive the car around the block. While you are driving, check if the engine light comes on after replacing the transmission oil pressure sensor.
Also, check and make sure the gearbox shifts properly and doesn't get stuck in emergency mode.
Step 2: Check for oil leaks. When you're done with your test drive, grab a flashlight and look under the car for an oil leak.
Make sure the wiring harness to the switch is clear of any obstructions and that there are no oil leaks.
If the engine light comes back on, the transmission does not shift, or if the engine does not start after replacing the transmission oil pressure sensor, this may indicate an additional diagnosis of the transmission oil pressure sensor circuitry.
If the problem persists, you should seek help from one of AvtoTachki's certified technicians and have the transmission checked.