How to replace an oxygen sensor
Oxygen sensors are one of the most important components of a modern car's engine management system. They are responsible for controlling the air-fuel mixture of the engine, and their readings affect important engine functions ...
Oxygen sensors are one of the most important components of a modern car's engine management system. They are responsible for controlling the engine's air-fuel mixture and their readings affect important engine functions such as timing and air-fuel mixture.
Over time, under normal use, oxygen sensors can become sluggish and eventually fail. Typical symptoms of a bad oxygen sensor are reduced engine performance, decreased fuel efficiency, rough idling, and in some cases even misfiring. Typically, a bad oxygen sensor will also turn on the check engine light, indicating which sensor on which bank has failed.
In most cases, replacing an oxygen sensor is a relatively simple procedure that usually requires only a few tools. In this step-by-step guide, we'll take a look at what usually entails removing and replacing an oxygen sensor.
Part 1 of 1: Oxygen Sensor Replacement
Necessary materials
- Basic set of hand tools
- Jack and Jack stand
- Oxygen sensor socket
- OBDII Scanner
- Replacing the oxygen sensor
Step 1: Identify the failed sensor. Before you begin, connect an OBD II scan tool to your vehicle and read the codes to determine which oxygen sensor has failed and needs to be replaced.
Depending on engine design, cars may have multiple oxygen sensors, sometimes on both sides of the engine. Reading trouble codes will tell you exactly which sensor needs to be replaced - the upstream (upper) or downstream (lower) sensor - and on which bank (side) of the engine.
Step 2: Raise the car. After determining the faulty sensor, raise the car and secure it on jacks. Be sure to raise the vehicle to the side where you will have access to the oxygen sensor that needs to be replaced.
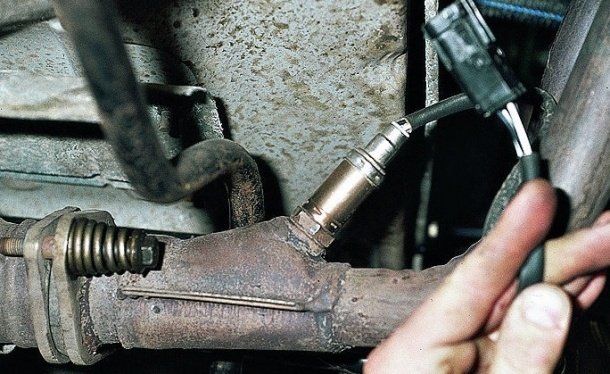
Step 3: Disconnect the oxygen sensor connector.. With the vehicle raised, locate the failed oxygen sensor and disconnect the wiring harness connector.
Step 4 Remove the oxygen sensor.. Loosen and remove the oxygen sensor using the oxygen sensor socket or the appropriate size open end wrench.
Step 5: Compare the failed oxygen sensor with the new sensor.. Compare the old oxygen sensor with the new one to make sure the installation is correct.
Step 6: Install a New Oxygen Sensor. After checking the installation, install a new oxygen sensor and connect the wiring harness.
Step 7Clear the codes. After installing the new sensor, it's time to clear the codes. Connect an OBD II scan tool to the vehicle and clear the codes.
Step 8: Start the car. After deleting the codes, remove and reinsert the key, and then start the car. The check engine light should now go away and the symptoms you were experiencing should be relieved.
In most vehicles, replacing an oxygen sensor is a simple procedure requiring only a few tools. However, if this is not a task that you are comfortable doing on your own, any professional technician from AvtoTachki, for example, can quickly and easily take care of it.
