How to replace a wooden hammer handle?
Content
- Things you will need:
- Step 2 - Pinch and support the hammer head
- Step 3 - Drill out the rest of the handle
- Step 4 - Resize the Handle
- Step 5 - Insert the hammer handle
- Step 6 - Use firm taps as needed
- Step 7 - Check the handle for size
- Step 8 - Find the wedges
- Step 9 - Try Wedge Sizes
- Step 10 - Insert Wedges
- Step 11 - Cut off the extra hammer handle
If the handle of your fencing sledgehammer needs to be replaced, use our simple step-by-step guide…Things you will need:
 Hand saw - preferably with large teeth
 Deputy
 Drill
Drill Drill bit 7 mm or ½” in wood
 Hammer
 bit
bit Sandpaper - coarse
  Wooden hammer handle replacement kit - consists of a handle, wedges and pins.
  Step 1 - Remove the remaining hammer handle
Use a coarse-tooth hand saw to cut away the remaining broken handle on the underside of the hammer head.

Step 2 - Pinch and support the hammer head
Place your head in a vise if you have access to one.
 If you don't have a vise, place the sledgehammer head on two hard surfaces with a gap in the middle and top to bottom, using a hammer and the old sledgehammer handle as a punch, knock the remaining handle through the gap.
This should be done in the same direction that the old pen would have been inserted.

Step 3 - Drill out the rest of the handle
This may very well go according to plan, but if the remaining knob is too tight, some help may be needed.
Use a drill with a drill bit to drill holes in the wood from the top or bottom, as this will help relieve the pressure holding the wood in place.

Step 4 - Resize the Handle
If the new handle brought to the ear on the head of the sledgehammer is more than 2 mm larger than the eye, it must be ground to the correct size.
However, keep in mind that the hammer handle needs to be slightly larger to fit securely into the hammer head.


Step 5 - Insert the hammer handle
Lay the hammer head down on the bench.
Insert the handle into the head (the end that was just made to size) and using a hammer, gently tap the opposite end of the handle so that it fits into the head.
 If necessary, use a vise to hold the head steady while installing the new hammer handle.
Step 6 - Use firm taps as needed
If more force is required, grab the hammer head with the new handle inserted and place the end of the handle on the ground.
While holding the head firmly, tap the handle firmly on the ground to push it into place.

Step 7 - Check the handle for size
When installed, there must be at least 20 mm (3/4″) of handle protruding through the top.

Step 8 - Find the wedges
Two small wooden wedges and two metal pins come with the new mace handle. They are designed to hold the handle in place and prevent the sledgehammer head from loosening.


Step 9 - Try Wedge Sizes
Lay the hammer on a bench and insert each wooden wedge into the slots to make sure once installed they are large enough to spread the handle and clamp the head.

Step 10 - Insert Wedges
Open the wedge slots with a chisel, then insert two wooden wedges as far as possible, tapping in place with a hammer if necessary.

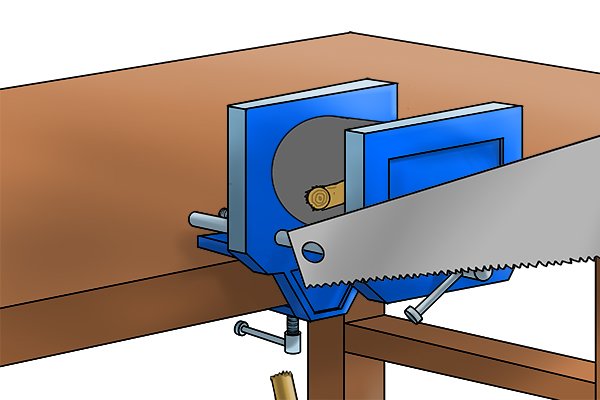
Step 11 - Cut off the extra hammer handle
Trim off any excess handle with a hand saw to get a smooth finish, then sand until all chips and edges are removed.
 Step 12 - Secure With a Pin
Insert the metal locking pin perpendicular to the wooden wedges (as shown) and the handle should now fit snugly into the head.

 To prolong the life of the handle, take fine sandpaper and lightly sand the wood, then apply boiled linseed oil.
The linseed oil will keep the pen in great condition and will also make it water resistant.

