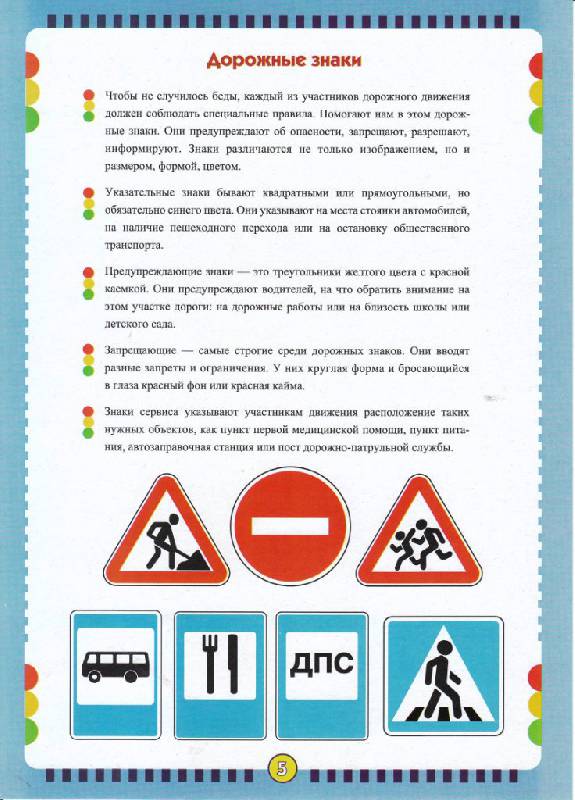
How to replace a door striker
Content
Door latches are hooks or bolts that lock car doors. The reciprocal level is designed to create a snug fit of the door to the cabin seal. The striker plate is made from hardened metal, which prevents wear and tear when the door is opened and closed many times a day. In addition, the striker plate also helps keep the car door in place when the hinge pins are worn.
In some vehicles, a door latch mounted on the end of the car door hooks onto the door latch when the door is closed for a snug fit. On other vehicles, especially some older vehicles, the door striker plate is mounted on the surface of the door frame and hooks onto the door latch. By pressing the outer or inner door handle, the door latch is released from the striker and allows the door to open freely.
If the door latch is damaged or worn, the door may not hold tightly or even jam the latch. Most door strikers can be adjusted or rotated as they wear.
Part 1 of 5. Check the condition of the door striker.
Step 1: Find the striker. Locate a door with a damaged, stuck, or broken door latch.
Step 2: Check the striker plate for damage. Visually inspect the door strike plate for damage.
Gently lift the door handle to see if there is any problem with the mechanism inside the door when the door latch is released from the striker. If the door seems to be pulling or if the handle is difficult to operate, this may be a sign that the striker plate needs to be adjusted or replaced.
- Attention: Child safety locks on vehicles will only prevent the rear doors from opening when the inside handle is pressed. The doors will still open when the outside door handle is pulled.
Part 2 of 5: Preparing to Replace Your Door Latch
Having all the necessary tools and materials in place before starting work will allow you to get the job done more efficiently.
Necessary materials
- SAE Hex Wrench Set / Metric
- Composite filler
- #3 Phillips screwdriver
- grinding machine
- level
- Putty knife
- Sandpaper grit 1000
- Torque bit set
- Touch up with paint
- Wheel chocks
Step 1: Park your car. Park your vehicle on a level, firm surface. Engage the parking brake to keep the rear wheels from moving.
Step 2: Attach the rear wheels. Place wheel chocks on the ground around the rear wheels.
Part 3 of 5: Remove and install the door strike plate.
Step 1: Unscrew the damaged door latch.. Use a #3 Phillips screwdriver, a set of torque bits, or a set of hex wrenches to unscrew the door strike plate.
Step 2: Remove the door strike plate.. Remove the door strike plate by sliding it. If the plate is stuck, you can pry it off, but be careful not to damage the area that secures the door latch.
Step 3: Clean the door latch mounting surface. Use 1000 grit sandpaper to sand down any sharp parts on the door striker mounting surface.
Step 4: Install the new door striker. Install a new door striker to the cab. Tighten the mounting bolts on the door strike plate.
- Attention: If the door strike plate is adjustable, you will need to adjust the strike plate to ensure that the door fits snugly on the cab.
Part 4 of 5. Replace the door latch and repair any cosmetic damage.
With extended use, the door strike plate tends to push back and forth and be pressed into the surface of the door or cab. When this happens, the surface surrounding the plate begins to crack or break. You can repair this superficial damage by replacing the door strike plate with a new one.
Step 1: Unscrew the damaged door latch.. Use a #3 Phillips screwdriver, a set of torque sockets, or a set of hex wrenches to remove the bolts on the damaged door strike plate.
Step 2: Remove the door strike plate.. Remove the door strike plate by sliding it. If the plate is stuck, you can pry it off, but be careful not to damage the area that secures the door latch.
Step 3: Clean the mounting surface of the door striker.. Use 1000 grit sandpaper to file away any sharp parts around the mounting surface or damaged areas.
Step 4: Fill in the Cracks. Take a composite filler that matches the cabin material. Use aluminum compound for aluminum cabs and fiberglass compound for fiberglass cabs.
Apply the composition to the area with a spatula and scrape off the excess. Let the composition dry for the time indicated in the instructions on the package.
Step 5: Clear the area. Use a sander to clean the area. Don't rub too hard or you'll have to reapply the compound.
Use 1000 grit sandpaper to smooth out any sharp nicks on the surface.
Step 6: Check if the surface is level. Use a level and make sure the patch is properly installed on the cockpit. Check horizontal and vertical measurements for proper accuracy.
Step 7: Install the new door striker on the cab. .Tighten the fixing screws on the door striker.
Part 5 of 5: Checking the door strike plate
Step 1. Make sure the door closes tightly.. Make sure the door closes and fits snugly between the seal and the cab.
Step 2: Adjust the plate. If the door is loose, loosen the door latch, move it slightly and tighten it again. Check again if the door closes tightly.
- Attention: When adjusting the door strike plate, you may need to adjust it several times to ensure a good fit on the door.
If your vehicle door is sticking or won't open even after replacing the door latch, you may need to perform further checks on the door latch assembly and the door latch to see if any component of the door latch has failed. If the problem persists, seek help from a certified technician, such as an AvtoTachki technician, to inspect the door and determine the cause of the problem.