How to change the headliner
As your car ages, there is probably nothing more annoying than a sagging ceiling. But the car does not have to be old for the ceiling fabric and foam to begin to deteriorate. Incorrect headlining installation is a problem for both new vehicles and older ones. Either way, the thought of a headliner falling on your head while driving on the freeway is terrifying.
When the headliner starts to fall off, temporary solutions (such as screw-in pins) may seem attractive at first, but may damage the headlining panel. When it comes time for a permanent repair, this damage will only make the job harder. You must completely replace the headliner fabric.
Hiring a professional to repair your car's headlining can be an expensive decision. If you have about two hours and some basic crafting skills, here's how you can replace your car's headlining:
How to replace car headliner
Gather the right materials - Cloth (make sure you have a little more than you need), hobby knife/X-acto knife, panel opener (optional, but makes it easier), screwdriver(s), sound deadening foam/thermal insulation material (optional) , spray adhesive and wire brush.
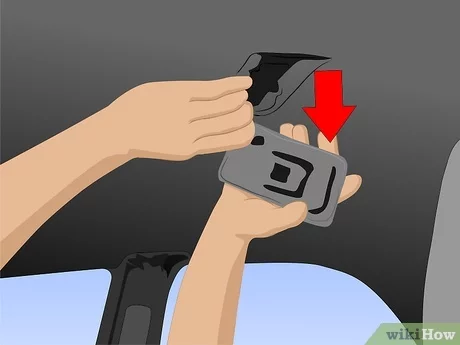
Remove anything holding the headlining. - Unscrew, unscrew or disconnect anything that is preventing the ceiling panel from being removed or holding the ceiling panel to the roof. This includes sun visors, rear view mirror, coat racks, side handles, dome lights, seat belt covers and speakers.
Take out the headliner - After you've removed everything holding the headlining to the roof, make sure it's completely loose and remove it. Be very careful when maneuvering the headliner so as not to damage it.
Functions: Driver side and passenger side upper corners can be difficult and fragile. Be especially careful here. Fully recline the seats for more room to work. The easiest way is to remove the roof lining from the front passenger door.
Explore sound deadening foam - While the roof is open, take the time to look at the condition of the soundproofing foam to see if it needs to be reinforced or replaced.
Functions: Do you live in a hotter climate? Maybe you'd like to beef up your sound deadening foam with a heat blocker that will not only keep your car cool, but also protect the ceiling replacement job you're currently working on. It should be available at your local home improvement store.
Scrape off the flaky Styrofoam Now that you've removed the headboard, lay it on a flat work surface. You will notice that it is dried styrofoam that is peeling off. Take a wire brush or light sandpaper and scrape it all off. If any of the corners have been torn off, you can use industrial glue to fix it. Repeat several times for optimum cleanliness.
Functions: Be careful when cleaning so as not to damage the board.
Lay the new fabric on the board and cut it to size. - Now that the headlining is clean, take the cloth and place it over the board to give it some dimension.
Functions: make sure when you cut it you leave some extra material on the sides. You can always take away a little more, but you can't add it back.
Glue the fabric to the board - Lay the cut fabric on the headlining where you want to stick it. Fold half of the fabric back to expose half of the ceiling panel. Apply glue to the board and smooth the fabric by stretching it so that there are no wrinkles. Also, be sure to follow the contour as much as possible, working with your palms and fingertips. Repeat for the other half.
Functions: Spray glue dries quickly, so you need to work quickly. Since there is little margin for error, if half the board is too much, try doing it in quarters. If you get confused and need to peel it off, you may only be able to do it once or you risk tearing the fabric.
Seal the edges and let the glue dry. - Turn over the headlining board and attach the remaining material to the board.
A warning: If you have damaged the corners of the board in any way, this is your chance to get some of the structural integrity back. Now, following the instructions on the spray, let the glue dry.
Cut pilot holes - Since the fabric covers all the holes where you need to drive the screws, use a utility knife to cut out the pilot holes.
FunctionsA: Resist the temptation to completely cut holes. Not only can it take much longer, you can leave a gaping area around the holes that the screws and bolts won't close.
Reinstall the headliner - Carefully install the roof lining back into the vehicle and fit the accessories. Patience is key here.
Functions: It is helpful to have someone hold the headlining while you reinstall. You may want to start by reinstalling the dome. From there, you can move the headliner around until it fits perfectly. Be careful not to snag the headliner fabric with a knife or screws to avoid tearing.
Ceiling care can make a huge difference when it comes to maintaining the look of your car. Taking the time to replace or repair any damaged headlining material yourself can greatly improve the overall aesthetics of your vehicle's interior, as well as save money in the process.