How to replace a car idle valve
The IAC valve, or idle air control valve, controls your vehicle's idle speed. A faulty valve can lead to rough idle and engine stall, among other problems.
The speed at which the engine is revving while stopped is called idling or idling speed. When the car is stationary and the driver does not apply gas, the computer must maintain a minimum number of revolutions per minute so that the engine is still running and ready to go at any moment. Your vehicle's idle speed should remain the same when coming to a complete stop. This steady pace is provided by the vehicle's idle air control valve, which is also known as the idle air control valve.
A faulty valve can cause the check engine light to come on, rough idle, engine stall, and a sudden increase or decrease in engine speed during shutdown. These valves can also accumulate soot, which causes problems with the valve and surrounding components.
Sometimes it is necessary to replace the valve itself, while other times cleaning the valve and other components around it can improve performance and communication between the valve and the computer. Newer models are less likely to be serviceable or cleanable.
Part 1 of 1: Idle Air Valve Replacement.
Necessary materials
- Throttle valve cleaner
- Pliers (if needed)
- Idle valve replacement
- Socket set and ratchet
Step 1: Disconnect the battery. Disconnect the negative battery cable from the battery and set it aside.
Step 2: Find the valve. The location of the idle control valve depends on the make and model of your vehicle. The owner's manual for your car will have the exact location information. The valve will almost always be located on the intake manifold.
Step 3: Disconnect the wiring harness. Locate the wiring harness connected to the valve and disconnect the electrical connector from the valve.
There will be a clip or pull tab to release, and it may be easier to carefully remove it with pliers.
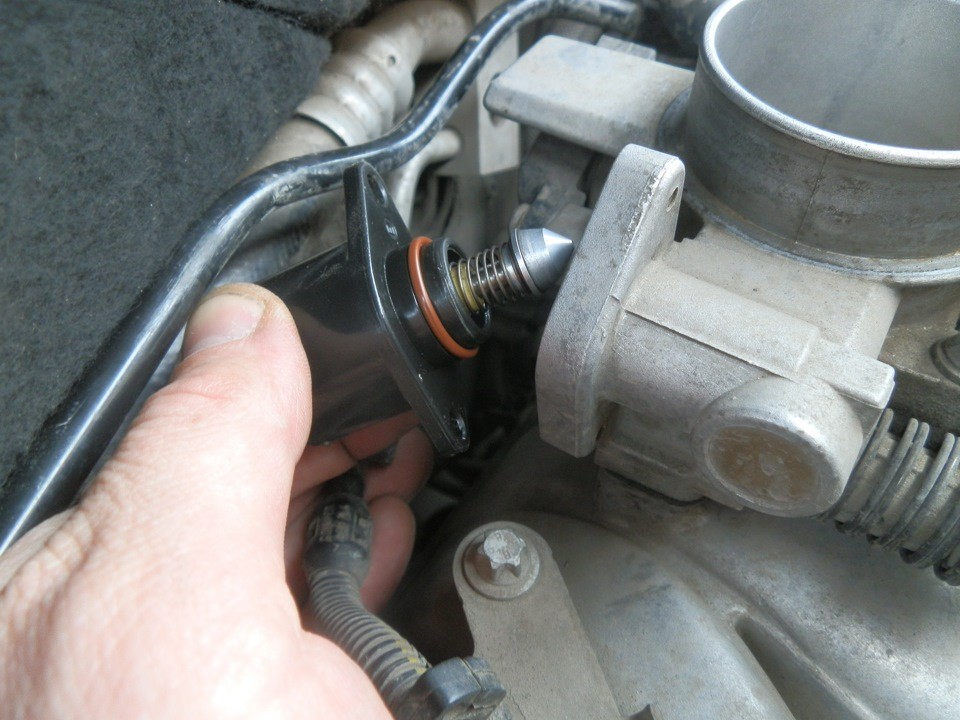
Step 4: Remove the old idle control valve.. Remove each of the valve mounting bolts.
Now that the bolts and wires are removed, the valve should just slide out of its place.
Step 5: Clean the seat. With the valve seat exposed, use a throttle body cleaner to clean the area where you will be attaching the new valve. This ensures a clean seal between the valve and its seat.
Step 6: Install the new valve. First compare the old valve you are replacing with the new valve. Make sure that the wiring terminals, the location of the locking bolts and the position of the seat match.
Then install the new valve in place and install the retaining bolts finger-tight to the seat. Use the socket and ratchet to gradually press them one by one.
- A warning: Do not overtighten the bolts as this may cause leakage or malfunction of the system.
Step 7: Reinstall the wiring harness. Connect the wiring harness to the valve. Make sure the terminal is making a proper connection and the clip is fully engaged to secure the connection.
Step 8 Connect the battery. Connect the negative battery cable to the battery. Tighten the bolt so that any engine vibration does not loosen it. This will restore power to the car.
Step 9: Check idle speed. Start the engine and observe the idle speed. Depending on your particular vehicle and ambient temperature, your idle speed should be maintained between 550 rpm (lowest when it's hot outside) to 1,000 rpm (at maximum and colder temperatures).
Having a properly functioning idle control valve will make a huge difference to your car's handling. Even beginners should be able to replace this valve. However, you can always contact one of the certified AvtoTachki specialists to replace the idle valve for you.