How to replace the timing cover
Content
The timing cover protects the timing mechanism and has channels for oil and coolant. If damaged, it should be replaced to prevent leakage and debris.
There's not much that goes wrong with the timing cover itself. His life is usually long and trouble-free. If there is a failure, it is usually caused by something nearby failing. If the chain or belt it protects is too loose, if the water pump attached to it fails, or if someone changes a part and installs the bolts incorrectly, you can replace the timing cover.
In addition to protecting the timing mechanism inside, the timing cover also has coolant and oil passages. If any of these areas are leaking, the timing cover will have to be removed. Most often, the malfunction occurs in the gaskets or seals on the timing cover, but sometimes there may be cracks or chips that will require the replacement of the timing cover itself.
Necessary materials
- Belt Tension Tool
- Switch
- combination keys
- Crankshaft holding tool
- Death blow with a hammer
- Gear puller or harmonic balancer puller
- Impact wrench (pneumatic or electric)
- Jack and Jack stand
- RTV Silicone Sealant
- Safety glasses
- Screwdrivers (Phillips and flat)
- Small mount
- Socket wrench set
- Wrench
- Repair manual
Part 1 of 3: Accessing the Timing Cover
Step 1: Jack up the car. Make sure the car is parked or in first gear if it is a manual transmission. Set the brake and place wheel chocks under the rear wheels. Jack up the front of the car and put it on good stands.
Step 2: Drain the coolant. If your vehicle uses a timing belt, it may not be necessary to drain the coolant. But in most cars, the coolant is passed through the timing cover, so it must be drained before removing the cover.
Remove the radiator or coolant reservoir cap, locate the drain holes using the repair manual, and drain the coolant into the drain pan. If your vehicle does not have a drain port, you may need to loosen the hose at the bottom of the engine.
Step 3: Remove the heatsink. Not all vehicles require radiator removal. If you have a front-wheel drive car with a transverse (side-mounted) engine, almost certainly not. However, if your car is front-engined, rear-wheel drive, the radiator probably needs to come out. There are a few exceptions when there is enough room to work with a heatsink installed.
Remove the hose clamps and disconnect the hoses. If your vehicle has an automatic transmission, disconnect the oil cooler lines as well. We unscrew the fasteners and remove the radiator.
Step 4: Remove Drive Belt(s). Your vehicle must have one or more drive belts removed. It could be a matter of loosening a fastener on the alternator or other accessory, or if it's a late model car it will have a spring loaded tensioner that you need to loosen.
They are often difficult to reach and having the proper belt tensioning tool will be critical. When the belt is loose, it may still be necessary to crank the engine with a wrench while you "pull" the belt off the pulley.
Step 5: Remove the water pump. On most timing chain driven vehicles and on many belt driven vehicles the water pump must be removed to gain access to all bolts or sufficient clearance to remove the cover. Loosen the screws holding it in and carefully pry it out.
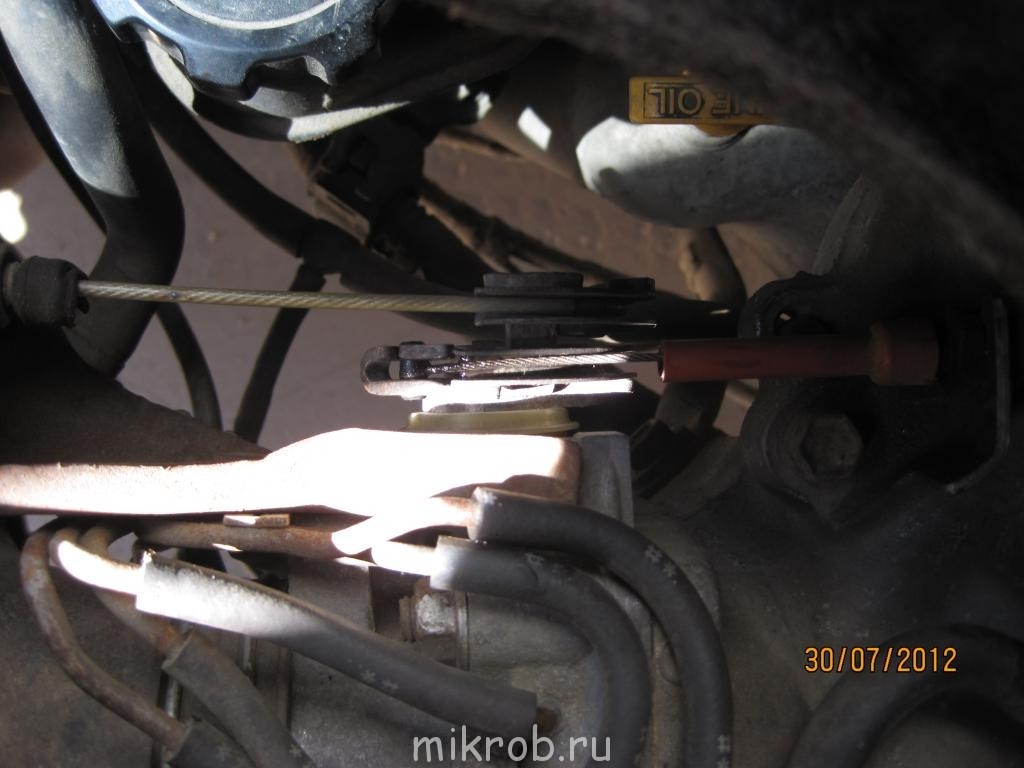
Step 6: Remove Drive Pulley. At the front of the engine is a large pulley or harmonic balancer that runs through the timing cover. Removing the bolt from this pulley can be a problem because the engine is trying to crank while you are trying to loosen the bolt. You will need to use a crankshaft holding tool or impact wrench to remove this bolt.
Once the center bolt is out, you can remove the pulley from the crankshaft with just a few hammer blows on the sides. If he is stubborn, a gear puller or harmonic balancer puller will help. Keep a close eye on any loose keys that might slip out with it.
Step 7: Remove accessories. You may need to remove the power steering, A/C and/or alternator to gain full access to the timing cover. In some cases, it may only be necessary to remove the pulley from the accessory.
Study the repair manual and try to imagine that you are removing the cover six inches straight from the car to see what might be in the way.
Part 2 of 3: Removing the Timing Cover
Step 1: Remove the valve cover. This is another operation that may not apply to all vehicles. If your vehicle has an overhead camshaft, you will need to remove the valve cover to gain access to the top of the timing cover. If your car has a camshaft in the block, it probably isn't needed.
Remove the crankcase breather hose and spark plug fittings. Unscrew the cover and release it. It may take a few hits with a hammer to get started.
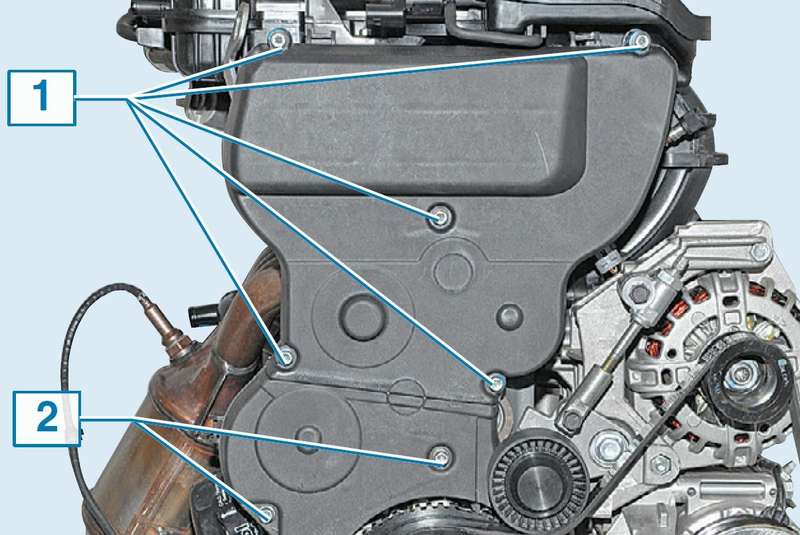
Step 2: Remove the timing cover bolts.. Most timing covers have bolts of varying sizes and lengths holding them in place. It's important to keep track of them. If you insert a long bolt into a short hole and try to tighten it, you can cause serious damage, and some bolts only differ by a few millimeters in length.
The best way to keep track of them is to draw a diagram of the timing cover on a piece of cardboard and insert the bolts into the cardboard as you remove them.
On some engines, several bolts run through the oil pan and down through the cylinder head to the timing cover. Be sure not to miss them.
Step 3: Remove the timing cover. If your vehicle has the cam in the block, use a small pry bar or large screwdriver to hook the timing cover and remove it from the block.
If your vehicle has an overhead camshaft, part of the timing cover may be located under the cylinder head. Be very careful not to damage the cylinder head gasket at this point.
Some overhead cam engines have a two-piece timing cover. There are a few more bolts, but this makes it easier to replace the gasket. Remove the upper part of the timing cover in front of the lower part.
Step 4: Inspect the timing cover. Thoroughly clean the timing cover and check the timing cover for cracks or chips. Carefully inspect the machined surface to which the gaskets are attached. If you are trying to fix a leak, it can be solved by simply replacing the gaskets and seals.
Part 3 of 3: Installing the New Timing Cover
Step 1: Install new gaskets and seals. Press the new oil seal into the timing cover and tap it with a hammer until it is flush with the cover surface. Apply RTV Gasket Sealant to the surface of the engine and timing cover at the gasket attachment points, and adhere the gasket to the engine or timing cover.
If there are dowel pins in the timing block or timing cover, glue the gasket to the dowel pin surface.
Step 2: Install the timing cover. Installing the engine cover can be the hardest part of the job. The cover may have to slide over the pan gasket at the bottom or the cylinder head gasket at the top before it makes contact with the surface of the engine.
A small amount of RTV sealant at the corners where one gasket meets another can help prevent leakage. Tap the cover with an impact hammer to make sure it is securely installed.
Step 3: Install the bolts. Refer to the diagram and screw the bolts into the correct position. Don't tighten them right away. As you tighten the bolts, work alternately across the entire lid so that the entire surface of the lid is evenly tightened.
Bolts passing through the head or pan should be tightened last. If the engine has a top and bottom cover, tighten the bottom cover first.
Step 4: Install the Front Pulley or Harmonic Balancer. Install pulley and tighten bolt to specification in manual. This is very important because the consequences of loosening a bolt while driving can be severe.
Using the crankshaft locking tool and torque wrench, follow the instructions in the manual. The torque value for the front bolt will be high, probably around 180 ft-lbs.
Step 5. Replace the water pump, belts and other accessories.. If the water pump is old, it is recommended to replace it now. It's relatively inexpensive and will eventually fail, so you can save yourself some trouble later.
Similarly, it is recommended to install new belts at this time, since they have already been removed. Apply some RTV sealant to the new water pump gasket as you put it on.
Step 6: Replace the Radiator and Fill the Cooling System. If there is a coolant outlet, open it. If not, remove the heater hose from the top of the engine. If the coolant you drained is more than two years old, you must replace it with fresh coolant.
Pour coolant through the reservoir. Continue pouring until coolant flows from the bleeder or hose you disconnected. Close the outlet valve and reconnect the hose.
Set the heater to maximum power and run the car until you feel heat coming out of the vents. Continue adding oil to the reservoir while the engine warms up. When the car is fully warmed up and the coolant is at the right level, install an airtight cap on the reservoir.
Check the engine for oil or coolant leaks, then jack it up and ride it. Check for leaks again after a few minutes of driving.
If your vehicle does not have an overhead camshaft or has a timing belt driven camshaft, this job can be done in a day or less. If your car has an overhead camshaft driven by a chain, this job will probably take you more than a day. This can be a complex procedure with many possible complications that can make the job even longer. If you think you'd rather spend your Saturday watching a ball game than leaning over the hood of your car, AvtoTachki can send a qualified technician to your home or work to replace the timing cover at your convenience.