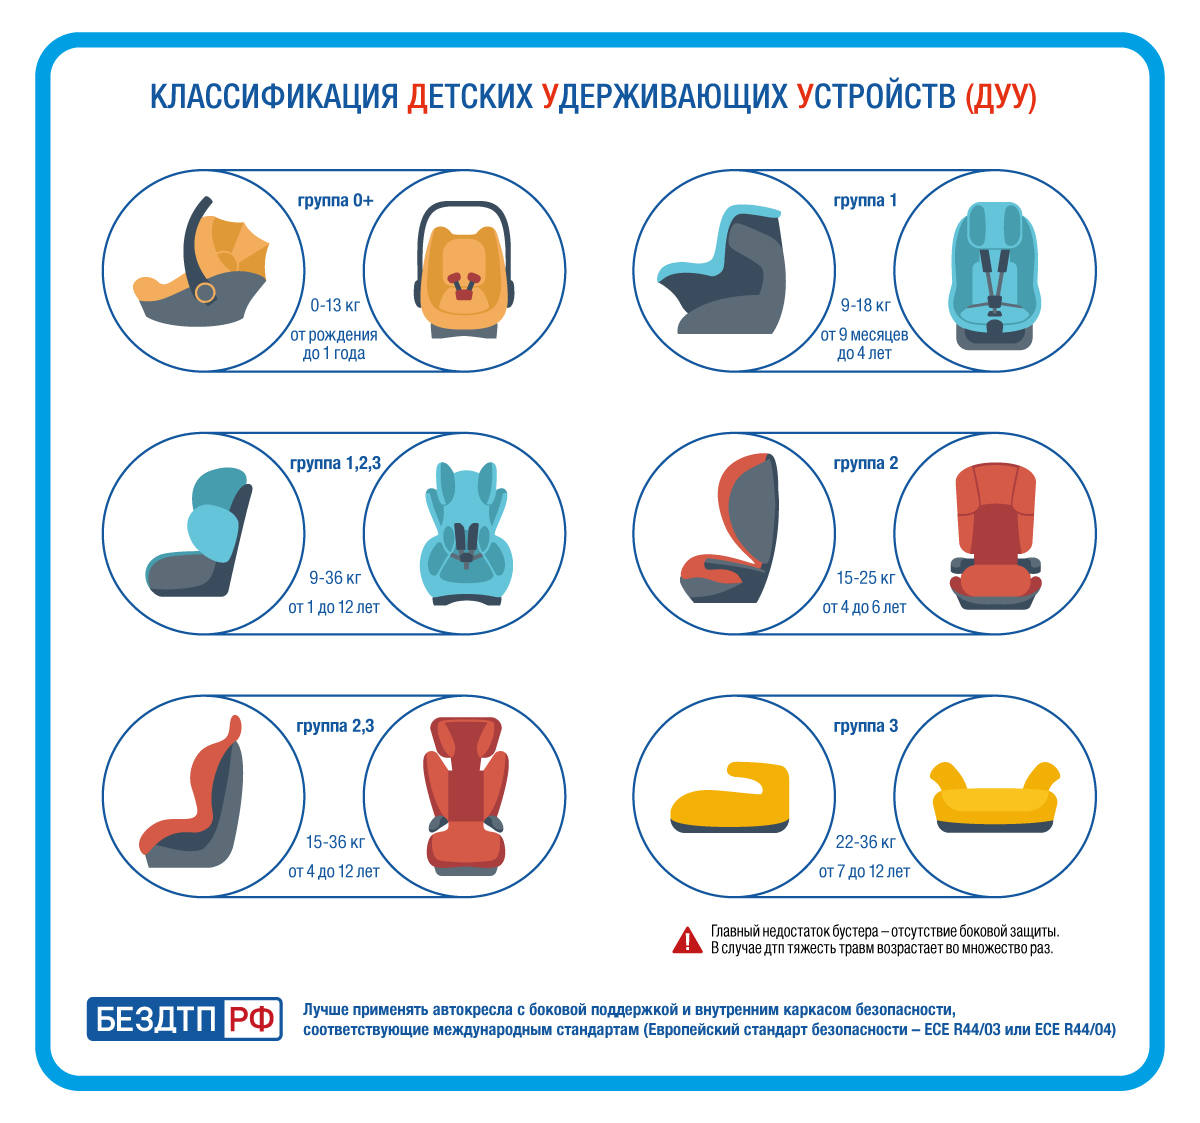
How to Replace Oil Cooler Lines on Most Cars
Oil cooler lines fail if the hose is kinked, the oil level is low, or oil is visibly pooling under the vehicle.
Many vehicles designed for heavy duty or extreme conditions use an oil temperature sensor. These heavy vehicles are usually subjected to more stress than the average vehicle due to carrying more weight, operating in more adverse conditions, or towing a trailer. All this increases the load on the car and its components.
The more intensively the car works, the higher the likelihood of an increase in oil temperature. This is why these vehicles usually have an auxiliary oil cooling system and an oil temperature gauge. The sensor uses the oil temperature sensor to communicate information that is displayed on the instrument cluster to tell the driver when the oil level reaches an unsafe level and loss of performance may occur. Excessive heat causes the oil to break down and lose its ability to cool and lubricate.
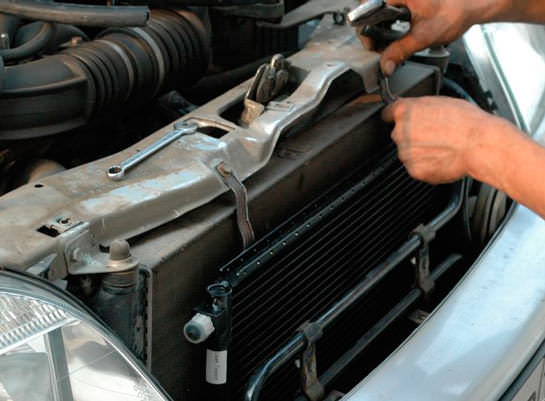
These vehicles are also usually equipped with an oil cooler that is front mounted to keep the oil temperature down. These oil coolers are connected to the engine by oil cooler lines that carry oil between the cooler and the engine. Over time, these oil cooler lines fail and need to be replaced.
This article is written in such a way that it can be adapted for most applications. Most manufacturers use either a threaded connector at the ends of the oil cooler lines or a connector that requires the retaining clip to be removed.
Method 1 of 1: Replace Oil Cooler Lines
Necessary materials
- Pallet
- Hydraulic jack
- Jack stands
- Screwdriver Set
- Towel/cloth shop
- Socket set
- Wheel chocks
- Set of wrenches
Step 1: Raise the car and install the jacks.. Jack up the vehicle and jack stands using the factory recommended jacking points.
A warning: Always make sure that the jacks and stands are on a solid base. Installation on soft ground may cause injury.
A warning: Never leave the weight of the vehicle on the jack. Always lower the jack and place the weight of the vehicle on the jack stands. Jack stands are designed to support the weight of a vehicle for an extended period of time whereas a jack is designed to support this type of weight for only a short period of time.
Step 2: Install wheel chocks on both sides of the wheels that are still on the ground.. Place wheel chocks on both sides of each wheel that is still on the ground.
This reduces the chance that the vehicle will roll forward or backward and fall off the jack.
Step 3: Locate the oil cooler lines. Oil cooler lines typically move oil between the oil cooler at the front of the vehicle and the access point on the engine.
The most common point on an engine is the oil filter housing.
A warning: Oil is lost when the oil cooler pipes and their components are disconnected. It is recommended that a drain pan be installed under the oil line connection points to collect any oil that is lost during these processes.
Attention: Oil cooler lines can be held by any number and type of fasteners. This includes clamps, clamps, bolts, nuts or threaded fittings. Take a moment to determine which type of retainers you will need to remove in order to complete the job.
Step 4: Remove the oil cooler lines from the engine.. Remove the oil cooler lines where they attach to the engine.
Remove the hardware that holds the oil cooler lines in place. Go ahead and remove both oil cooler lines at this end.
Step 5: Drain excess oil from oil cooler lines.. After both oil cooler lines are disconnected from the engine, lower them down and allow the oil to drain into a drain pan.
Lowering the lines closer to the ground should allow the oil cooler to drain, which can help cut down on the mess when disconnecting the other end of the oil cooler lines.
Step 6: Remove all oil cooler line support brackets.. Due to the length of most oil cooler lines, there are usually support bracket(s) to support them.
Trace the oil cooler lines to the oil cooler and remove any support brackets that hold the oil cooler lines from removal.
Step 7: Remove the oil cooler lines on the oil cooler.. Remove the hardware that secures the oil cooler lines to the oil cooler.
Again, this can be any combination of clamps, clamps, bolts, nuts, or threaded fittings. Remove the oil cooler lines from the vehicle.
Step 8: Compare Oil Cooler Replacement Lines With Removed. Lay the replacement oil cooler lines next to the removed ones.
Please note that the replacement parts are of an acceptable length and that they have the necessary kinks to provide the clearance needed to reinstall them.
Step 9: Check the seals on the oil cooler replacement lines.. Check oil cooler replacement lines to make sure seals are in place.
Seals are already installed on some replacement lines, while others are supplied in a separate package. These seals may be in the form of O-rings, seals, gaskets, or gaskets. Just take a moment to match the correct seals on the replacements with the ones that were removed.
Step 10: Connect spare oil cooler lines to oil cooler.. After installing the correct seals on the oil cooler replacement lines, install them on the oil cooler.
After installation, reinstall the restraint hardware.
Step 11: Install replacement oil cooler lines on engine side.. Install the oil cooler replacement lines on the end that attaches to the engine.
Be sure to install them completely and reinstall the restraint equipment.
Step 12: Replace the refrigeration line mounting brackets.. Reinstall all support brackets removed during disassembly.
Also, make sure the oil cooler replacement lines are routed so that they don't rub against anything that could cause premature failure.
Step 13: Remove Jacks. To check the engine oil level, the vehicle must be level.
To do this, you will need to raise the car again and remove the jack stands.
Step 14: Check the engine oil level. Pull out the engine oil dipstick and check the oil level.
Top up with oil as needed.
Step 15: start the engine. Start the engine and it runs.
Listen for any abnormal noises and check underneath for signs of leakage. Let the engine run for a minute or two to allow the oil to return to all critical areas.
Step 16: Stop the engine and check the engine oil level again.. Often at this time it is necessary to add oil.
The addition of oil coolers on heavy duty vehicles can greatly extend the life of the engine oil. When the oil is allowed to operate in colder conditions, it can resist thermal breakdown much better and allows it to perform better and for a longer period of time. If at any point you feel that you can manually replace the oil cooler lines on your vehicle, contact one of AvtoTachki's certified technicians who will do the repair for you.