How to replace the traction control module
The Traction Control Module (TCM) can reduce engine power or apply braking to an individual wheel to prevent wheel spin during rain, ice, or snow.
Traction control is available in most modern vehicles, from the simplest economy cars to luxury cars and SUVs. The result of an anti-lock braking system, traction control relies on braking and reducing engine power to limit or prevent wheel spin on low grip surfaces such as rain, ice and snowy roads. With the increasing use of electronic throttles over mechanical cables, the traction control module can reduce engine power or apply braking to an individual wheel up to 15 times per second without your intervention. You may experience problems with the traction control module, such as traction control not being active, the Check Engine or ABS light coming on, or traction control freezing or not working.
Part 1 of 1: Traction Control Module Replacement
Necessary materials
- Driver set
- Plastic sheet or rubber mat
- Traction Control Module Replacement
- Rubber gloves
- Sockets/ratchet
- Keys - open / cap
Step 1: Disconnect the battery. Always disconnect the negative battery terminal when working on vehicle electronic components. Since most electronic components work by controlling ground, the worst thing that can happen if a loose negative contact touches the case is a shorted circuit. If you loosen the positive terminal and it touches the case/chassis, this will cause a short circuit that can damage the electronic components.
- FunctionsA: Wearing rubber gloves reduces the chance of static discharge between you and the car's electronics.
Step 2 Locate the traction control module.. On some vehicles it is located under the hood and/or is part of the ABS control module. In other vehicles, the traction control module may be located in the passenger compartment or in the trunk.
When replacing a module located in the cabin/trunk, be sure to spread a plastic sheet or rubber mat in the areas where you will be working. Modern automotive electronics are very sensitive to power surges. Placing yourself on plastic or rubber reduces the chance of static discharge between you and the upholstery/carpeting, which can damage any electronics.
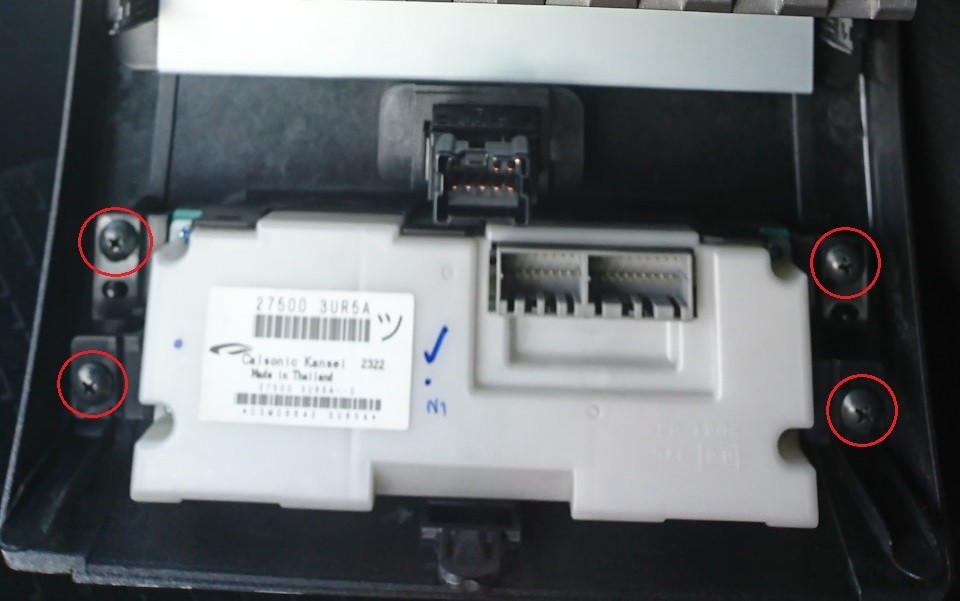
Step 3: Disconnect the traction control module.. Once found, disconnect all electrical connectors on the module. Take a photo or use duct tape to mark any connectors so you won't have any questions about where they are later. Remove the screws securing the module; usually four screws hold it in place.
Step 4: Reconnect the wiring to the new module.. With the new module in hand, reconnect any connectors that were disconnected from the old module. Be careful as plastic becomes brittle over time and can break easily. Carefully lock the connectors in place.
Step 5: Replace the new module. When placing a new module on the mounting surface, ensure that all holes on the underside of the module align with all of the plungers on the mounting surface before replacing it. After installation, replace the fixing screws, being careful not to overtighten them.
Step 6: Start the car. Connect the negative terminal of the battery and start the car. The ABS and/or Check Engine lights should flash and then turn off. As a general rule, a few ignition cycles—starting the car, driving, then turning it off—should eliminate any faults that may have been stored in the system. If not, your local auto parts store can clear the codes for you.
If you have problems with the traction control system of your car, schedule an AvtoTachki mobile technician to visit your home or office today.