How to replace the fan clutch
The fan clutch controls the vehicle's engine cooling fan and operates in response to temperature. It attaches to the water pump and can cause overheating if broken.
The fan clutch is equipped with a temperature sensitive spring which is used to control the fan on and off depending on the motor temperature. As you go faster, your engine temperature creeps up and eventually causes that spring to expand, thereby engaging the fan clutch. Internally, the fan clutch consists of a set of clutch discs and a silicone-based oil filled clutch with an internal valve that opens and closes to direct oil flow between two separate cavities. One of these cavities acts as a reservoir, while the other fits into the sleeve itself. When this valve opens, fluid flows into the clutch, helping the fan to spin faster. When this valve closes, this oil flows back into the reservoir, causing the clutch to slip, causing the fan to spin much more slowly.
Fan clutch problems
The temperature sensitive spring described above is often one of the potential culprits in fan clutch problems. Also, as the oil consistency of the fan clutch gradually deteriorates over the years, the clutch can begin to slip more than normal, eventually slowing down to the point where it cannot keep up with the engine's cooling needs. Other symptoms could be things like an oil leak or a loose clutch, which can cause a slight hesitation.
Various types of fan clutches
There are usually two different types of fan clutches. One of these is known as the fan thermal clutch described above. This design is temperature dependent and responds to fluctuations in engine temperature, thus controlling the fan on and off. Another type of fan clutch is known as a non-thermal or sometimes called a torque-limiting fan clutch, which is controlled by clutch disc slippage rather than temperature control. For the purposes of this article, the uninstall and install process is the same for either type.
Part 1 of 1: Replacing the Fan Clutch
Necessary materials
- Pulley locking tool
- wrench
- Ratchet socket set
- Rubber hammer
Step 1: Check the fan clutch for problems. A fan clutch in good working order will have considerable resistance when rotated without hands.
A good rule of thumb regarding the amount of slippage is that if it spins more than 1-1 times on its own, it's safe to assume it needs to be replaced.
Conversely, if it puts up too much resistance in the sense that it doesn't go beyond your help, it's safe to say it's jammed, which will also need to be replaced. The usual method used to measure the appropriate fan speed is to use a time indicator. Mark one of the fan blades with a white pen or chalk and use the time indicator to check for changes in fan speed that could also indicate problems. Other indicators of possible fan clutch wear can also be vibrations or bearing noises coming from the water pump shaft.
Step 2: Remove the fan shroud. Since every application is different, some of these steps may need to be modified to suit your particular application. However, in most cases the fan shroud is held on with a few bolts that need to be unscrewed to remove the shroud. In most cases, you will also need to remove the upper radiator hose to remove the fan shroud. If so, be sure to drain the cooling system before doing this. Once this is done, you can remove the fan shroud from the engine bay.
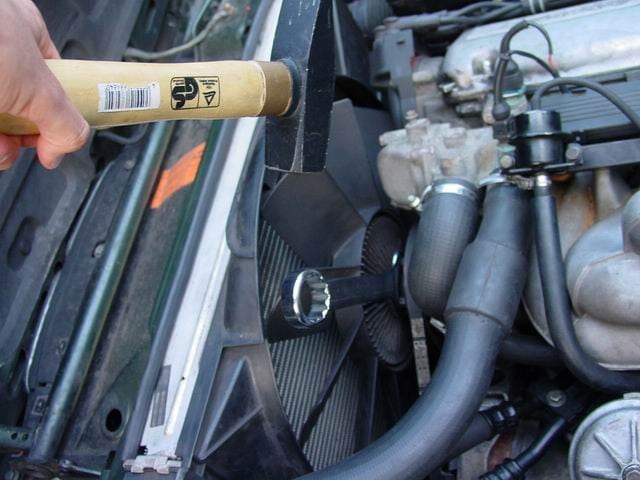
Step 3: Remove the fan. Usually the fan is attached in two ways; one will be with four large bolts, in which case you will need a simple wrench of the appropriate size to remove. Another fastening method is a large nut, which will likely require the use of a special pulley locking tool, which is used to prevent the pulley from moving when the nut is removed.
Since this is a dedicated tool, most DIYers may not have access to this tool. In this case, an alternative to using this special tool may be to use a screwdriver. Use a screwdriver to hold the bolt in place while loosening the nut. When doing this, pay special attention to the placement of the screwdriver, as this can damage the edges of the bolts if not done properly.
Step 4: Swing from side to side. Once all bolts and/or nuts have been removed, hold the fan with both hands, rocking it slightly from side to side, while removing it from the water pump shaft.
Step 5: Remove the bolts. Mount the fan on your desktop with the fan shaft facing you. There are four large bolts in the center of the fan assembly that hold the clutch in place. Remove these bolts and the clutch will be free from the fan.
Step 6: Install a new fan clutch.. Hold the new fan clutch in place by lining up the bolt holes in the same locations as the old fan clutch.
Lightly insert the bolts into the holes, making sure the threads are properly aligned.
- Functions: The bolts should slide freely into the threads with little or no resistance. If you feel like they're tight or you're applying too much force, you're probably screwing them in a cross pattern, which can cause the bolts to not fit tightly and eventually fall out. Note that this is extremely important.
Step 7: Tighten the bolts. Once you have hand-tightened all bolts, use a wrench to torque them to factory specifications (see service manual or instructions for new fan clutch).
Step 8: Install the fan back into the engine.. Slide the fan assembly back into the engine compartment, paying particular attention to the alignment of the water pump shaft.
Once in place, carefully screw the four bolts into place, holding the fan with one hand and screwing the bolts back in with the other hand. This may require some maneuvering to get it right, but remember that it's important to move slowly, evenly, and pay attention to detail.
When all four bolts are back in place and hand-tight, use the same wrench you used to remove them to tighten them back to factory specifications (again, check your service manual for exact specifications).
If your application requires you to remove the top radiator hose to remove the fan shroud, now is a good time to reinstall that same radiator hose. Remember to also top up the coolant system if draining was part of the removal process.
Slide the fan shroud back into place, aligning the bolt holes in the same position it was removed. Tighten each bolt by hand until all are accounted for and torque to factory specifications (refer to service manual for torque information).
You have replaced the fan clutch. It's good practice, as always, to start the car and listen for abnormal noises and watch for movements of interchangeable parts that don't match.